Manage and monitor SQL Server backups from a central location
Introduction
Running and maintaining multiple SQL Server instances can often be a formidable challenge, especially if these instances run on multiple servers. It is easy enough to set up a SQL Server agent job for each server to automate the backups, but what happens if there are 20, 30, or 100 servers that need maintenance? In this scenario, configuring agents on each server would take forever, and monitoring the entire setup would prove to be a nightmare for any administrator. Of course, there are several solutions for this scenario:
In order to configure this setup, you have to install Central Management Server (CMS) first. Mind that you will not be able to manage databases on this server itself by using central script execution or PBM policies. Therefore, the best practice is to use a machine that does not require database maintenance as a Central Management Server. The entire process consists of few basic steps: creating the CMS, defining new server groups, and registering new servers in these groups. Here are basic instructions for the setup using SSMS:
To create multiserver environment, you need to assign the master server (MSX), and to add one or more target servers (TSX) to it.
ApexSQL Backup
ApexSQL Backup is 3rd party software application, that can be used to manage multiple backups across any number of servers. It supports both Windows, and SQL Server authentication. The application consists of three main components: User interface, Central Repository Database and an agent service. The user interface is used to manipulate, schedule, and execute jobs; central repository database for storing information and configuration data; and agent service for communication between user interface, central repository database and SQL Server instances. To install ApexSQL Backup, perform the following steps:
- It is possible to configure Central Management Server, to define server groups, and to add one or more servers to these server groups. This way, T-SQL statements or Policy-Based Management policies could be executed on all registered servers from a Server Group at the same time. The main flaw of CMS setup is complex monitoring and limited automation. Furthermore, only Windows Authentication is allowed when using CMS setups.
- You could create multiserver environment. If using this solution, the Master server (MSX), and one or more Target servers have to be configured using SQL Server Agent. In this setup, jobs are initially defined on the master server. The defined jobs are then passed to, and executed on target servers automatically. The reports on the jobs that run on target servers are sent back to the master server, which makes the monitoring much easier.
- Use ApexSQL Backup. A simple-to-use software with all needed features in one place. ApexSQL Backup user interface, central repository database and Backup Agent Service are installed on the server that is used for backup management and monitoring. By connecting to other servers using ApexSQL Backup, application automatically installs Backup Agent Service on connected servers. All connected servers are displayed in application server list. Through this application, it is possible to manage and monitor backups with ease, all from a single machine.
In order to configure this setup, you have to install Central Management Server (CMS) first. Mind that you will not be able to manage databases on this server itself by using central script execution or PBM policies. Therefore, the best practice is to use a machine that does not require database maintenance as a Central Management Server. The entire process consists of few basic steps: creating the CMS, defining new server groups, and registering new servers in these groups. Here are basic instructions for the setup using SSMS:
- Log in to a server that you want to use as a CMS
- Go to the View menu, and click Registered servers
- In Object explorer, connect to all servers that you want to include in this setup. Be sure to use Windows authentication for all of them.
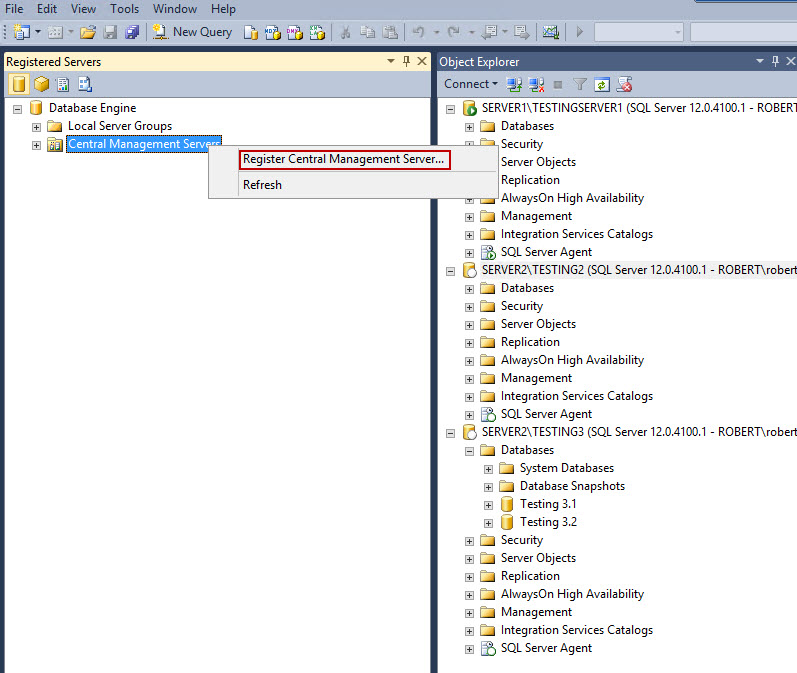
- Right click on Central Management Servers, select Register Central Management Server…
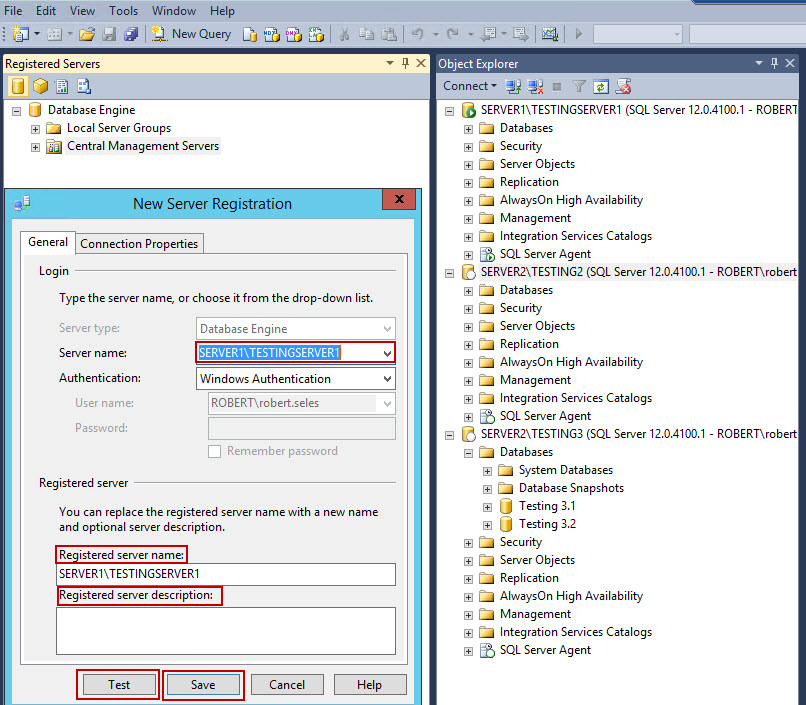
- In the Server name field, select the server that you want to use as a CMS from the dropdown menu. Optionally, you can replace the name of registered server, or add the description for it. Click on the Test button to make sure that the connection with the server runs properly. If you get the message “The connection was tested successfully”, click the Save button to complete the CMS registration.
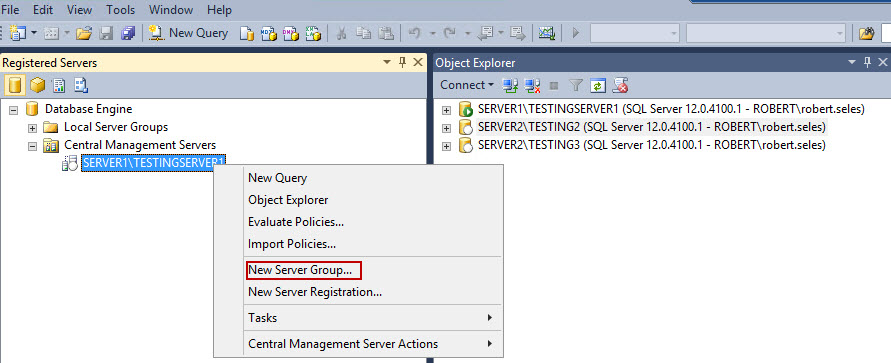
- To create the server groups, right click on your CMS. Select New Server Group…
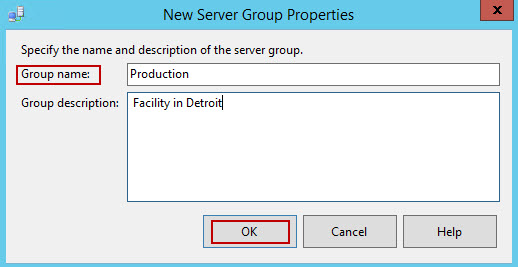
- Specify the Group name, and Group description (optionally)
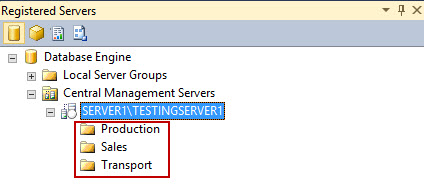
- By repeating steps 6 and 7, you can add as many groups as you need. IN this article, 3 groups are defined: Production, Sales and Transport
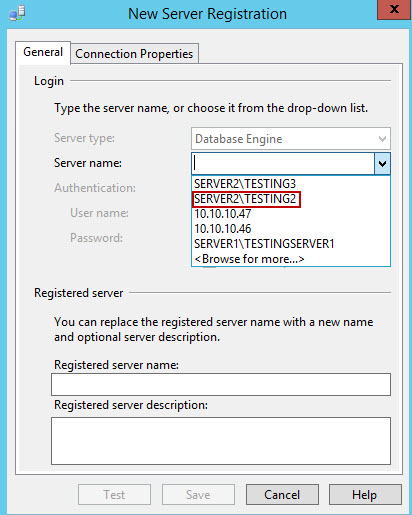
- To add new servers to defined server groups, right click on the server group, and select New server registration… From the dropdown menu in Server names, select one of the servers that you want to add to the group. Enter the registered server name and description if needed, Test the connection, and Save changes. By repeating this step, additional servers can be registered and sorted amongst server groups.
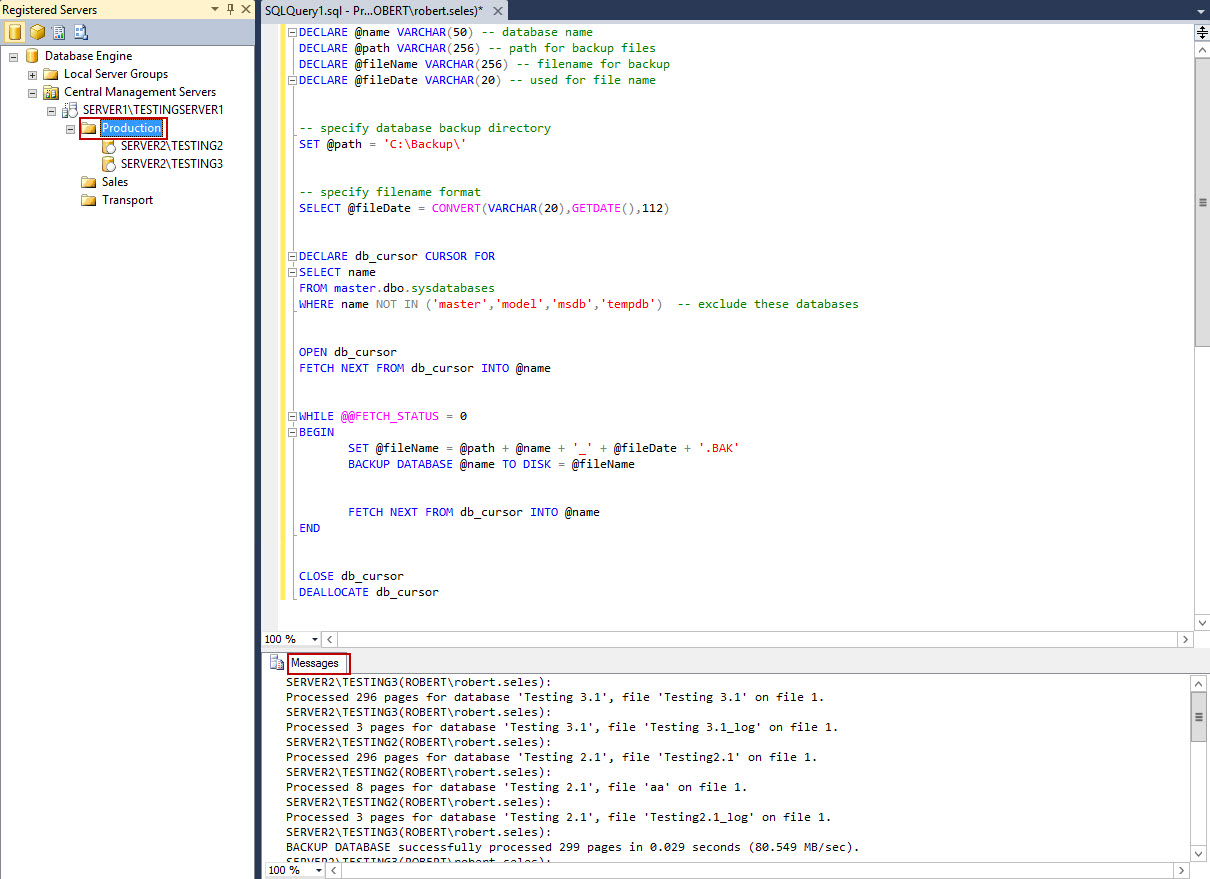
- All types of queries can be run against any of the defined server groups, including backup queries. By right clicking on a group, and selecting New query, you can define the query that runs against all servers in selected group. In the example, the Backup query is run against all servers in Production group. The results of the query are displayed in the lower screen, in Messages.
- Simple PBM policy can be used to monitor the status of backups. Create the policy that you want to evaluate, and run it against single, or all server groups.
To create multiserver environment, you need to assign the master server (MSX), and to add one or more target servers (TSX) to it.
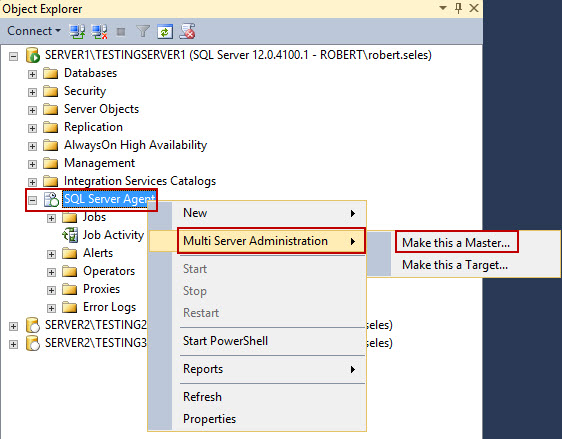
- Connect to the server instance that you want to use as a master server
- Right click on SQL Server Agent, select Multi Server Administration, and Make this a Master.
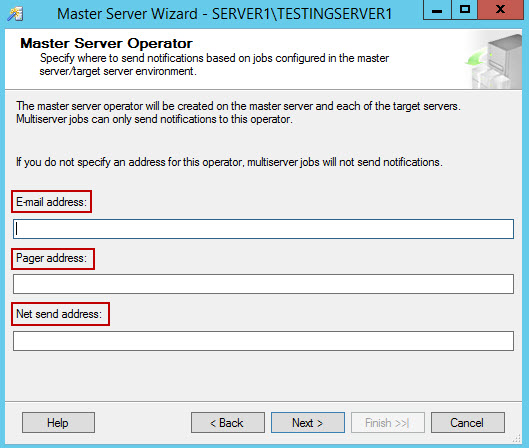
- The option will start Master server configuration wizard. In first step of the wizard, addresses for the notifications could be set: E-mail, Pager, or Net send address.
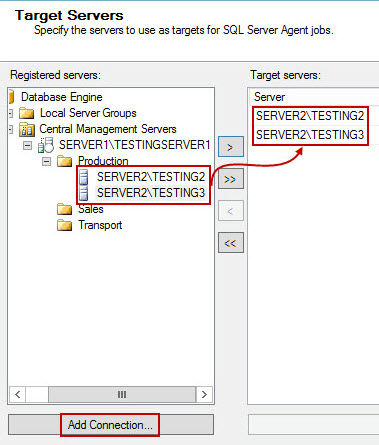
- Next step assigns the target servers. All registered servers are displayed on the left. Each of them can be used as a target server, simply by adding them to the list on the right window. If you want to add more target servers, that are not yet in the list, you can use Add connection button. Unlike CMS setup, multiserver environment allows SQL Server authentication when adding target servers to the list.
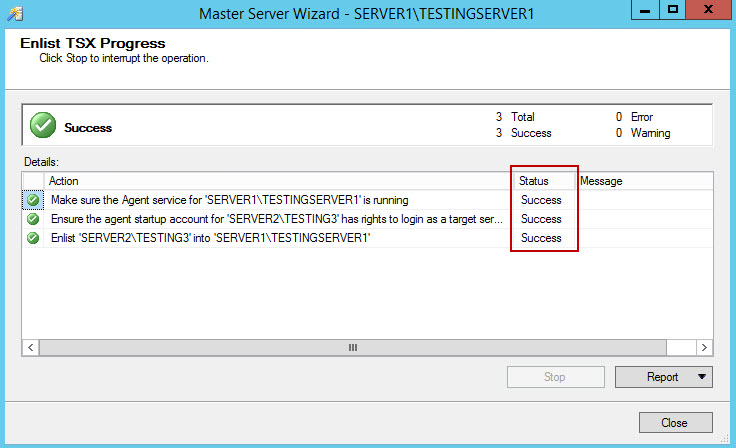
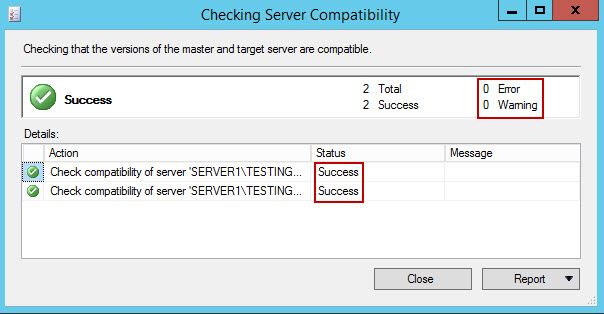
- After all servers are added, wizard checks the compatibility between master and target servers. If all processes complete successfully, click Close.
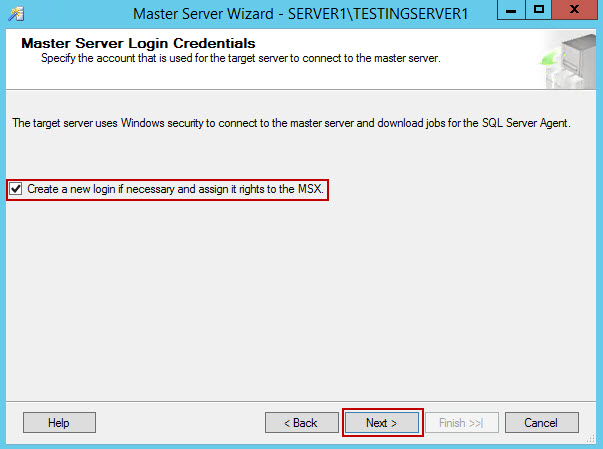
- Optionally you can specify new Login to use when connecting to target servers
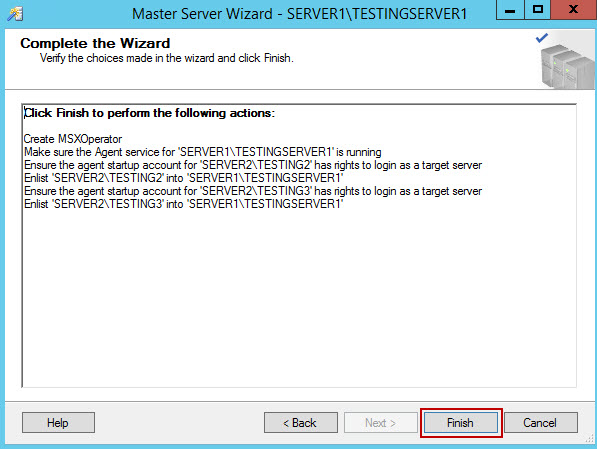
- In final step, the list of pending actions is displayed
- The wizard runs the actions from previous step, and If all complete successfully, click close. Should you get an error, you might need to modify startup account for the target server(s), and grant it additional permission, or to make a new account. I also had to change the registry value for MsxencryptChannelOptions from 2 (default) to 0.
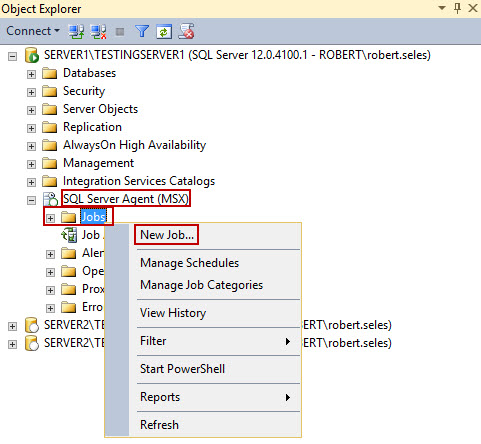
- After the multiserver environment setup completed successfully, we need to create backup jobs that will run on target servers. To create a new job, connect to the server that is used as MSX, expand SQL Server Agent (MSX), right click Jobs, and select New job.
- In New Job window, General tab, the Name, Owner, Category, and Description for the job are specified.

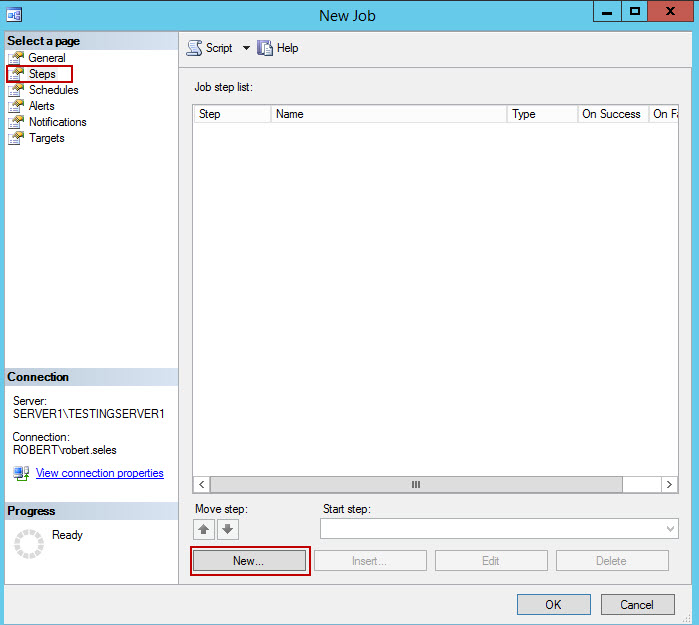
- In Steps tab every step of the procedure needs to be defined. To add the first step, click New.
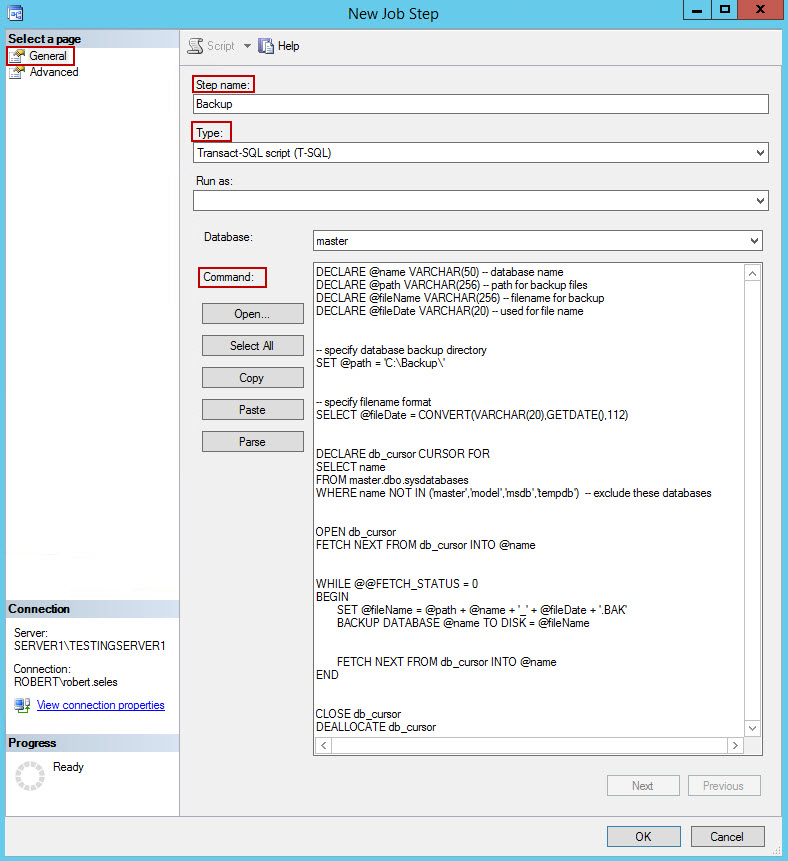
- The Step name, Type, and Command need to be defined for the step. For this step, we are using the T-SQL script that backs up all non-system databases in C:\Backup\ folder. When done, click Ok. If additional steps are needed for the job, repeat this step until the job is configured according to your needs.
- Schedules, Alerts and Notifications could also be specified for the job
- Finally, in Targets tab, select the Target multiple servers radio button, and check the boxes in front of the servers that need to be backed up. Click Ok when done.

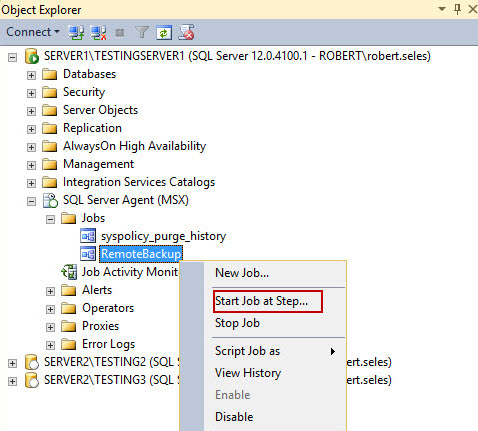
- To run the created job, expand SQL Server Agent (MSX), and Jobs. Right click on a job that needs to be done, and select Start Job at Step.
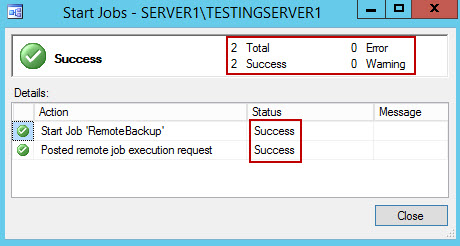
- If all is done properly, the job will execute all defined steps, and display the Success message

ApexSQL Backup
ApexSQL Backup is 3rd party software application, that can be used to manage multiple backups across any number of servers. It supports both Windows, and SQL Server authentication. The application consists of three main components: User interface, Central Repository Database and an agent service. The user interface is used to manipulate, schedule, and execute jobs; central repository database for storing information and configuration data; and agent service for communication between user interface, central repository database and SQL Server instances. To install ApexSQL Backup, perform the following steps:
- The installer could be downloaded here.
- Run the installer, select Install ApexSQL Backup, and click Next.
- Specify the installation path for ApexSQL Backup
- Complete the setup by clicking on Close button.
- Running ApexSQL Backup for the first time will automatically start the installation of central repository database. In this step, we can choose the server that will host the ApexSQL Backup central repository database. The ApexSQL Backup central repository database can be installed on either local, or network server. To obtain list of available servers, click on the Server button next to the SQL Server text box. The SQL Server instances will be visible in the list only if SQL Server Browser service runs on these servers.
- You should also choose Login type for the server that will host the ApexSQL Backup central repository database. You could choose either Windows or SQL Server Authentication, depending on the Login that is used to administer this SQL Server. The Login that is used needs to have administrator privileges on the chosen server. It is also recommended to use SQL Server authentication, if you plan to manage multiple servers that do not belong to the same domain. Click Ok when done.
- As soon as central repository database is configured, the form for the agent service installation will start automatically. ApexSQL Backup agent service is a small service that is used for communication between the user interface, central repository database and SQL Server instances. Only one agent service is required, regardless of the number of managed instances. ApexSQL Backup agent service is installed on the same computer as the ApexSQL Backup application. To install the agent service, it is necessary to select Account type. If User account is selected, provide the full domain Username, and password for this account (this password is also used for logging in to Windows, when this user starts the operating system). Click OK and wait a few moments until the installation completes.
- To add servers that you want to manage with the application, click Add button in the Home tab. You can choose servers which you want to add and specify the Logins that you use to access these servers. Both local and remote server instances can be added this way. The Server field accepts server parameters both in the form of server name (DOMAIN\NAME) and the IP address of the server. To see the list of available servers, and pick one manually, click on the Server button next to the text box. Select the authentication type in Authentication box. The login that is used to access the server needs to have appropriate permissions to backup and restore databases on respective server. It is best to use SQL Server authentication for the servers that are outside of the current domain.
- To add multiple servers, just repeat the previous steps. All servers that are added, along with the databases located on these servers will appear in the server pane to the left.


- To perform backup operations, click the Backup button in the Home tab ribon
- This will start the Backup wizard. You can specify the SQL Server that will be used in the operation, exact databases that you want to backup, backup type, and backup componens. Main tab of the backup wizard also contains settings for the job naming and job description along with the settings for the file destination.

- If backup job needs to be run on a regular basis, click the Schedule radio button, and the Schedule wizard will appear automatically. Set the preferred frequency for the backup job in the Schedule wizard.

- In Advanced tab, additional actions could be set for the backup job, like verification, compression, encryption, and cleanup of the old files.

- If needed, set the Email notification settings in Notification tab. Cjeck the boxes in front of the job conditions that should trigger Email notification, and add one or more Email addresses as Email recipients. To complete job configuration, click on OK button at the bottom of the page.

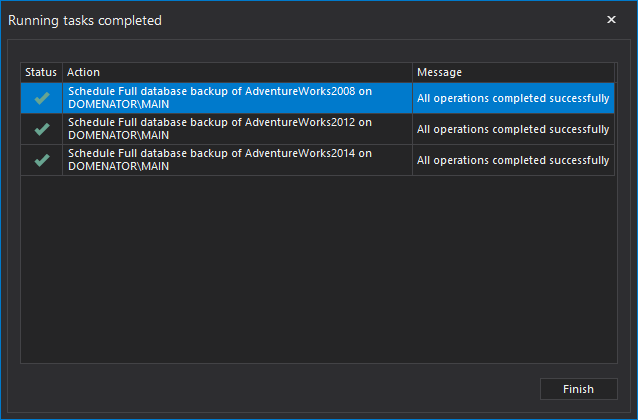
- In final step, all executed actions are listed. In this example, 3 database backups are scheduled.

- You can track all performed backups in Activities tab. All activities regarding selected database, server, or complete server list are displayed in Activities grid.
- All schedules are displayed in Schedules tab. Schedules can be grouped by server, database, status, or any other column that is present in the grid. Each schedule can be edited, disabled, deleted or run on demand, either from the application ribbon, or from the context menu.

- History tab shows the details for all backups performed on the selected database.


No comments:
Post a Comment