Manage multiple database backups across different SQL Server instances
One of the most common ways to ensure that the recovery will be possible if a data-file corruption or any other disaster occurs is to create a recovery plans for this scenario. The most popular recovery plans include regular creation of database backups which can later be used to restore a database to a nearest available point in time, prior to disaster.
In order to create and apply successful recovery plan, it is important to create a solid backup schedule and to manage backups of multiple databases across different SQL Server instances.
In this article we will create a SQL Server scheduled backup by using a SQL Server Agent job and ApexSQL Backup.
Schedule and automate database backup(s) with SQL Server Agent
To perform this task via SQL Server Agent, we will create a SQL Server Agent job:
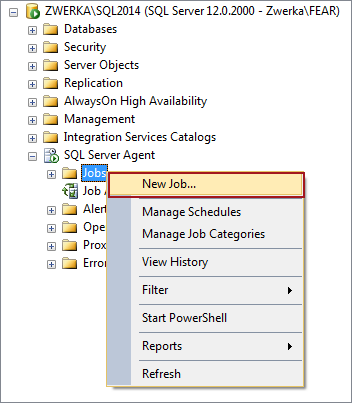
- In the SQL Server Management Studio, navigate to the SQL Server Agent node in the Object Explorer, right click on the Jobs node and choose New job from the context menu
- In the New Job dialog specify a name for a job and all other job details (owner, category, description)
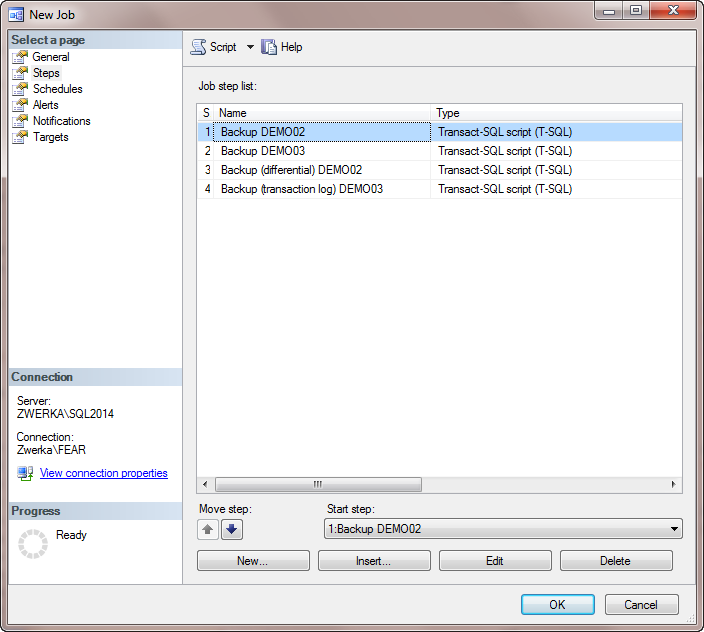
- In the Select a page pane click on the Steps tab and click on the New button to create a backup step
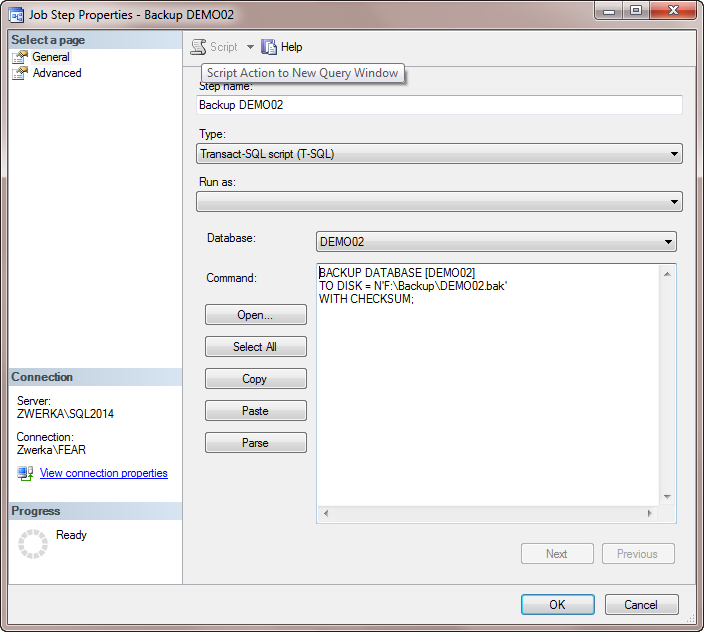
- Specify the name of the step and chose Transact-SQL script (T-SQL)
- Depending on the type of backup being created (full, differential or transaction lob backup), paste one of the following scripts to the Command pane:
- Full database backup
- Differential backup
- Transaction log backup
BACKUP DATABASE [DEMO02]
TO DISK = N'F:\Backup\DEMO02.bak'
WITH CHECKSUM;
--WARNING! ERRORS ENCOUNTERED DURING SQL PARSING!
BACKUP DATABASE [DEMO02]
TO DISK = N'F:\Backup\DEMO02.bak'
WITH DIFFERENTIAL;
WITH CHECKSUM;

GO
BACKUP LOG [DEMO02]
TO DISK = N'F:\Logs\DEMO02.log';
GO
Note: To be able to create a differential or a transaction log SQL Server database backup a full database backup has to be created first. - Click on the OK button to add the job step Note: to set up backup of multiple databases, simply repeat steps 4-6 and provide appropriate details for those databases
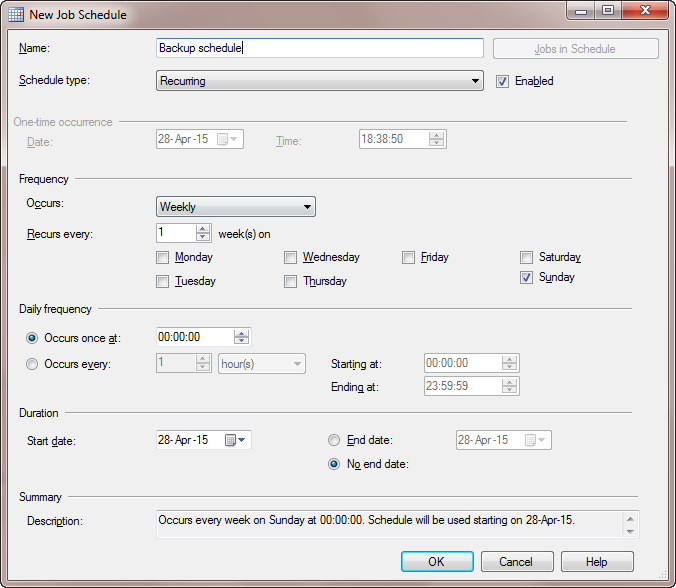
- In the Select a page pane click on the Schedules tab and click on the New button to create a schedule for the job
- Provide a job schedule name, choose a schedule type, occurring frequency and job validity date range
- Click OK to create a schedule, and OK again to create a job With this, the job has been created and can now be found in the Object Explorer pane under the SQL Server Agent / Jobs.
- Process of the backup job creation and scheduling via SQL Server Agent can be substantial and hard to understand
- Inability to see both scheduled jobs and those that have already been ended
- It is not possible to include databases from different SQL instances in the same job
- Transact-SQL script (T-SQL) must be provided for each individual database
- The backup job and schedule wizards are simple and easy to manage
- Both scheduled jobs and historical overviews of all backup (and restore and log shipping) jobs can be used for easy tracking of all or specific jobs
- There is no limit in number of SQL instances that can be managed at the same time
- There is no need for any transact-SQL script (T-SQL)
To put the job in use, right click on it in the Object Explorer pane and click on the Start job at stepoption in the context menu
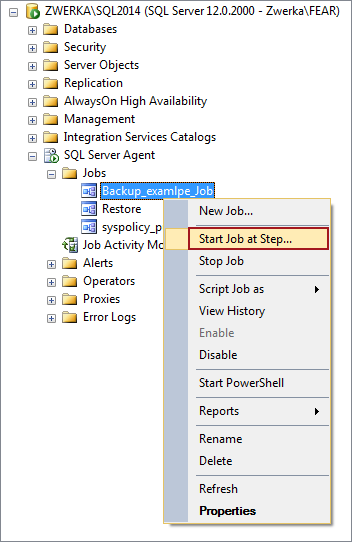
At this moment, the backup job is set and scheduled actions will complete at the specified time
There are several disadvantages to automating database backup(s) with SQL Server Agent:
Different approach to create and schedule database backup jobs in SQL Server is to ApexSQL Backup – a tool for management and automation of SQL Server backup, restore and log shipping jobs. ApexSQL Backup enables user to schedule database backup jobs through simple wizard, and allows one to overview all jobs history, schedules and results, or notify about the result on completion by email alert.
Main advantages when using ApexSQL Backup in comparison to SQL Agent jobs:
- Start the application, and navigate to Home tab, and click on Manage button in Backup templates ribbon group.

- In Backup templates form, click the New button.

- In the main tab of the form, provide the name and description for the template, and select the backup type. To set the naming rules for the backup set name, description and destination filename, click on browse button (…) next to respective text boxes.

- The form with predefined tags for server, instance and database names, along with the tags for backup type, date and time will appear. Include any relevant tag in the string for backup set, backup description or backup filename, and click OK to confirm the selection.

- To set the job schedule, click on Browse (…) button in the Schedule text box. The Schedule wizard will appear. The backup job frequency can be set in this form as one-time job, or reoccurring job running on daily, weekly or monthly basis. Click OK button when the job frequency is set. In this example, the schedule for daily database backup at 12AM will be set.

- In Advanced tab of the wizard, set the options regarding the media, verification, compression or cleanup of the old backup files.

- It is also possible to set up an automatic Email notification when the scheduled job is completed in Notification tab. Check the box for each job status that will send the email notification. Add any relevant recipient Email adresses to the list.

- Click OK button, and the backup template will be created. Now, when the template is created, it simply needs to be deployed to as many databases on as many SQL Server instances is needed. To deploy the template, start the process by clicking on the Deploy button in the main ribbon
- As Deploy templates form appears, click browse button in Tempalates box, check the created template in the list and click OK.

- Browse button in Databases box opens the database selection. Check databases from multiple SQL Servers from the list. The template will be applied to all checked databases.

- The list in Deploy templates form will be populated with the server names from where the databases originate, along with the default backup path for these servers. If any of these paths need to be changed, click on the browse button (…), and provide a new folder path. When done, click OK button at the bottom to deploy the template.

- The success message is displayed. Click Finish button to complete the process. One backup schedule will be created for each database checked in step 10.

- The backup jobs schedules are now created and will occur in accordance to the schedule’s specification. The schedules will be displayed in the Schedules tab of the application, with other ongoing and finished schedules. Each of these schedules can be run on demand, edited or disabled if necessary.


No comments:
Post a Comment