How to Use Oracle VM Templates
How to prepare an Oracle VM environment to use Oracle VM Templates, how to obtain a template, and how to deploy the template to your Oracle VM environment.
This article describes how to prepare an Oracle VM environment to use Oracle VM Templates, how to obtain a template, and how to deploy the template to your Oracle VM environment. It also describes how to create a virtual machine based on that template and how you can clone the template and change the clone's configuration. As an example, the article uses a template for Oracle Database that contains two disk images: an Oracle Linux system image and an Oracle Database image.
About Oracle VM Templates
Virtualization technology offers many benefits, including higher utilization of the CPU and other hardware resources, easy software deployments, and simplified systems management. To make software management and deployment even easier, Oracle introduced Oracle VM Templates: prebuilt, preconfigured virtual machines (VMs) that are fully ready for deployment to a virtualized environment. A typical template includes a guest operating system and application software, along with configuration information needed for the VM deployment.
The main attraction for using Oracle VM Templates is to make deploying and managing VMs easier. Oracle offers a large number of VM templates for most popular Oracle products, including Oracle Database, Oracle Business Intelligence Enterprise Edition, Oracle WebLogic Server, Oracle Linux, and MySQL Database, to name a few.
Preparing Your Working Environment
Before you can make use of a template, you must first install Oracle VM, which requires installing at least one Oracle VM Server plus Oracle VM Manager.
To install Oracle VM Server, you'll need a clean machine. Oracle VM Server provides a hypervisor and a privileged domain (Dom0) to install directly on a bare metal server that does not require a host operating system.
Oracle VM Server takes over the entire hard drive, thus requiring a dedicated machine. If you just want to play a little with it and cannot provide a dedicated machine for it, a simple workaround might be to temporarily use another hard drive, such as a removable hard drive. There are motherboards that let you connect such external devices through the back panel of the computer as a SATA device. If that is not possible, you should be able to connect it through a USB port. Then, be sure to set it as the first boot device in the BIOS. To be on the safe side, you should temporarily unplug your regular hard drive. This approach allows you to easily revert back to your regular configuration later on.
After installing Oracle VM Server, you need to install Oracle VM Manager, which will be used to manage the virtualization environment created during the server installation. Oracle VM Manager does not require a dedicated machine. However, Oracle recommends that Oracle VM Server and Oracle VM Manager be installed on separate machines (installing both on the same machine is tricky and unsupported). In other words, you'll need another machine. As of Oracle VM Manager 3.0, you can install Oracle VM Manager on a computer running Oracle Linux 5 Update 5 (64-bit) or later.
To learn about the software and hardware requirements for a specific release of Oracle VM, refer to the appropriate Oracle VM installation guide.
During the simple installation of Oracle VM Manager 3.0, the following software components are installed:
Note: Oracle Database, Express Edition 11g is bundled with Oracle VM Manager 3 for customer-evaluation purposes, but Oracle Database, Standard Edition or Oracle Database, Enterprise Edition is required for production support as the management repository. All necessary licenses, including licenses for Oracle WebLogic Server and Oracle Database (Standard Edition or Enterprise Edition) are included at no additional charge. For more details, refer to My Oracle Support Doc ID 1356588.1: Oracle VM 3.0 WebLogic and Oracle Database Product Licensing and Support Policy (requires login).
Setting Up Your Oracle VM Environment
After you have installed Oracle VM Server and Oracle VM Manager, the next task is to see whether the machine hosting Oracle VM Server is pingable from the Oracle VM Manager's host. If it is, you can proceed to set up your Oracle VM environment with the help of Oracle VM Manager.
To start working with Oracle VM Manager, point your browser to this address:
http://example.com:7001/ovm/console.
Alternatively, you can use Secure Sockets Layer (SSL) by pointing your browser here:
https://example.com:7002/ovm/console.
You'll be routed to the Login page of Oracle VM Manager, where you need to enter the administration username and password you specified during the Oracle VM Manager installation.
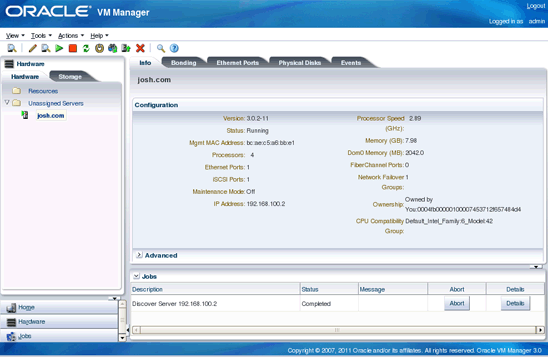
Discovering the Oracle VM Server
To complete the task of discovering your Oracle VM Server, perform the following steps:
Creating a Server Pool
Now that your Oracle VM Server has been discovered, you can create a server pool, which is a required step when setting up an Oracle VM environment. To do this, follow these steps:
Adding the Discovered Server to the Server Pool
You can now add your Oracle VM Server to the newly created server pool by performing the following steps:
- Under the Home->Server Pools node in the navigator, select the newly created server pool.
- Select Add/Remove Servers from the Actions menu.
- In the Add/Remove Servers dialog box, move your Oracle VM Server from the Available Servers pane to Selected Servers.
Creating a Storage Repository for Storing Oracle VM Resources
The next required step is to create a storage repository for storing your Oracle VM resources, including Oracle VM Templates. Here, you have several options. In the simplest case, you can take advantage of an NFS share. The other options include local storage, iSCSI SAN, and Fibre Channel SAN.
Although it's more reliable to use a separate location (such as an NFS share) for a storage repository, you can use a local disk of your Oracle VM Server instead, thus taking advantage of the local storage option. Beware, though: Oracle VM Server 3.0 doesn't allow you to utilize the unused space on the physical disk it's installed on. For local storage, you'll need at least one more physical disk. In other words, you'll need a total of two disks at minimum on your Oracle VM Server host if you want to use local storage. In practice, though, local storage is not a primary use case. The major downside to this approach is that local storage, by definition, cannot be shared between different servers.
For the NFS share option, an NFS file server can be set up easily on the majority of operating systems being used today. The ability to expose a file system to a network so that remote hosts can mount it as if it is mounted locally provides interesting storage opportunities. For example, you might readily turn a host running Microsoft Windows into a file server that will host a storage repository in your Oracle VM environment. For further details on setting up an NFS server, you can check the vendor documentation.
Registering a File Server or a Storage Array
The next step is to register a file server or a storage array, depending on what you're going to use. As mentioned, this step is not required if you are using the local storage on your Oracle VM Server. In the case of the NFS share option, you'll need to register a file server. The following steps describe how you might do this, assuming you already have an NFS file server running in your network:
- 1. Move to the Hardware view.
- 2. In the navigator, click the Storage tab.
- 3. On the Storage tab, right-click File Servers and then select Register File Server.
- 4. On the first screen of the Register File Server wizard, fill out the Name and Access Host fields and select the storage plug-in in the Storage Plug-in list box.
- 5. On the next screen of the wizard, you should see your file server in the Available Servers pane. Move it to the Selected Servers pane, and complete the wizard.After completing the file server registration, Oracle VM Manager automatically starts a discovery job for the server's file systems. So, you should have a file system that can be used to create a storage repository for your server pool. That file system should appear under the File Servers->your_file_server node on the Storage tab of the Hardware view.
- 6. Next, create a storage repository based on the server's file system:
- Refresh the discovered file system by right-clicking it in the navigator and then selecting Refresh File System from the pop-up menu.
- Move to the Home view.
- In the navigator, select the Server Pools node.
- In the management pane, move to the Repositories tab.
- On the tools panel of the Repositories tab, click the Create icon.
- In the Create Repository dialog box, complete the required fields, which are Name, Repository Location, and, if you selected Network File Server for Repository Location, Network File System.
Presenting the Repository to the Oracle VM Server
As a result of the previous steps, the newly created repository should appear in the table on the Repositories tab. Now you need to present the repository to your Oracle VM Server so the server can use it. To do this, follow these steps:
Obtaining an Oracle VM Template
After successfully completing the previous steps, you're ready to start working with Oracle VM Templates. The first step will be to obtain a template from the Oracle Software Delivery Cloud (requires login).
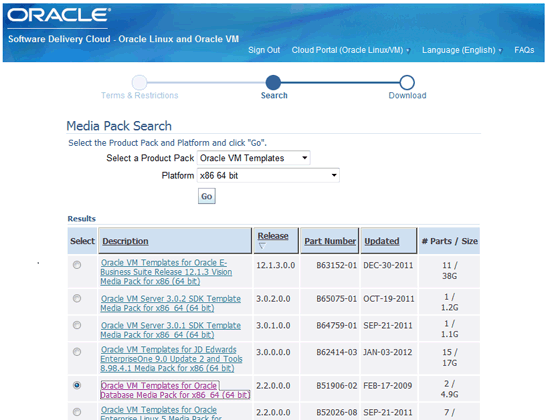
Also, on the download page, you can find the readme file accompanying the template. Read it carefully to learn the following:
Importing an Oracle VM Template
After downloading the template archive to your system, move it to a directory where it will be available through FTP, HTTP, or HTTPS. (The template importing mechanism used in Oracle VM Manager is limited to those protocols only.)
The following steps describe how you can import a template into your Oracle VM environment through Oracle VM Manager:
If the importing process fails at the very beginning, the first thing to check is the firewall. In particular, you might need to disable the firewall on the host running Oracle VM Manager (the firewall is disabled on Oracle VM Server by default).
During importing, the template archive will be downloaded and then unpacked in the specified repository. Then the repository will be automatically refreshed so that Oracle VM Manager can reflect the changes made in its content tabs. Figure 3 illustrates what the Oracle VM Manager window might look like after the importing process has been completed successfully.

Figure 3. Templates Tab After an Importing a Template into the Oracle VM Environment
To view the template's configuration and network and storage information, select the template in the Templates table and then click an appropriate tab.
Creating a Virtual Machine from an Oracle VM Template
After you have successfully imported a template into your Oracle VM environment, you might want to create a virtual machine from it. Before you can do that, though, you need to perform some networking tasks in Oracle VM Manager. In particular, you need to create a virtual machine network and generate a set of Virtual Network Interface Cards (VNICs) that will be assigned to virtual machines as network cards.
To create a virtual machine network, follow the steps below:
- 1. In Oracle VM Manager, move to the Hardware view.
- 2. In the navigator, click the Hardware tab and select the Resources folder.
- 3. In the management pane, select the Network tab.
- 4. On the tools panel of the Network tab, click the Create New Network icon to invoke the Network Configuration wizard.
- 5. On the first screen of the wizard, select a network configuration option.If you have a single Oracle VM Server, you can select the Create a logical network on a single server option. In that case, the wizard will present only two more screens.
- 6. On the Create Network screen, specify a name for the network being created and, optionally, provide a description.
- 7. On the Select Server screen, make sure that your Oracle VM Server is specified in the Server field, and then complete any remaining steps in the wizard.
- 8. The next step is to generate a set of VNICs (at least one, if you're planning to create a single virtual machine):
- In Oracle VM Manager, select Vnic Manager from the Tools menu.
- In the Virtual Network Interface Card Manager dialog box, click Next to obtain the next available MAC address, and then click Generate.
- 9. Now you can create a virtual machine. To do this, you'll need to clone the template as follows:
- Move to the Home view.
- In the navigator, select the Server Pools folder.
- In the management pane, click the Templates tab.
- In the Templates table, select the template you want to clone.
- On the tools panel of the Templates tab, click the Clone icon.
- In the Clone Virtual Machine Template dialog box (shown in Figure 4), choose Simple Clone for the clone type, and select Virtual Machine for the target clone type. Also, enter a name for the virtual machine being created.
 Figure 4. Clone Virtual Machine Template Dialog BoxAs a result of the above steps, a virtual machine will be created and deployed to the server pool in a stopped state.
- 10. To run the VM, follow these steps:
- Move to the Home view.
- In the navigator, expand the Server Pools->your_server_pool->your_vm_server node.
- Right-click the virtual machine and select Start from the pop-up menu.
- 11. Now that the virtual machine is running, you need to install Virtual Machine Console, a tool available in Oracle VM Manager, so that you can you access the VM. Before you can take advantage of the Virtual Machine Console, you need to install a VNC viewer on the computer hosting Oracle VM Manager. This viewer can be, for example, TightVNC, whose latest package can be obtained from http://oss.oracle.com/oraclevm/manager/RPMS/
- 12. Next, download Java and install it on the computer from which you're connecting to Oracle VM Manager.
- 13. Now you can launch the Virtual Machine Console as follows:
- In the navigation pane of the Home view, expand the Server Pools->your_server_pool->your_vm_server node.
- Right-click the virtual machine icon and select Launch Console from the pop-up menu.
- When prompted, enter the login credentials for Oracle VM Manager.
As a result, the virtual machine's console should appear, reflecting the virtual machine's load process. On the first load, you'll be asked several questions to configure the virtual machine. In particular, you'll be asked whether you're going to obtain an IP address for the virtual machine via DHCP or use a static IP address.Figure 5 illustrates what the console might look like at this stage: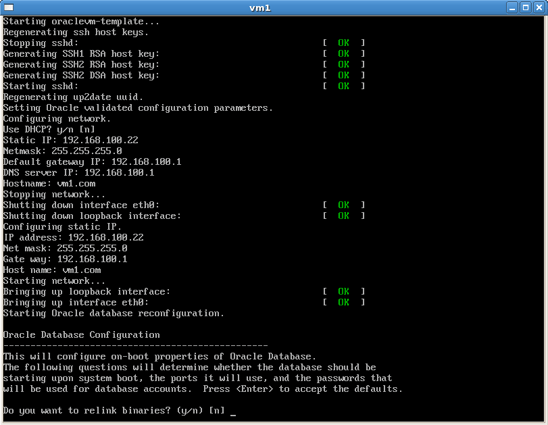 Figure 5. Virtual Machine Console During the First Start of a Virtual Machine
The preinstalled applications might also require some configuration during the first load of a virtual machine. For example, when first loading a virtual machine with a preinstalled Oracle Database, you'll be prompted to enter the TCP/IP port for the Oracle Net listener as well as the password for system accounts and other things that are needed to set the initial configuration parameters of the database. You will also be asked whether you want the database to be started on boot.
After this initial configuration, you'll be prompted to log in to the guest operating system. You can login as
root using the password ovsroot (which is the case for all Oracle VM templates). If a template contains an Oracle database, as in our example, you can use the database account oracle with the password oracle to connect to the database.Creating a New Template from a Virtual Machine
As you probably realize, the cloning mechanism we touched on in the preceding section is not limited only to creating a virtual machine from a template. In fact, cloning also allows you to create new templates from existing ones and even create new templates and virtual machines from existing virtual machines.
Turning back to our example, let's clone the virtual machine created from a template in the preceding section to create a new template. The reasoning here is to create a template that might be used to generate virtual machines that do not require initial configuration, which could shorten the time it takes to get those virtual machines ready for use. With this approach, some parameters might be configured later, if needed, of course.
The following steps describe how you might create a new template from a virtual machine:
In the preceding steps, you performed a clone operation known as a cold clone, because a clone was created from a stopped virtual machine. Alternatively, you might perform a hot clone by dealing with a running virtual machine. Be warned, though: A hot clone produces a clone with inconsistent disk status, which makes it suitable only for use as a snapshot or a backup copy.
After completing the preceding steps, you should have a new template you can use to create virtual machines that do not require initial configuration. However, there are at least two parameters you most likely will want to change when a new virtual machine is created from this template:
It seems reasonable to do that, unless you want to have more than virtual machine sharing the same host name and IP address in your network.
If you want to change these parameters at the first start of the virtual machine, perform the following steps:
- 1. Through the virtual machine's console, log in to the guest as
root(using the passwordovsroot). - 2. Use the
vitext editor to edit the following configuration files, changing the IP address and the host name to the new values: - 3. Stop the virtual machine and then start it again for the changes to take effect.
As you might guess, the example discussed here is rather unlikely. It's hard to believe that someone would choose to do manual configuration in place of answering some questions on the first boot of a virtual machine. However, there might be situations where you have a need to create a template from a virtual machine. For example, after creating some objects (such as tables, views, indexes, and stored procedures) in a virtual machine that is running an Oracle database, you might want to create a template from that virtual machine.
Reconfiguring a Template
So far, we have looked at a simple clone created with the same configuration as the item from which it was cloned. In practice, though, you might need to create a clone with different configuration and deployment options. This is where you can take advantage of the advanced clone option.
To perform an advanced cloning of a template, you invoke the clone operation for that template and then select Advanced Clone for the clone type. Then, the wizard will walk you through the process of reconfiguring the template.
Moreover, you can edit a template, changing its network settings, amount of memory, virtual CPU number, and so on.
To invoke the Edit Template wizard, follow these steps:
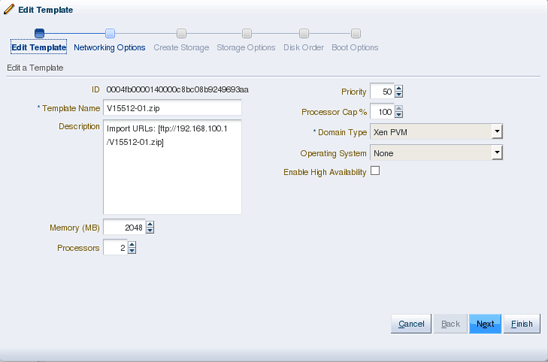
When you complete the steps in the wizard, you should have a template with the configuration differing from the initial configuration.
Conclusion
As you learned in this article, Oracle VM Templates provide a good way to distribute Oracle technologies to an Oracle VM environment, making it easy for you to get up and running quickly.
This article described a simple example of the Oracle VM Templates technology in action. The template containing Oracle Database running on Oracle Linux was downloaded and then imported into an Oracle VM environment. Then, the article described how you might clone the template to create a new virtual machine or a new template with different configuration.
See Also
For more information, see the Oracle VM Templates Website: http://www.oracle.com/technetwork/server-storage/vm/templates-101937.html.
About the Author
Yuli Vasiliev is a software developer, freelance author, and consultant currently specializing in open source development, Java technologies, business intelligence, databases, service-oriented architecture (SOA), and, more recently, virtualization. He is the author of a series of books on Oracle technology; the most recent one is Oracle Business Intelligence: An Introduction to Business Analysis and Reporting (Packt, 2010).

