Tuesday, May 3, 2016

Resize linux root disk in Oracle VM


Resize linux root disk in Oracle VM


I just needed to grow my root fs on an Oracle Linux guest VM running in OVM 3.2 and I thought I’d share the process with you. A lot of the steps are taken from a similar blog on doing a similar thing on vmware.
To start with, I have a linux vm which started as a clone of one of the Linux VM templates that Oracle provides. It comes with a 20G disk which is partitioned into two pieces. One for /boot and the other one is lvm physical volume that holds the rest of the system including the root partition.
The basic steps are:
– backup the existing system just in case
– resize virtual disk in OVM
– grow the partition to the new size
– grow the pv device
– grow the logical volume for my root / partition
– grow the filesystem on /
Instead of growing the original physical volume and partition I could also simply add a second disk to the lvm pool but I like to keep things simple and use as few devices as possible.
First you want to backup the VM in case something goes wrong later. If your VM is on an OCFS repository, you can simply clone the running VM. This VM was on an NFS repo so I had to turn it off and create a clone from there (actually I simply made a copy of the virtual disk .img file once the VM was shut down).
resize_OVM_disk
Edit the VM in OVM manager, navigate to the virtual disk and enter a new (bigger) size for the virtual disk. Click apply and this should be taken care of. Now the Linux guest needs to see the change and this can be done either by rebooting the VM or rescanning the devices. Since this is a paravirtualized VM (PVM) simply running ‘sync’ or rescanning the SCSI bus won’t work because the device (xvda) is not really scsi. I have yet to find a way to do this online (and if you know one, please leave a comment). Until then: reboot the VM so that fdisk recognized the new size of the VM. After that, start fdisk, check the new size and re-create the lvm partition to the new maximum size. I am always a bit scared of this step because you are actually deleting the partition. But this simply means removing the entry from the partition table and will actually leave your data intact as long as you re-create the partition with the same start sector.
[root@ovmm32 ~]# fdisk /dev/xvda

WARNING: DOS-compatible mode is deprecated. It's strongly recommended to
         switch off the mode (command 'c') and change display units to
         sectors (command 'u').

Command (m for help): p

Disk /dev/xvda: 34.4 GB, 34359738368 bytes
255 heads, 63 sectors/track, 4177 cylinders
Units = cylinders of 16065 * 512 = 8225280 bytes
Sector size (logical/physical): 512 bytes / 512 bytes
I/O size (minimum/optimal): 512 bytes / 512 bytes
Disk identifier: 0x00082e48

    Device Boot      Start         End      Blocks   Id  System
/dev/xvda1   *           1          64      512000   83  Linux
Partition 1 does not end on cylinder boundary.
/dev/xvda2              64        2611    20458496   8e  Linux LVM

Command (m for help): d
Partition number (1-4): 2

Command (m for help): n
Command action
   e   extended
   p   primary partition (1-4)
p
Partition number (1-4): 2
First cylinder (64-4177, default 64): 
Using default value 64
Last cylinder, +cylinders or +size{K,M,G} (64-4177, default 4177): 
Using default value 4177

Command (m for help): p

Disk /dev/xvda: 34.4 GB, 34359738368 bytes
255 heads, 63 sectors/track, 4177 cylinders
Units = cylinders of 16065 * 512 = 8225280 bytes
Sector size (logical/physical): 512 bytes / 512 bytes
I/O size (minimum/optimal): 512 bytes / 512 bytes
Disk identifier: 0x00082e48

    Device Boot      Start         End      Blocks   Id  System
/dev/xvda1   *           1          64      512000   83  Linux
Partition 1 does not end on cylinder boundary.
/dev/xvda2              64        4177    33038728+  83  Linux

Command (m for help): t
Partition number (1-4): 2
Hex code (type L to list codes): L

 0  Empty           24  NEC DOS         81  Minix / old Lin bf  Solaris        
 1  FAT12           39  Plan 9          82  Linux swap / So c1  DRDOS/sec (FAT-
 2  XENIX root      3c  PartitionMagic  83  Linux           c4  DRDOS/sec (FAT-
 3  XENIX usr       40  Venix 80286     84  OS/2 hidden C:  c6  DRDOS/sec (FAT-
 4  FAT16 <32M      41  PPC PReP Boot   85  Linux extended  c7  Syrinx         
 5  Extended        42  SFS             86  NTFS volume set da  Non-FS data    
 6  FAT16           4d  QNX4.x          87  NTFS volume set db  CP/M / CTOS / .
 7  HPFS/NTFS       4e  QNX4.x 2nd part 88  Linux plaintext de  Dell Utility   
 8  AIX             4f  QNX4.x 3rd part 8e  Linux LVM       df  BootIt         
 9  AIX bootable    50  OnTrack DM      93  Amoeba          e1  DOS access     
 a  OS/2 Boot Manag 51  OnTrack DM6 Aux 94  Amoeba BBT      e3  DOS R/O        
 b  W95 FAT32       52  CP/M            9f  BSD/OS          e4  SpeedStor      
 c  W95 FAT32 (LBA) 53  OnTrack DM6 Aux a0  IBM Thinkpad hi eb  BeOS fs        
 e  W95 FAT16 (LBA) 54  OnTrackDM6      a5  FreeBSD         ee  GPT            
 f  W95 Ext'd (LBA) 55  EZ-Drive        a6  OpenBSD         ef  EFI (FAT-12/16/
10  OPUS            56  Golden Bow      a7  NeXTSTEP        f0  Linux/PA-RISC b
11  Hidden FAT12    5c  Priam Edisk     a8  Darwin UFS      f1  SpeedStor      
12  Compaq diagnost 61  SpeedStor       a9  NetBSD          f4  SpeedStor      
14  Hidden FAT16 <3 63  GNU HURD or Sys ab  Darwin boot     f2  DOS secondary  
16  Hidden FAT16    64  Novell Netware  af  HFS / HFS+      fb  VMware VMFS    
17  Hidden HPFS/NTF 65  Novell Netware  b7  BSDI fs         fc  VMware VMKCORE 
18  AST SmartSleep  70  DiskSecure Mult b8  BSDI swap       fd  Linux raid auto
1b  Hidden W95 FAT3 75  PC/IX           bb  Boot Wizard hid fe  LANstep        
1c  Hidden W95 FAT3 80  Old Minix       be  Solaris boot    ff  BBT            
1e  Hidden W95 FAT1
Hex code (type L to list codes): 8e
Changed system type of partition 2 to 8e (Linux LVM)
Command (m for help): w
The partition table has been altered!

Calling ioctl() to re-read partition table.

WARNING: Re-reading the partition table failed with error 16: Device or resource busy.
The kernel still uses the old table. The new table will be used at
the next reboot or after you run partprobe(8) or kpartx(8)
Syncing disks.
This calls for another reboot which is unfortunate, but one more cycle won’t hurt us now. After that we we can resize the pv:
[root@ovmm32 ~]# pvdisplay 
  --- Physical volume ---
  PV Name               /dev/xvda2
  VG Name               vg_ovmm32
  PV Size               19.51 GiB / not usable 2.00 MiB
  Allocatable           yes (but full)
  PE Size               4.00 MiB
  Total PE              4994
  Free PE               0
  Allocated PE          4994
  PV UUID               HPweY3-sK8N-qKRR-57qR-HimH-zPKK-WD4p6e
   
[root@ovmm32 ~]# pvresize /dev/xvda2
  Physical volume "/dev/xvda2" changed
  1 physical volume(s) resized / 0 physical volume(s) not resized
[root@ovmm32 ~]# pvdisplay 
  --- Physical volume ---
  PV Name               /dev/xvda2
  VG Name               vg_ovmm32
  PV Size               31.51 GiB / not usable 3.38 MiB
  Allocatable           yes 
  PE Size               4.00 MiB
  Total PE              8065
  Free PE               3071
  Allocated PE          4994
  PV UUID               HPweY3-sK8N-qKRR-57qR-HimH-zPKK-WD4p6e
[root@ovmm32 ~]# vgdisplay 
  --- Volume group ---
  VG Name               vg_ovmm32
  System ID             
  Format                lvm2
  Metadata Areas        1
  Metadata Sequence No  5
  VG Access             read/write
  VG Status             resizable
  MAX LV                0
  Cur LV                2
  Open LV               2
  Max PV                0
  Cur PV                1
  Act PV                1
  VG Size               31.50 GiB
  PE Size               4.00 MiB
  Total PE              8065
  Alloc PE / Size       4994 / 19.51 GiB
  Free  PE / Size       3071 / 12.00 GiB
  VG UUID               Yi9o86-E9fU-ZbU0-Fvuj-9QQn-n1AJ-N04Hzb
So let’s look at the logical volumes and then resize the root volume to the new maximum size:
[root@ovmm32 ~]# lvdisplay 
  --- Logical volume ---
  LV Path                /dev/vg_ovmm32/lv_root
  LV Name                lv_root
  VG Name                vg_ovmm32
  LV UUID                Z3slmg-uIYv-0cRP-q1ZQ-8kmA-12Ja-WU6FfT
  LV Write Access        read/write
  LV Creation host, time ovmm32.portrix.net, 2013-06-07 14:00:44 +0200
  LV Status              available
  # open                 1
  LV Size                11.70 GiB
  Current LE             2994
  Segments               1
  Allocation             inherit
  Read ahead sectors     auto
  - currently set to     256
  Block device           252:0
   
  --- Logical volume ---
  LV Path                /dev/vg_ovmm32/lv_swap
  LV Name                lv_swap
  VG Name                vg_ovmm32
  LV UUID                6dfA32-ZH6r-Ulbn-ZzUT-uDOh-EwlP-y8E3PC
  LV Write Access        read/write
  LV Creation host, time ovmm32.portrix.net, 2013-06-07 14:01:55 +0200
  LV Status              available
  # open                 2
  LV Size                7.81 GiB
  Current LE             2000
  Segments               1
  Allocation             inherit
  Read ahead sectors     auto
  - currently set to     256
  Block device           252:1
   
[root@ovmm32 ~]# lvextend -l +100%FREE /dev/vg_ovmm32/lv_root
  Extending logical volume lv_root to 23.69 GiB
  Logical volume lv_root successfully resized
[root@ovmm32 ~]# lvdisplay 
  --- Logical volume ---
  LV Path                /dev/vg_ovmm32/lv_root
  LV Name                lv_root
  VG Name                vg_ovmm32
  LV UUID                Z3slmg-uIYv-0cRP-q1ZQ-8kmA-12Ja-WU6FfT
  LV Write Access        read/write
  LV Creation host, time ovmm32.portrix.net, 2013-06-07 14:00:44 +0200
  LV Status              available
  # open                 1
  LV Size                23.69 GiB
  Current LE             6065
  Segments               2
  Allocation             inherit
  Read ahead sectors     auto
  - currently set to     256
  Block device           252:0
   
  --- Logical volume ---
  LV Path                /dev/vg_ovmm32/lv_swap
  LV Name                lv_swap
  VG Name                vg_ovmm32
  LV UUID                6dfA32-ZH6r-Ulbn-ZzUT-uDOh-EwlP-y8E3PC
  LV Write Access        read/write
  LV Creation host, time ovmm32.portrix.net, 2013-06-07 14:01:55 +0200
  LV Status              available
  # open                 2
  LV Size                7.81 GiB
  Current LE             2000
  Segments               1
  Allocation             inherit
  Read ahead sectors     auto
  - currently set to     256
  Block device           252:1
Last step: resize the ext4 filesystem
[root@ovmm32 ~]# resize2fs /dev/mapper/vg_ovmm32-lv_root
resize2fs 1.43-WIP (20-Jun-2013)
Filesystem at /dev/mapper/vg_ovmm32-lv_root is mounted on /; on-line resizing required
old_desc_blocks = 1, new_desc_blocks = 2
The filesystem on /dev/mapper/vg_ovmm32-lv_root is now 6210560 blocks long.

[root@ovmm32 ~]# df -h
Filesystem            Size  Used Avail Use% Mounted on
/dev/mapper/vg_ovmm32-lv_root
                       24G  7.1G   16G  32% /
tmpfs                 3.9G     0  3.9G   0% /dev/shm
/dev/xvda1            477M  152M  296M  34% /boot

Oracle VM 3 storage choices – part 1: intro, types and support


Oracle VM 3 storage choices – part 1: intro, types and support


During my most recent installation of an Oracle VM 3.2 server pool, I was pondering again all the different options to manage storage with OVM, wrote them down together with pros and cons (to help me decide which one to implement) and now I am sharing these notes.
First of all, you will need to understand the different kinds of storage that OVM can use for all its data. We will start with the easier ones and work our way up.
VM Templates, Assemblies and ISOs need to be stored somewhere. Since these files are not really needed for VMs to run, availability may not be of the utmost importance. However, if you are planning to (thin) clone off of templates, these need to be on the same storage as the virtual disks. Using physical disks for these files (especially ISOs) does not make much sense.
The shared storage for server pool is needed for cluster heartbeat and eviction decisions. It does not require a lot of performance but if this storage is unavailable the cluster gets into trouble. So availability trumps speed or throughput here. I have set this up on physical disks (both iSCSI and FC) in the past but sometimes ran into trouble when that storage was unavailable for short periods during scsi bus rescans. What happened was that access to the SCSI device was blocked during a LIP and after a few seconds nodes started to reboot because they were unable to access and/or ping the shared storage. The root cause of that is most likely something within the SAN, SCSI stack, HBA or driver and may or may not be the same for your environment. I prefer NFS for the cluster storage now.
The vm config storage still needs to be on a repo even if you are using physical disks for everything else. I have not tested what happens to running machines when this storage goes down (I imagine they’d simply keep running). And again, performance is not an issue, these are just a bunch of small xml files with the machine configs.
The actual vm disks (either physical or virtual) are the real big question when setting up an OVM system. The options are NFS vs repository vs physical disks (LUNs in a SAN). And also ethernet (or iSCSI) vs fibre channel. And not all options are supported for all file types which makes it even more complicated.
This overview should make the options clear:

ISOS, ASSEMBLIESPOOL CLUSTER STORAGEVM CONFIGVM DISKS
NFS✓✓✓✓
REPOSITORY✓–✓✓
PHYSICAL DISK–✓–✓
So far, we have looked at what our options are and which are supported. Now let’s see which features are supported by each of the storage options. Performance considerations will be taken into account in another part of this blog series.
NFS-based repositories are by far the easiest method to set up. All you need is a filer somewhere and you are good to go. Backup is also really easy because you just need to mount the share and copy the data off of it. But there is no support for thin cloning so everytime you create a VM from a template or clone a VM all the data will be copied and used from the storage.

PROCON
easiest setupno thin cloning (and no cloning of running VMs)
easy backup: can directly read files, “only” need to shut down machines for consistent vdiskssneak peek into part 2: poor performance when compared with the other options
The way OCFS repositories work is by creating a cluster filesystem on a shared LUN (either iSCSI or Fibre Channel) across all nodes. So obviously you will need that LUN first and all the rest will be taken care of by the OVM manager when you create a new repository. The cluster file system allows all nodes in the server pool to access the same files at the same time and OCFS also provides a few features like reflink based think cloning of virtual disks. This comes at a small price of some added overhead and the other risk is that a problem with the cluster file system will affect all the files and VMs depending on it at the same time. I will leave the discussion of iSCSI vs FC out of this post since this will most likely depend on your existing infrastructure.

PROCON
thin cloning (based on reflinks)backup requires setup of NFS export of fs
somewhat easy setup (LUNs only need to be setup once)resize (add storage) is annoying
The final option available is to use physical disks. The term may be a bit misleading since these disks are just as physical or virtual as the others. Also, in a server pool, these cannot be disks local to any of the OVM servers since those could only be accessed from that one server which prevents VMs from failing over or being migrated to another server in the pool. So a physical disk in a server pool is a LUN (either iSCSI or Fibre Channel) on a SAN that is directly mapped to a virtual machine without a layer of OCFS in between. Creating these physical disks require new LUNs to be created and presented through the SAN which can be a number of manual steps. Fortunately, OVM supports storage-connect plugins which can be used to automate these tasks from the OVM manager GUI. Plugins exist for arrays from a number of vendors including EMC, NetApp, Hitachi, Fujitsu and of course also Oracle’s own ZFS storage appliance. I have used physical disks with a generic array before but that was a big pain and I highly recommend to using the plugin if one exists for your storage. Not only does it make management of devices easier but it also allows you to use features from your storage array to support thin cloning.

PROCON
zfs based thin cloning (on ZFS SA, other arrays may have similar features)backup either with array tools or by cloning to an nfs or repo (but currently that is not scriptable through cli)
no ocfs or vdisk overhead (more on this in part 2)(re)discovery of LUNs is not always smooth, may depend on setup
nice, easy integrated management from ovmm
In conclusion I decided against NFS for my vdisk storage for two reasons. Performance was much better with all other approaches and the ability to create snapshots of running VMs is the foundation for our backup and recovery strategy. Without consistent snapshots (or clones) of running machines the backup options are limited to regular file-based backups from withing the VM guests or require you to halt the VMs in order to take a backup of the whole machine.
Deciding between repositories and physical disks is a bit more challenging. On one hand, OCFS adds a bit of overhead and one more piece that can break to your setup. On the other hand, adding and rediscovering LUNs can also cause trouble, especially without the storage-connect plugin. Part 2 of this blog will be about benchmarking and comparing these options so one can base the decision on performance aswell as manageability.
What others say about this:

Oracle restart deprecated in 12c


oracle restart deprecated in 12c


The short summary here is: there is nothing new to see. There is just a not in the 12c docs that creates a bit of confusion. But let’s go back one step. This blog post started with (what looked like) a simple question by Christian Antognini:
Without much thinking, I shot from the hip and answered “clusterware / grid infrastructure” but I had to realize later that I really don’t know much about Oracle Restart. First of all, to me Oracle Restart has been just a stripped down installation of the clusterware. You download and install grid infrastructure to use it and in the end you use srvctl to manage your oracle items (listener, asm, databases and services) like in a RAC or RAC one node environment. Just without a real cluster. It may be more complicated than that but that’s how I see it. And that really may not be the whole truth.
My second answer was “it is still there, still works, is even documented. Had I just scrolled up a tiny bit I would have seen a note similar to this one in the 12c database upgrade guide:
Oracle Restart is deprecated in Oracle Database 12c. Oracle Restart is currently restricted to manage single-instance Oracle databases and Oracle ASM instances only, and is subject to desupport in future releases.
And there was my second mistake. I confused deprecated with desupported. I first thought they simply abondoned the name and are now calling it clusterware light or something like that. I really had to google for the word “deprecated” to understand what it really means. I now interpret the note as saying: “Don’t be surprised if a future version of Oracle does not have the Restart feature”. There is no replacement that I know of from Oracle today but I would hope and assume that they would provide an alternative if and when that happens. And if not, we’ll just recycle those good old start/stop scripts that we have relied on before 11.2 came along.
So I guess the real answer to Chris should have been: “Excellent question. There is no alternative for single instances as of today. We may have to go back to our own or 3rd party scripts at some point”. Think more before you tweet. Lesson learned.
Since all this was so confusing (and still is), I decided to clear my head by checking it out and installing Oracle Restart on my lab machine that I had just set up. Just to verify that Restart is still fine. I had already installed the database software and set up a database and listener. Usually, you would install Restart first and the database after that because then DBCA would register with it for you. The process is documented very well in the 12c admin guide.
Download the clusterware from OTN, unzip, and start with runInstaller. I opted to install the grid infrastructure software only and went with the defaults on all other pages, ignoring some warnings. With RAC installs, I prefer to run the grid stuff as a seperate grid user but with this setup, I was lazy and installed and ran as the oracle user.
12c_install_restart_01
I ignored this warning I received because I did not set up an extra group for asmadmin which would make sense if you have seperate accounts for grid and database.
12c_install_restart_02
12c_install_restart_03
Yury Velikanov mentioned in his 12c gi install blog that the installer now offers an option asking for your root password so it could run the root.sh scripts for you. I was a bit disappointed to learn that for some reason I still had to log in as root and run it the old fashioned way. I guess it has to do with me just doing the “Install Grid Infrastructure Software Only” option.
12c_install_restart_04
The output of the root.sh script was nice enough to point me to the script I needed to run to turn this into a true standalone clusterware install for Restart.
[root@ora12c ~]# /u01/app/12.1.0/grid/root.sh 
Performing root user operation for Oracle 12c 

The following environment variables are set as:
    ORACLE_OWNER= oracle
    ORACLE_HOME=  /u01/app/12.1.0/grid

Enter the full pathname of the local bin directory: [/usr/local/bin]: 
The contents of "dbhome" have not changed. No need to overwrite.
The contents of "oraenv" have not changed. No need to overwrite.
The contents of "coraenv" have not changed. No need to overwrite.

Entries will be added to the /etc/oratab file as needed by
Database Configuration Assistant when a database is created
Finished running generic part of root script.
Now product-specific root actions will be performed.

To configure Grid Infrastructure for a Stand-Alone Server run the following command as the root user:
/u01/app/12.1.0/grid/perl/bin/perl -I/u01/app/12.1.0/grid/perl/lib -I/u01/app/12.1.0/grid/crs/install /u01/app/12.1.0/grid/crs/install/roothas.pl


To configure Grid Infrastructure for a Cluster execute the following command as oracle user:
/u01/app/12.1.0/grid/crs/config/config.sh
This command launches the Grid Infrastructure Configuration Wizard. The wizard also supports silent operation, and the parameters can be passed through the response file that is available in the installation media.
And so I executed that script.
[root@ora12c ~]# /u01/app/12.1.0/grid/perl/bin/perl -I/u01/app/12.1.0/grid/perl/lib -I/u01/app/12.1.0/grid/crs/install /u01/app/12.1.0/grid/crs/install/roothas.pl
Using configuration parameter file: /u01/app/12.1.0/grid/crs/install/crsconfig_params
LOCAL ADD MODE 
Creating OCR keys for user 'oracle', privgrp 'oinstall'..
Operation successful.
LOCAL ONLY MODE 
Successfully accumulated necessary OCR keys.
Creating OCR keys for user 'root', privgrp 'root'..
Operation successful.
CRS-4664: Node ora12c successfully pinned.
2013/07/02 13:41:04 CLSRSC-330: Adding Clusterware entries to file 'oracle-ohasd.conf'

ora12c     2013/07/02 13:41:26     /u01/app/12.1.0/grid/cdata/ora12c/backup_20130702_134126.olr
2013/07/02 13:42:33 CLSRSC-327: Successfully configured Oracle Grid Infrastructure for a Standalone Server
And if I had done this before creating my database with dbca it would have picked it up automatically and registered for me. But it was too late for that and so I had to add the database and listener manually like this:
[oracle@ora12c ~]$ srvctl add database -db ORCL12 -oraclehome /u01/app/oracle/product/12.1.0/dbhome_1
[oracle@ora12c ~]$ srvctl status database -db ORCL12
Database is not running.
In fact it was running from an earlier manual STARTUP command which srvctl could not know about. So I shut it down manually first and started it again properly through srvctl.
[oracle@ora12c ~]$ sqlplus sys/ as sysdba

SQL*Plus: Release 12.1.0.1.0 Production on Tue Jul 2 13:51:49 2013

Copyright (c) 1982, 2013, Oracle.  All rights reserved.

Enter password: 

Connected to:
Oracle Database 12c Enterprise Edition Release 12.1.0.1.0 - 64bit Production
With the Partitioning, OLAP, Advanced Analytics and Real Application Testing options

SQL> shutdown immediate;
Database closed.
Database dismounted.
ORACLE instance shut down.

[oracle@ora12c ~]$ srvctl start database -db ORCL12
The listener was a similar story, it was already running and adding it generated an error. So I stopped it before adding it to gi. You could also start the listener from the grid home by setting the ORACLE_HOME environment variable to the grid home but I had already configured it in the other home so I just used that.
[oracle@ora12c ~]$ srvctl add listener
PRCN-2061 : Failed to add listener ora.LISTENER.lsnr
PRCN-2065 : Port(s) 1521 are not available on the nodes given
PRCN-2067 : Port 1521 is not available across node(s) "ora12c"

[oracle@ora12c ~]$ lsnrctl stop

LSNRCTL for Linux: Version 12.1.0.1.0 - Production on 02-JUL-2013 13:54:04

Copyright (c) 1991, 2013, Oracle.  All rights reserved.

Connecting to (DESCRIPTION=(ADDRESS=(PROTOCOL=TCP)(HOST=ora12c)(PORT=1521)))
The command completed successfully
[oracle@ora12c ~]$ srvctl add listener -listener LISTENER
[oracle@ora12c ~]$ lsnrctl status
[oracle@ora12c ~]$ srvctl start listener
I verified everything by rebooting the whole server and just as expected the listener and database instance were started automatically after the reboot.

Friday, April 29, 2016

How to Move Oracle VM OCFS2 Repositories Between Server Pools

How to Move Oracle VM OCFS2 Repositories Between Server Pools

The ability to quickly move Oracle VM OCFS2 reporitories between server pools (source and target) is an essential Oracle VM lifecycle operation.  
Prerequisites:
  • You may have to wipe the Oracle VM Manager repository database to be able to successfully complete this operation. If you have never successfully wiped your Oracle VM Manager repository database, and re-discovered resources, BEFORE moving forward confirm that you can indeed successfully wipe the Oracle VM Manager repository database, and recover all the resources. 
  • Before starting the process, the OCFS2 reporitories that will be moved from the source to target server pool should not be mounted by "any" Oracle VM Servers. 
  • The OCFS2 repositories should only be zoned and masked to the target Oracle VM Servers. 

1) This step is optional/informational. This step is only done on one dom0 to confirm cluster IDs. Once we have the correct cluster ID, for a sanity check, we list the old repositories cluster ID.
a) from only one dom0, as root, confirm the target pools cluster ID:
# o2cluster -o /dev/mapper/<the poolfs>
Write down the cluster ID from the new pool.
b) from only one dom0, as root, confirm the previous pool's cluster ID (the repositories will have the previous pool's cluster ID):
# o2cluster -o /dev/mapper/<wwid of existing repo1>
# o2cluster -o /dev/mapper/<wwid of existing repo2>
# o2cluster -o /dev/mapper/<wwid of existing repo3>
2) from only one dom0, as root, fsck.ocfs2 each repository (select Y, that's it!):
# fsck.ocfs2 /dev/mapper/UUID
fsck.ocfs2 1.8.2
[RECOVER_CLUSTER_INFO] The running cluster is using the o2cb stack
with the cluster name ce53582811c386e9, but the filesystem is configured for
the o2cb stack with the cluster name 76e9713d2092bfe6. Thus, fsck.ocfs2 cannot
determine whether the filesystem is in use or not. This utility can
reconfigure the filesystem to use the currently running cluster configuration.
DANGER: YOU MUST BE ABSOLUTELY SURE THAT NO OTHER NODE IS USING THIS
FILESYSTEM BEFORE MODIFYING ITS CLUSTER CONFIGURATION.
Recover cluster configuration information the running cluster? <n> y
Checking OCFS2 filesystem in /dev/mapper/36000d31000394200000000000000004e:
  Label:              OVS40ce40cbe9d1e
  UUID:               0004FB000005000092940CE40CBE9D1E
  Number of blocks:   402653184
  Block size:         4096
  Number of clusters: 1572864
  Cluster size:       1048576
  Number of slots:    32

/dev/mapper/36000d31000394200000000000000004e wasn't cleanly unmounted by all nodes.  Attempting to replay the journals for nodes that didn't unmount cleanly
Checking each slot's journal.
Replaying slot 0's journal.
Slot 0's journal replayed successfully.
/dev/mapper/36000d31000394200000000000000004e is clean.  It will be checked after 20 additional mounts.
Slot 0's journal dirty flag removed

Before step 3, confirm if the cluster ID has been reset:
# o2cluster -o /dev/mapper/<wwid of existing repo1>
# o2cluster -o /dev/mapper/<wwid of existing repo2>
# o2cluster -o /dev/mapper/<wwid of existing repo3>

If the correct cluster ID has been set, skip step 3.

3) To set the new pool's cluster ID on the previous repositories, as root, from only one dom0, type the following command for each repo (this will set the correct cluster ID):
# tunefs.ocfs2 --update-cluster-stack /dev/mapper/<wwid from each LUN>
4) Next, on only one of the dom0s, mount each of the repositories and change/confirm that the Oracle VM Manager UUID is correct. You can list the target Oracle VM Manager UUID in the /dev/mapper/<the poolfs>/.poolfs file, i.e. # cat /dev/mapper/<the poolfs>/.poolfs
as well as the Oracle VM Manager GUI, Help => About.
OVS_REPO_MGR_UUID=CORRECT_UUID
Save the change.
5) From the Oracle VM Manager, access the Storage Tab --> Shared File Systems --> Refresh (right click each repository, you can select any server, click "refresh")
6) Next, access the Repositories Tab -> Present each the Pool, confirm that all of the hosts have been added. Next, refresh each repository.
If you receive a message saying there is a mismatch between the repo and pool ID, wipe Oracle VM Manager database repository and rediscover all the objects. The MySQL DB must be wiped to remove bad repository entries. The user friendly names will also need to be restored after the resources have been re-discovered. 
7) The VMs will now all be in the Unassigned Virtual Machines directory. Move to servers and start each VM

How to wipe the Oracle VM Manager MYSQL DB and rediscover all resources:
1) Oracle VM Manager host: Reset the Oracle VM Manager Database Repository. As root, access the Oracle VM Manager host, and drop the Oracle VM Manager Database Repository:
MySQL:
# /u01/app/oracle/ovm-manager-3/bin/ovm_upgrade.sh --deletedb --dbhost=localhost --dbtype=MySQL --dbport=49500 --dbsid=ovs --dbuser=ovs --dbpass=PASSWORD
Note: Substitute PASSWORD with the admin password.
SE or EE Database:
# /u01/app/oracle/ovm-manager-3/bin/ovm_upgrade.sh --dbhost=localhost --dbport=1521 --dbsid=MYSID --dbuser=ovs --dbpass=PASSWORD --deletedb
Note: Substitute localhost with the hostname, i.e. localhost or the host name of the DB server, MYSID with the Database SID, PASSWORD with the Database SYS password.
2) Oracle VM Manager Hosts: As root, access the Oracle VM Manager host, and stop and start the ovmm service:
# service ovmm stop && service ovmm start
3) Oracle VM Manager GUI: From the Oracle VM Manager Servers and VMs page, discover the Oracle VM Servers. 
Note: Up to Oracle VM Release 3.2.7 discover all the Oracle VM Servers. Oracle VM Release 3.2.8 only discover one Oracle VM Server.
4) Oracle VM Manager GUI: From the Oracle VM Manager Repositories page, refresh each storage repository, i.e. right click each repository, and click refresh.
5) Oracle VM Manager GUI: From the Servers and VMs page, rediscover each Oracle VM Server.
6) Oracle VM Manager GUI: From the Networking => Virtual NIC page, create new MAC addresses. Only the MAC addresses in use will be re-discovered. 

Wednesday, April 27, 2016

Copying Virtual Machines between repositories in Oracle VM for x86

Copying Virtual Machines between repositories in Oracle VM for x86

Back in the days of OVM 2.x, the repository filesystem structure was somewhat collapsed from what it looks like these days in 3.x.  It was much simpler to copy whole VM’s from one repository to another because the files were all in the same folder.  Today, the easiest way to move VM’s between repositories is to present both repo’s to the same pool (if they aren’t already), power off the VM and migrate it.  Voila!

Yeah- so what if I have two pools and I’m having problems getting both repo’s presented to the same pool?  Normally the way I’d handle this is by using an NFS repo as the go-between.  Create an NFS share and make a repository on top of it, then present it to both the source and target pools.  That’s one of the cool things about NFS repo’s is that you can have them presented to more than one server pool at a time unlike block based storage repo’s (Fiber Channel or iSCSI).  This is due to the nature of the OCFS2 filesystem and underlying clusterware mechanisms that don’t like repo’s from other clusters muscling in on their territory.  So the path there would be power off the VM, migrate it to the NFS repo in source pool.  Then go to the target pool and migrate the VM from the NFS repo into the target pool’s persistent repository whether that be Fiber Channel, iSCSI or even local disk on the OVM server.  Again- Voila!
Ok, but I don’t have NFS or don’t want to do it that way or just plain can’t do it that way form one reason or another.  So be stubborn then!  Below is the process that I followed recently with a customer to copy the VM files themselves from one repository to another.  In my case, the customer had 2 repositories sitting on Fiber Channel disk.  One repo used to belong to a server pool that had it’s pool filesystem sitting on an NFS share that inadvertantly got deleted out from under the pool.  Bad mojo there… Anyway I was having a heck of a time getting the repo presented to the new pool because OVM Mangler thought the repo was still part of the pool that now has no pool filesystem.  The pool filesystem’s job among other things is to help keep track of what is presented where and how.  Remember- the pool filesystem was whacked.  I’ll let that sink in for a bit.
Anyway- I was able to re-signature the OCFS2 filesystem and put the new cluster stamp on it so I could at least mount it on a server in my target pool where I wanted the VM’s to wind up.  I still couldn’t present the repository to the pool in OVM Manager due to the previously mentioned pool filesystem tom foolery that took place.  Regardless, it got me far enough to do what I need.  Keep in mind- I could have just copied the files across the network and not messed about with all this re-signaturing nonsense, but we’re talking about hundreds of gigs here and that would take too long for my impatienceness.
Here’s a high level outline of the steps I took to make this all work:
  • Make sure all VM’s to be moved are powered off
  • Take note of the following items for each VM (either from OVM Manager or the CLI) and put them into a notepad session
    • VM UUID (Servers and VM’s tab – Source Pool – Virtual Machines.  Click on the down arrow to expand the VM’s info)
    • VM Disk UUID’s (same place as above)
    • VM Disk names
    • Current Repository UUID (Repositories tab – Source Repository – info)
    • Page83 ID of the current repository LUN (see my post here on mapping physical disks in OVM to their page83 SCSI ID using OVM CLI)
  • create a folder in the target repository that matches the UUID of the VM you’ll be copying
mkdir /OVS/Repositories/{UUID of Target Repository}/VirtualMachines/{VM UUID}
  • make sure the source repository LUN is presented to all servers in the target pool from the SAN.  Also make sure you can see it in the output of fdisk -l or multipath -ll (if you’re using multipathing).
  • If necessary, resignature the repository LUN’s OCFS2 filesystem with the cluster ID of the target pool (do this from a server in the target pool)
fsck.ocfs2 /dev/mapper/{page83 ID of source repository LUN}

tunefs.ocfs2 --update-cluster-stack /dev/mapper/{page83 ID of source repository LUN}
  • mount the source repository on a server that belongs to the target pool and has that pool’s repository already mounted.  I use the /mnt mountpoint
  • copy the vm.cfg from the source repository to the destination repository
cp /mnt/VirtualMachines/{UUID of VM to copy}/vm.cfg /OVS/Repositories/{UUID of target Repository}/VirtualMachines/{UUID of VM to copy}
  • copy all the Virtual Disks for the VM from the source repository to the target repository.  Note the –sparse=always flag: this is used so that when you copy the files they don’t get inflated to their full size in the target repo.  I’m assuming you gave the VM thin provisioned disks (or sparse disks as OVM refers to them as) to begin with.
cp --sparse=always /mnt/VirtualDisks/{UUID of virtual disk(s) in VM}.img /OVS/Repositories/{UUID of target Repository}/VirtualDisks/
Here’s where things can go sideways.  Make sure you write down or copy into a notepad session the information I had you note before.  You’re going to create new UUID’s for the VM itself as well as all the virtual disks contained in that VM.  Pay attention and go slow!
  • Create a new UUID for the VM’s identity and for each virtual disk that belongs to the VM
# uuidgen -r
18286ea4-55d7-424f-9c9b-6d250e64daee
{repeat for each virtual disk and write each one down}
  • cd into the target repository
  • cd into the VirtualDisks folder
  • for each disk that belongs to the VM, rename the virtual disk from it’s original UUID to the new one you just created.  Note which UUID you used and map the old one to the new one in your notepad session for later.
  • make a backup of the vm.cfg file (put it in another folder not the current one)
  • open the vm.cfg file in the target repository (OVS/Repositories/{UUID}/VirtualMachines/{UUID of VM}/vm.cfg)
  • Locate the line that begins with “disk = [“.  This is the listing of all the virtual disks assigned to this VM.  You will need to modify each disk entry to reflect the following:
    • change the UUID of  the repository so it points to the target repo not the source (/OVS/Repositories/{UUID})
    • change the UUID of the disk file to reflect the new UUID you created a few steps earlier (/OVS/Repositories/{UUID}/VirtualDisks/{new UUID of virtual disk})
  • Locate the line that starts with “name = ”
    • Replace the current contents of this field with the UUID that you generated earlier for the VM’s identity.  Note that you’ll have to strip out all of the dashes for this field.
  • Locate the line that starts with “uuid = ”
    • Replace the current contents of this field with the UUID that you generated earlier for the VM’s identity.  In this field, you will leave the dashes intact as they are.
  • Write the file out to disk
  • cd to the target repository
  • cd to the VirtualMachines folder
  • rename the old UUID of the VM to the new one you created
mv {old UUID} {new UUID}
  • At this point, you should be able to go into the OVM Mangler interface and navigate to the repository tab
  • locate the target repository and refresh it
  • go to the Servers and VM’s tab
  • look in the Unassigned Virtual Machines folder and you should see the VM you copied
  • edit the VM and rename the virtual disk names to what they used to be in the source repo.  You will be renaming them from something like 18286ea455d7424f9c9b6d250e64daee.img to rootdisk_OS or whatever your disks were named before.  Use your notepad to fill in the details.
  • migrate the VM to the target pool
  • power on the VM
  • bask in your awesomeness for having done everything right the first time
OR
  • look at whatever error messages are thrown at you and observe your typo’s so you can fix them:).


Thursday, April 14, 2016

How is Network Bonding Used in Oracle VM?

How is Network Bonding Used in Oracle VM?

Network bonding refers to the combination of network interfaces on one host for redundancy and/or increased throughput. Redundancy is the key factor, it is desirable to protect the entire virtualized environment from loss of service due to failure of a single physical link. This network bonding is the same as the Linux network bonding or Oracle Solaris data link aggregation. Using network bonding in Oracle VM may require some switch configuration.
Important
While Oracle VM Manager uses the Linux terminology for network bonds, Oracle Solaris users should understand this to be equivalent to data link aggregation.
In Oracle VM, there are three modes of network bonding:
  • Active Backup or Active-Passive (mode 1): There is one NIC active while another NIC is asleep. If the active NIC goes down, another NIC becomes active. While this mode does not increase throughput, it provides redundancy in case of failure. Active Backup is a safe option if you intend to make use of VLANs.
  • Dynamic Link Aggregation or Link Aggregation (mode 4): Aggregated NICs act as one NIC which results in a higher throughput, but also provides failover in the case that a NIC fails. Dynamic Link Aggregation requires a switch that supports IEEE 802.3ad. Dynamic Link Aggregation is the preferred mode of network bonding, but requires that the network is configured correctly on the switch. Furthermore, you should be aware that there are significant cabling requirements. An initial guideline is that all of the Ethernet ports aggregated into a single bond using this bonding mode must be connected to the same switch.
  • Adaptive Load Balancing or Load-Balanced (mode 6): The network traffic is equally balanced over the NICs of the machine and failover is also supported to provide redundancy. Unlike Dynamic Link Aggregation, Adaptive Load Balancing does not require any particular switch configuration. Adaptive Load Balancing is only supported in x86 environments. Adaptive Load Balancing may not work correctly with VLAN traffic.
Note
Adaptive Load Balancing (mode 6) is currently not supported for SPARC servers.

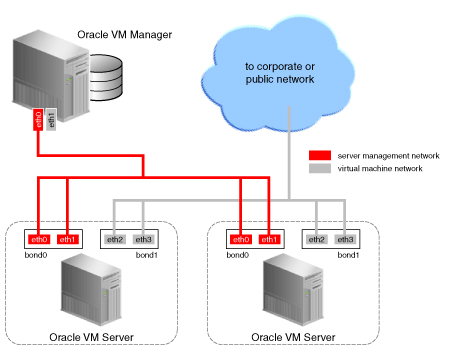
Figure 5.2 Network bonding
This figure illustrates network bonding.

During installation of Oracle VM Server, the network interface (selected when prompted for the management port) is configured as a bonded interface. The bond is created with only one interface. This is done because the reconfiguration of the management interface on the Oracle VM Servers is not supported. You can add a second interface to the already existing bond device without affecting the configuration of the original interface. This is illustrated in Figure 5.2, “Network bonding”, where a second network interface is added to bond0, the network bond created during installation. By default, the bond mode is set to Active Backup for the management network.
Figure 5.2, “Network bonding” also illustrates the configuration of a second bonded interface, bond1, which can be used for other network usage, such as the virtual machine channel. Separation of network functions into different channels is discussed in more detail in Section 5.6, “How are Network Functions Separated in Oracle VM?”.
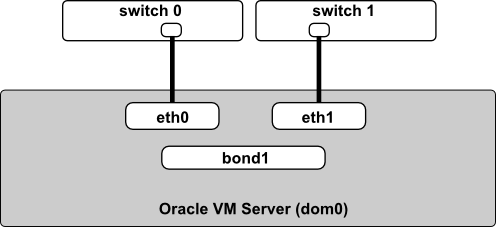
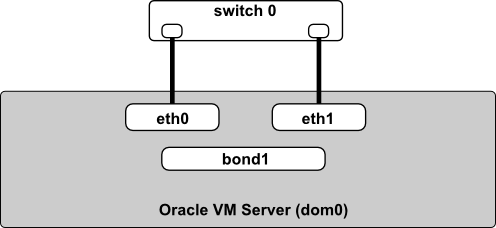
It is important to understand that the actual cabling of Ethernet interfaces is important when using network bonds. If you are using Active Backup (mode 1) or Adaptive Load Balancing (mode 6), the Ethernet ports can be connected to alternate switches as shown in Figure 5.3, “Network bonding for modes 1 and 6”. On the other hand, if you are using Dynamic Link Aggregation (mode 4), the Ethernet ports must be cabled to the same switch, which is configured for dynamic link aggregation (IEEE 802.3ad). This is illustrated in Figure 5.4, “Network bonding for mode 4”.

Figure 5.3 Network bonding for modes 1 and 6
This figure illustrates network cabling to switches for bonding modes 1 and 6. The Ethernet ports that make up the bond can be cabled to alternate switches.


Figure 5.4 Network bonding for mode 4
This figure illustrates network cabling to switches for bonding mode 4. The Ethernet ports that make up the bond must be cabled to the same switch, which is configured for dynamic link aggregation (IEEE 802.3ad).

For more information on configuring bonds in Oracle VM, see Bond Ports Perspective in the Oracle VM Manager User's Guide.

  DAILY CHECKLIST Oracle Database instance is running or not select name,open_mode from V$database; Note: Check the Oracle databases are ru...