Wednesday, April 13, 2016

How to add ISCSI storage array to OVM ?

How to add ISCSI storage array to OVM ?

Oracle VM storage mechanisms uses oracle storage connect plug-ins. Oracle provides two type of generic plugins along with oracle VM software. One is Storage array plugin that  used to connect  block level storage and the second one is  a filesystem plugin that is used to connect network filesystem based storage.These plugins will just help you to detect the storage LUNS . You can’t resize the LUNS from oracle VM manager unless you have storage plugins from respective storage vendors. For an example , if you want to connect to EMC storage , you need to get the storage plugins from EMC for oracle VM server. So that you can create a LUN, modify the LUN size and configure the access group.
Here we will see how to add the ISCSI storage array to oracle VM and how to provide the access to oracle VM servers for storage.
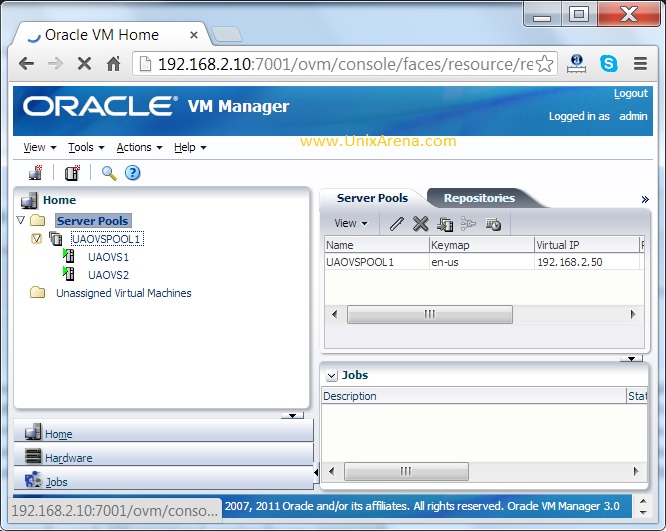
1.Login to oracle VM console.Here i have UAOVS1 and UAOVS2 oracle VM server have been configured on server pool.

Login to OVM console

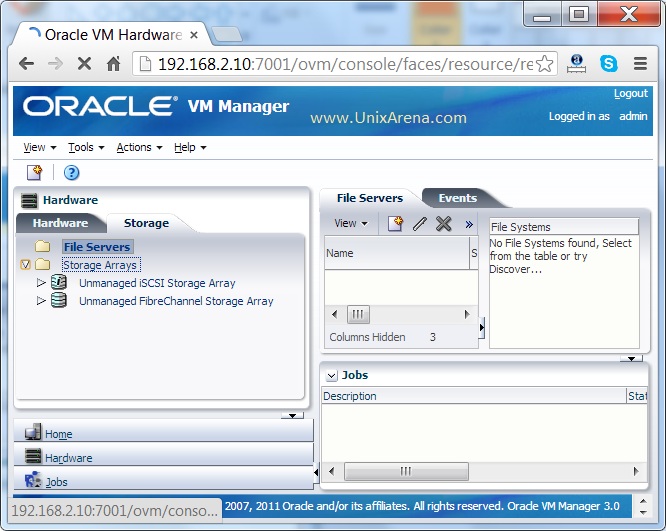
2.Click on the hardware tab and select the storage tab.

OVM Storage tab
OVM Storage tab

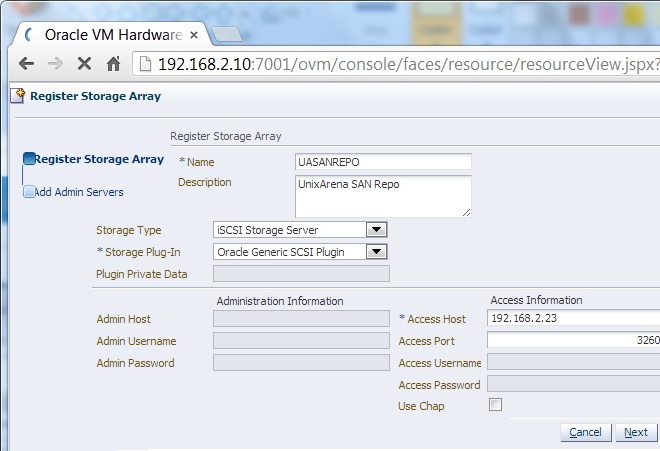
3.In the above screen , you can see two default generic storage array plugins. One is for ISCSI storage and another one is for FC SAN.Right Click on the “Storage array” and register the new storage. It will open below wizard.
  • Storage Array Name – UASANREPO
  • Storage Type – ISCSI storage server.
  • ISCSI server IP – 192.168.2.23.
  • Default ISCSI port :3260

Registering new ISCSI array

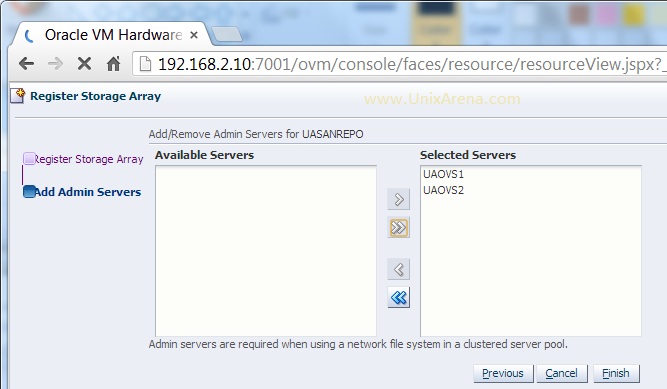
4.Add the OVS server to administrate this storage.

Select the admin servers

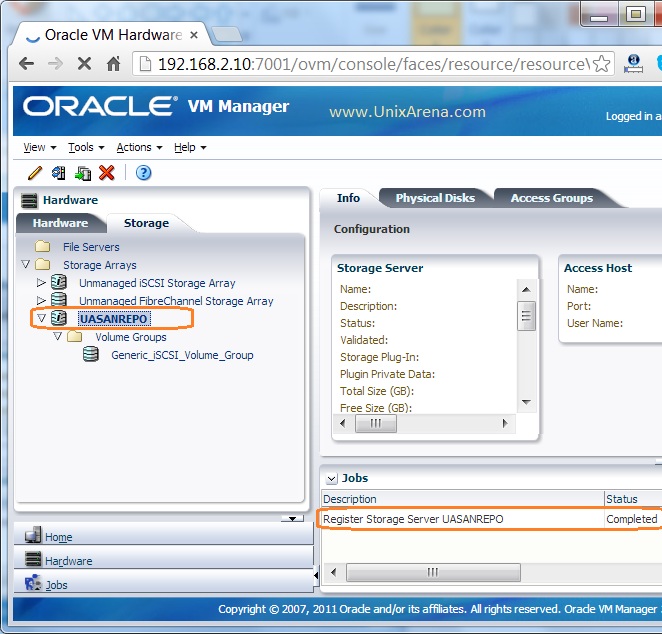
5.Once you have finished the above wizard, you can see new ISCSI storage array has been added to the oracle  VM manager.

ISCSI Storage Array Added

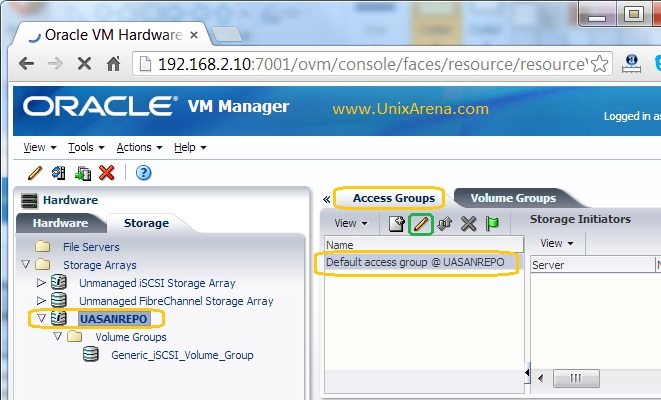
6.Click on the “UASANREPO” and select the access group tab to provide the access to Oracle VM servers’s  iqn number.Click on the Default access group and select edit.

Edit the access group

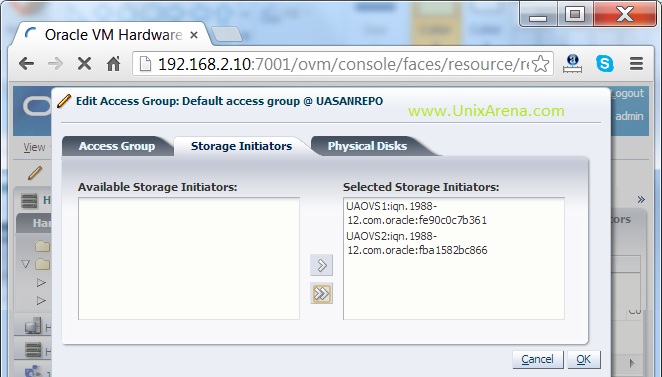
7.Add the oracle VM server’s storage initiators to the access group. You can see that one initiator from UAOVS1 oracle VM server and another one from UAOVS2 oracle VM server.I have given access to both the box.

Add the servers  storage initiators for storage access
Add the servers storage initiators for storage access

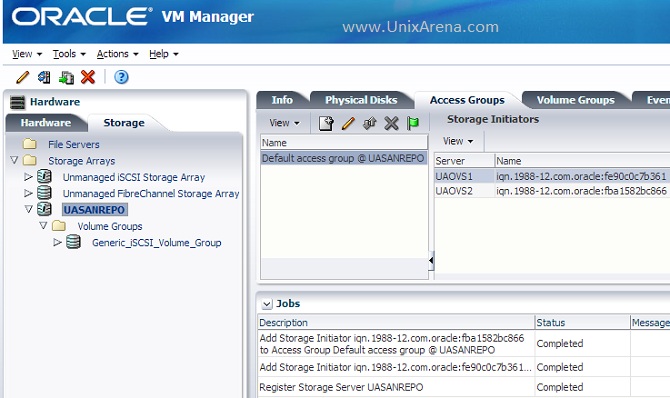
8.Once the initiators are added, You can see the storage initiators like the below snap.

Storage initiator has been added to OVS server

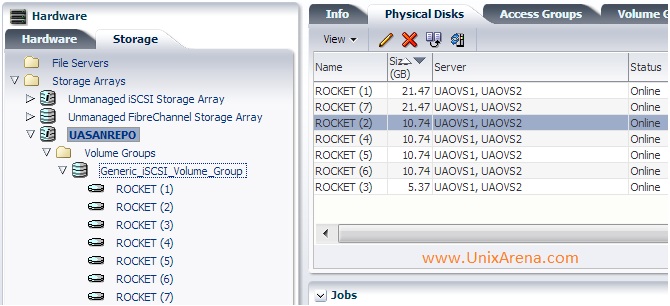
9.You can click on the physical disks tab to see the LUNS which are provisioned from ISCSI server.

ISCSI storage LUNS
ISCSI storage LUNS

We have successfully added the ISCSI storage server to oracle VM server. These storage LUNS will be used for various purpose on the oracle VM server. You can use these LUNS for virtual machine storage, creating the repositories, cluster configuration storage,creating the virtual disks and assigning the raw LUNs to virtual machine.
Hope this article is informative to you .
Share it ! Comment it !! Be Sociable !!!

Monday, April 11, 2016

Disable/Enable Automatic Startup Oracle HAS

Disable/Enable Automatic Startup Oracle HAS

On 11gR2, Oracle Clusterware consists of two separate stacks: an upper stack anchored by the Cluster Ready Services (CRS) daemon (crsd) and a lower stack anchored by the Oracle High Availability Services daemon (ohasd).

So.. How to disable/enable Oracle HAS.
Use the crsctl disable has command to disable automatic startup of the Oracle High Availability Services stack when the server boots up.
# crsctl config has
CRS-4622: Oracle High Availability Services autostart is enabled.
How to know Oracle HAS is enabled(if doesn't use "crsctl config has")
# cat /etc/oracle/scls_scr/rhel5-test/root/ohasdstr
enable

# crsctl disable has
CRS-4621: Oracle High Availability Services autostart is disabled.

# crsctl config has
CRS-4621: Oracle High Availability Services autostart is disabled.

# cat /etc/oracle/scls_scr/rhel5-test/root/ohasdstr
disable
Use the crsctl enable has command to enable automatic startup of the Oracle High Availability Services stack when the server boots up.
# crsctl enable has
CRS-4622: Oracle High Availability Services autostart is enabled.

# cat /etc/oracle/scls_scr/rhel5-test/root/ohasdstr
enable
If We just check HAS Disable/Enable status, that uses "crsctl config has" command, it's easier than "ohasdstr" file checking.

How about "crsctl disable/enable crs" on 11gR2?
They disable/enable automatic startup of Oracle HAS.

I posted "check enable/disable the startup of CRS".. that show Oracle Clusterware version <= 11gR1, we can check from "crsstart" file. On 11gR2, crsstart file is not used ??? 

Use the crsctl disable crs command to prevent the automatic startup of Oracle High Availability Services when the server boots.


Use the crsctl enable crs command to enable automatic startup of Oracle High Availability Services when the server boots.
# crsctl config has
CRS-4622: Oracle High Availability Services autostart is enabled.

# crsctl config crs
CRS-4622: Oracle High Availability Services autostart is enabled.

# ls -ltr /etc/oracle/scls_scr/rhel5-test/root/
-rw-r--r-- 1 root root 7 Sep 7 00:56 crsstart
-rw-r--r-- 1 root oinstall 5 Nov 22 17:04 ohasdrun
-rw-r--r-- 1 root oinstall 7 Nov 22 17:10 ohasdstr
# cat /etc/oracle/scls_scr/rhel5-test/root/crsstart
enable

# cat /etc/oracle/scls_scr/rhel5-test/root/ohasdstr
enable

# crsctl disable crs
CRS-4621: Oracle High Availability Services autostart is disabled.

# crsctl config crs
CRS-4621: Oracle High Availability Services autostart is disabled.

# crsctl config has
CRS-4621: Oracle High Availability Services autostart is disabled.

# ls -ltr /etc/oracle/scls_scr/rhel5-test/root/
-rw-r--r-- 1 root root 7 Sep 7 00:56 crsstart
-rw-r--r-- 1 root oinstall 5 Nov 22 17:04 ohasdrun
-rw-r--r-- 1 root oinstall 8 Nov 22 17:12 ohasdstr

# cat /etc/oracle/scls_scr/rhel5-test/root/crsstart
enable

# cat /etc/oracle/scls_scr/rhel5-test/root/ohasdstr
disable
However, check CRSCTL Utility Reference

4 COMMENTS:

Coskan Gundogar said...
Hi Surachart,

Is there a typo or am I missing something. I am expecting

cat /etc/oracle/scls_scr/rhel5-test/root/crsstart
disable

for the last execution because you disable it but your post says it is

cat /etc/oracle/scls_scr/rhel5-test/root/crsstart
enable

Am I missing something ?
Surachart said...
Thank You for your commend.

I'll check again...

But In my Test System, It's "enable" status in /etc/oracle/scls_scr/rhel5-test/root/crsstart file.
Surachart said...
Hi Again...

After test installation Grid Infrastructure for a Standalone Server (solaris)

$ crsctl check has
CRS-4638: Oracle High Availability Services is online

$ crsctl config has
CRS-4622: Oracle High Availability Services autostart is enabled.

$ cat /var/opt/oracle/scls_scr/sundb/root/crsstart
enable

$ cat /var/opt/oracle/scls_scr/sundb/oracle/ohasdstr
enable

$ crsctl disable has
CRS-4621: Oracle High Availability Services autostart is disabled.

$ cat /var/opt/oracle/scls_scr/sundb/root/crsstart
enable

$ cat /var/opt/oracle/scls_scr/sundb/oracle/ohasdstr
disable

$ crsctl enable has
CRS-4622: Oracle High Availability Services autostart is enabled.

$ cat /var/opt/oracle/scls_scr/sundb/root/crsstart
enable

$ cat /var/opt/oracle/scls_scr/sundb/oracle/ohasdstr
enable

That show... crsstart file not use anymore...

and if uses Grid Infrastructure for a Standalone Server "crsctl ... crs" can not use ...

$ crsctl disable crs
CRS-4013: This command is not supported in a single-node configuration.
CRS-4000: Command Disable failed, or completed with errors.

Wednesday, April 6, 2016

How to Set SSH Login Email Alerts in Linux Server

How to Set SSH Login Email Alerts in Linux Server

To carry out this tutorial, you must have root level access on the server and a little knowledge of nanoor vi editor and also mailx (Mail Client) installed on the server to send the emails. depending upon your distribution you can install mailx client using one of the following commands.
On Debian/Ubuntu/Linux Mint
# apt-get install mailx
On RHEL/CentOS/Fedora
# yum install mailx

Set SSH Root Login Email Alerts

Now login as root user and go to root’s home directory by typing cd /root command.
# cd /root
Next, add an entry to the .bashrc file. This file sets local environment variables to the users and does some login tasks. For example, here we setting a an email login alert.
Open .bashrc file with vi or nano editor. Please remember .bashrc is a hidden file, you won’t see it by doing ls -l command. You’ve to use -a flag to see hidden files in Linux.
# vi .bashrc
Add the following whole line at the bottom of the file. Make sure to replace “ServerName” with ahostname of your Server and change “your@yourdomain.com” with a your email address.
echo 'ALERT - Root Shell Access (ServerName) on:' `date` `who` | mail -s "Alert: Root Access from `who | cut -d'(' -f2 | cut -d')' -f1`" your@yourdomain.com
Save and close the file and logout and log back in. Once you login via SSH, a .bashrc file by default executed and sends you an email address of the root login alert.
Sample Email Alert
ALERT - Root Shell Access (Database Replica) on: Thu Nov 28 16:59:40 IST 2013 tecmint pts/0 2013-11-28 16:59 (172.16.25.125)

Set SSH Normal User Login Email Alerts

Login as normal user (tecmint) and go to user’s home directory by typing cd /home/tecmint/command.
# cd /home/tecmint
Next, open .bashrc file and add the following line at end of the file. Make sure to replace values as shown above.
echo 'ALERT - Root Shell Access (ServerName) on:' `date` `who` | mail -s "Alert: Root Access from `who | cut -d'(' -f2 | cut -d')' -f1`" your@yourdomain.com
Save and close the file and logout and login again. Once you login back again, a .bashrc file executed and sends you an email address of the user login alert.
This way you can set an email alert on any user to receive login alerts. Just open the user’s .bashrcfile which should located under the user’s home directory (i.e. /home/username/.bashrc) and set the login alerts as described above.

Thursday, March 17, 2016

Install and Configure Nagios On CentOS, RHEL, Scientific Linux 6.5/6.4


Install and Configure Nagios On CentOS, RHEL, Scientific Linux 6.5/6.4

Nagios is an open source software that can be used for network and infrastructure monitoring. Nagios will monitor servers, switches, applications and services. It alerts the System Administrator when something went wrong and also alerts back when the issues has been rectified.
With Nagios you can:
– Monitor your entire IT infrastructure.
– Identify problems before they occur.
– Know immediately when problems arise.
– Share availability data with stakeholders.hypothetical question
– Detect security breaches.
– Plan and budget for IT upgrades.
– Reduce downtime and business losses.
Scenario
In this tutorial i am going to use two systems as mentioned below.

Nagios server:

Operating system : CentOS 6.5 minimal installation
IP Address       : 192.168.1.101/24

Nagios client:

Operating System : Ubuntu 13.04
IP Address       : 192.168.1.100/24
Prerequisites
Before installing Nagios, make sure that you’ve a properly installed and configured LAMP stack in your server. To install and configure LAMP server, refer any one of the following links.
Also install the following prerequisites too. All commands should be run as root user.
# yum install gd gd-devel gcc glibc glibc-common
Install Nagios
I tested this how-to on CentOS 6.5 minimal server, although it should work on all RHEL 6.x and its clones like CentOS 6.x and Scientific Linux 6.x.
Nagios will not be found in CentOS official repositories, so let us add the EPEL repository to install nagios. To add and enable EPEL repository, refer the following link.
Next install nagios with all plug-ins and nagios agents(nrpe-agent) using command:
# yum install nagios*
Note: It worked for me either if i keep SELINUX and iptables enable or disable. All you need to do is allow the apache port through iptables as shown below.
# vi /etc/sysconfig/iptables
Add the following line:
[...]
-A INPUT -m state --state NEW -m tcp -p tcp --dport 80 -j ACCEPT
[...]
Save and close the file. Restart iptables.
# service iptables restart
Configure Nagios
Add the admin mail address in the nagios contact file to receive alerts from nagios server. To do that edit file /etc/nagios/objects/contacts.cfg,
# vi /etc/nagios/objects/contacts.cfg
Find the following line and enter the email id:
[...]
email                           sk@unixmen.com ;
[...
Save and close the file. Then Edit file /etc/httpd/conf.d/nagios.conf,
# vi /etc/httpd/conf.d/nagios.conf
And edit the following lines if you want to access nagios administrative console from a particular IP series. Here i want to allow nagios administrative access from 192.168.1.0/24 series only.
[...]
## Comment Lines 15 & 16 ##
#   Order allow,deny
#   Allow from all
## Uncomment and Change lines 17,18 & 19 as shown below ##
Order deny,allow
Deny from all
Allow from 127.0.0.1 192.168.1.0/24
[...]
Set nagiosadmin password
# htpasswd /etc/nagios/passwd nagiosadmin
New password:
Re-type new password:
Updating password for user nagiosadmin
Start nagios and httpd services and let them to start automatically on every boot.
# service nagios start
# service httpd start
# chkconfig nagios on
# chkconfig httpd on
Access Nagios admin console
Open nagios administrator console with URL http://nagios-server-ip/nagios and enter the username as nagiosadmin and its password which we created in the earlier steps.
New Tab - Mozilla Firefox_001This is how Nagios administrative console looks:
Nagios Core - Mozilla Firefox_002Click on the “Hosts” section in the left pane of the console. You will see the no of hosts to be monitored by Nagios server. Initially, the nagios server (localhost) itself will only be monitored.
Nagios Core - Mozilla Firefox_003Click on the monitoring host to display more details:
Nagios Core - Mozilla Firefox_004

Add Monitoring targets to Nagios server
Now let us add some clients to monitor by Nagios server. To do that we have to install nrpeand nagios-plugins in our monitoring targets.
On CentOS/RHEL/Scientifc Linux clients:
Like i said before, you have to add EPEL repository in your CentOS/RHEL/Scientific Linux 6.x clients to install nrpe package.
Install “nrpe” and “nagios-plugins” packages in client systems to be monitored.
# yum install nrpe nagios-plugins-all openssl
On Debian/Ubuntu clients:
$ sudo apt-get install nagios-nrpe-server nagios-plugins
Configure Monitoring targets
Edit /etc/nagios/nrpe.cfg file,
# vi /etc/nagios/nrpe.cfg
Add your Nagios server ip address
[...]
## Line 81 - Add the Nagios server IP ##
allowed_hosts=127.0.0.1 192.168.1.101
[...]
Start nrpe service:
# service nrpe start
# chkconfig nrpe on
For Debian/Ubuntu Clients, start nrpe service as shown below.
$ sudo /etc/init.d/nagios-nrpe-server restart
Now go back to your Nagios server to add the clients to be monitored through nagios server. Edit “/etc/nagios/nagios.cfg” file,
# vi /etc/nagios/nagios.cfg
and uncomment the following lines.
## Line 52 - Uncomment ##
cfg_dir=/etc/nagios/servers
Create a directory called “servers” under “/etc/nagios/”.
# mkdir /etc/nagios/servers
Create config file to the client to be monitored:
# vi /etc/nagios/servers/clients.cfg
define host{
use                             linux-server
host_name                       client
alias                           client
address                         192.168.1.100
max_check_attempts              5
check_period                    24x7
notification_interval           30
notification_period             24x7
}
Finally restart nagios service.
# service nagios restart
Now open the nagios admin console in the browser and navigate to “Hosts” section in the left pane. You will see the newly added client will be visible there. Click on the host to see if there is anything wrong or alerts.
Nagios Core - Mozilla Firefox_005Click on the monitoring target, you’ll get the detailed output:
Nagios Core - Mozilla Firefox_006Like this way, you can define more clients by creating a separate config files“/etc/nagios/servers directory for each client.
Define services
We did define the monitoring host before. Now let us add some services of the monitoring host. For example to monitor the ssh service, add the following lines shown in red colour in the /etc/nagios/servers/clients.cfg file.
# vi /etc/nagios/servers/clients.cfg
define host{
use                             linux-server
host_name                       client
alias                           client
address                         192.168.1.100
max_check_attempts              5
check_period                    24x7
notification_interval           30
notification_period             24x7
}
define service {
        use                             generic-service
        host_name                       client
        service_description             SSH
        check_command                   check_ssh
        notifications_enabled           0
        }
Save and close the file. Restart Nagios.
# service nagios restart
Now log in to Nagios web console and check for the added services. Navigate to Services section, you’ll see the ssh service there.
Nagios Core - Mozilla Firefox_008To know more about object definitions such as Host definitions, service definitions, contact definitions and more please do visit here. This page will describe you the description and format of all object definitions.
That’s all about now. Good Luck! Stay healthy!
You might want to check Nagios 4 installation on CentOS 7.
Wednesday, March 2, 2016

What is a raw device?

What is a raw device?

Generally when you access(read or write) a device without going through the usual layers, it is considered a "raw" access. For a harddrive, the usual layer would be a filesystem.

When you click "save" to save a file, the writing is handled/organized by the filesystem.

If you do this (as root), 'less /dev/sda', then you will view the raw output of what your harddrive disk looks like.

Raw access to devices is a feature in Linux that can be very powerful, but must be used with care.


Raw by definition means you are not mounting it. It may or may not also mean that the kernel won't buffer/cache/etc data to and from the hardware.

If you mounted /dev/sda or /dev/hda or whatever, then you would see the filesystem on it, like '/' or '/home' or whatever.
If you don't mount it, then you (or a program) can see the bytes that make up the filesystem directly, like the previous poster said.

There is a further (stricter) meaning of 'raw device', too. When you access /dev/sda etc, you're bypassing the kernel's filesystem layers, but you're not bypassing its buffered I/O layers.

Some software (such as I believe Oracle, optionally) thinks it knows better than the kernel how to buffer/optimise disk I/O and lay out data, so it bypasses both layers, and uses other 'raw' devices. These 'raw' devices used to be called /dev/raw[1-8] (see man MAKEDEV), but they're obsolete in kernel 2.6.22.1 according to its kconfig help.

Tuesday, March 1, 2016

How to Resize Root LVM Logical Volume

How to Resize Root LVM Logical Volume

Boot with rescue CD. Skip mounting of the system partitions.

# lvm vgchange -a y
# e2fsck -f /dev/VolGroup00/LogVol00
# resize2fs -f /dev/VolGroup00/LogVol00 10G
# lvm lvreduce -L10G /dev/VolGroup00/LogVol00

Above maybe wrong !!!!!


Example: Removed one LV, and enlarged another LV

# umount /oracle_grid
# df -h
# lvremove /dev/mapper/vg_knaerp01n-lv_oracle_grid
# lvdisplay /dev/mapper/vg_knaerp01n-lv_fra
# man lvextend
# lvextend -L+20G /dev/vg_knaerp01n/lv_fra
# df -h
# umount /fra
# e2fsck -f /dev/vg_knaerp01n/lv_fra
# resize2fs /dev/vg_knaerp01n/lv_fra

# mount /dev/mapper/vg_knaerp01n-lv_fra /fra


Sunday, February 28, 2016

Convert a XenServer HVM domain to PV (paravirtual) and back again


Convert a XenServer HVM domain to PV (paravirtual) and back again


After wading through complicated and poorly organized how-to’s for converting a XenServer HVM domain to PV (paravirtual), I wrote a quick and dirty tool to make the conversion in both directions. I was able to get Debian Lenny 5.0.8 paravirtual domain running without any issues. All memory, CPU, disk, and network stats shows up perfectly in XenCenter, too!
Usage:
[root@vps1a ~]# ./vmtool.pl
Usage: vmtool.pl --cmd (hvmtopv|pvtohvm) ([--vm name-label] or [--uuid uuid]) [--root partition_num]
Here’s an example of it running:
[root@vps1a ~]# ./vmtool.pl --cmd=hvmtopv --vm=c1068vm1
uuid = 7cf68fa6-3d07-0869-fa2d-40c89a724042
cmd = hvmtopv
Changing HVM-boot-policy
Changing PV-args
Setting disk boot flag
***Please update /etc/fstab, /etc/inittab. then reboot VM
Done.
If your root partition is anywhere except the 1st partition on the virtual disk, specify the partition number with the –root argument.
To reverse the process, change the –cmd argument from ‘hvmtopv’ to ‘pvtohvm’.
PV domains can be made into templates within XenCenter, so you don’t have to run the script all the time.
Here are steps to take on your domain after changingtour HVM domain to PV. Make sure to complete these steps (except 4) in HVM mode before rebooting. After the reboot, you can install the Xen tools and reboot again.
1. Install a Xen-aware kernel and make it the default boot option in grub.conf or menu.lst.
2. Update /etc/fstab entries – Example: replace /dev/hda1 with /dev/xvda1, /dev/hdd with /dev/xvdd, ect.
3. Update /etc/inittab – Example: replace tty1 with hvc0 so that the Console works properly
4. Make sure the /boot or / partition (depending on your partition layout) has the boot flag set. THIS IS IMPORTANT!
5. Install the Xen tools from the xs-tools CD so that memory, disk, and network usage appears properly in XenCenter
Get the script here:
It’s a shame that XenServer still caters to the Windows crowd by making HVM domains the default, with no way to easily switch to PV. Hopefully this script makes life easier for someone.

  DAILY CHECKLIST Oracle Database instance is running or not select name,open_mode from V$database; Note: Check the Oracle databases are ru...