Wednesday, August 10, 2016

How To Resize /dev/shm Filesystem In Linux?


By default installation, RHEL and most Linux distributions mount tmpfs (a RAM-based temporarily filesystem) to /dev/shm directory and this temporarily filesystem size is always set to be half of the installed memory.

If that default size is not something expected, you can increase or reduce the /dev/shm filesystem size at wish.

To be even extreme, you may drop or disable this temporarily RAM-based filesystem entirely, to prevent it from auto-mount during system boots up, if none of the application in that Linux server relying on shared memory function or explicitly using tmpfs (as a quick-and-dirty trick to improve execution performance).

To increase or decrease /dev/shm filesystem size

1) Open /etc/fstab with vi or any text editor of your choice,

2) Locate the line of /dev/shm and use the tmpfs size option to specify your expected size,

e.g. 512MB:
tmpfs      /dev/shm      tmpfs   defaults,size=512m   0   0

e.g. 2GB:
tmpfs      /dev/shm      tmpfs   defaults,size=2g   0   0

The /etc/fstab content format is documented in man fstaband the tmpfs filesystem options can be found in man mount

3) To make change effective immediately, run this mount command to remount the /dev/shm filesystem:
mount -o remount /dev/shm

To disable the /dev/shm or tmpfs filesystem
Actually, Linux allocates the memory for this tmpfs on demand basis, up to the maximum size that shown in df -h command output. If none of the application is using the /dev/shm, this tmpfs in fact does not consume any memory space. So, why have to disable it?

To disable /dev/shm immediately once only (but enable it on subsequent reboots), just execute the umount command:
umount /dev/shm

To prevent tmpfs from auto-mount each time the Linux boots up, just remark or delete that line from /etc/fstab.

Tuesday, July 26, 2016

Increasing Processes, Sessions and Transactions in Oracle XE

Increasing Processes, Sessions and Transactions in Oracle XE

Out of the box, Oracle Database 10g Express Edition RDBMS is fast and powerful. The stated limitations of 2GB of maximum RAM usage and 2GB of total datafile management are plentiful for it to easily run as the back-end for a small to medium-sized office application.
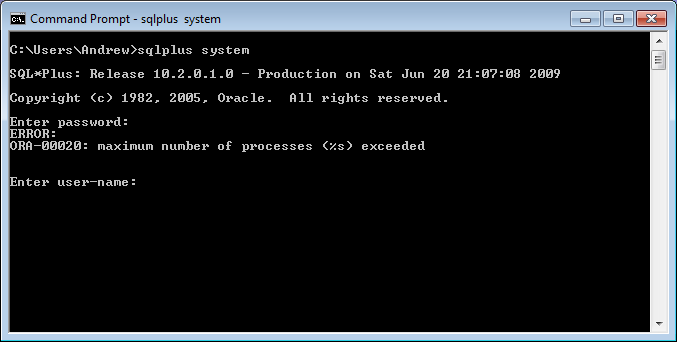
However, we soon hit a connection limit as characterised by the following Oracle Errors:
ORA-12516: TNS:listener could not find available handler with matching protocol stack

ORA-00020: maximum number of processes (%s) exceeded
We can get this second message because Oracle creates Operating System processes to handle Connections (or Sessions) - which means Processes, Sessions (and as we'll soon see..) Transactions are all related.
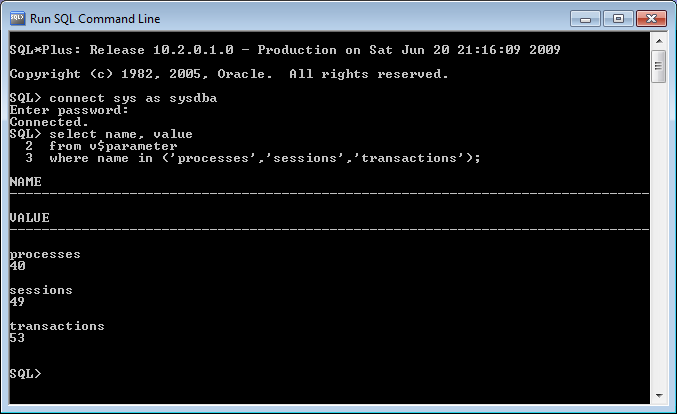
The default values in Oracle XE for these parameters are:
  • Processes = 40
  • Sessions = 49
  • Transactions = 53
I was able to generate the above error message (ORA-00020) from about ~30 connections on a vanilla Oracle XE installation (on Windows 7).
So, let's increase these limits to allow more connections to our Oracle Server..

1. Log in as SYSDBA

From the menu 'Oracle Database 10g Express Edition', find and select 'Run SQL Command Line', then type:
connect sys as sysdba
and enter your SYS, or SYSTEM password at the prompt
Oracle XE - Connected as SYSDBA, showing default values for processes, sessions and transactions

2. ALTER SYSTEM commands

Update: The Oracle XE 10g documentation links below were broken, so they now point to the Oracle 11g R2 Standard Edition documentation instead - note that the default values are greater in 11g R2 Standard than the Express Edition (XE).
The Oracle Documentation states that TRANSACTIONS is derived from SESSIONS, which in turn is derived fromPROCESSES, thus:
PROCESSES = 40 to Operating System Dependant
SESSIONS = (1.1 * PROCESSES) + 5
TRANSACTIONS = 1.1 * SESSIONS
So, what value to start with for PROCESSES?  Trebling it is as good a start as any, then I'd add a few more for good measure..  Here are the values I recommend:
  • PROCESSES = 150
  • SESSIONS = 300
  • TRANSACTIONS = 330
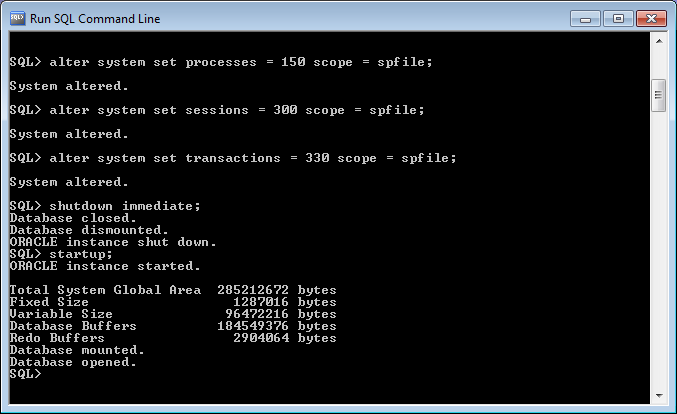
type the following commands:
alter system set processes = 150 scope = spfile;

alter system set sessions = 300 scope = spfile;

alter system set transactions = 330 scope = spfile;
then to make the settings take effect, we need to bounce the database..
shutdown immediate;

startup;
OracleXE - alter system commands and restarting the database

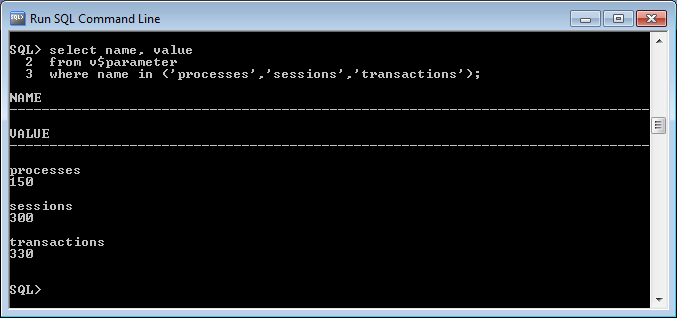
3. Verify the new parameters

with this simple select statement..
select name, value  
from v$parameter  
where name in ('processes', 'sessions', 'transactions');
OracleXE - showing updated processes, sessions and transactions

How Do I Access or Mount Windows/USB NTFS Partition in RHEL/CentOS/Fedora

How Do I Access or Mount Windows/USB NTFS Partition in RHEL/CentOS/Fedora

Wednesday, June 22, 2016

Oracle HAS setup after Hostname and IP change

Oracle HAS setup after Hostname and IP change


On my laptop, I have my virtual machines for oracle ASM and oracle RAC. I cloned one of the ASM single instance virtual machine and changed its hostname and IP address to a new one. After I made the change the database and the asm instance did not start. I learned that I had to reconfigure the Oracle High Availability Services. It is true even if you have a stand alone installation. lets see how it works…
How to Reconfigure Oracle Restart [ID 986740.1]
BEFORE the change of hostname and IP

[oracle@rhel5 ~]$ srvctl config asm
ASM home: /oracle/app/oracle/product/11.2.0/grid
ASM listener: LISTENER
Spfile: /oracle/app/oracle/product/11.2.0/grid/dbs/spfile+ASM.ora
ASM diskgroup discovery string:
[oracle@rhel5 ~]$ srvctl config listener
Name: LISTENER
Home: /oracle/app/oracle/product/11.2.0/grid
End points: TCP:1521
[oracle@rhel5 ~]$ srvctl config database
TEST11G
[oracle@rhel5 ~]$ srvctl config database -d TEST11G
Database unique name: TEST11G
Database name: TEST11G
Oracle home: /oracle/app/oracle/product/11.2.0/dbhome_1
Oracle user: oracle
Spfile: +DATA/TEST11G/spfileTEST11G.ora
Domain:
Start options: open
Stop options: immediate
Database role: PRIMARY
Management policy: AUTOMATIC
Database instance: TEST11G
Disk Groups: DATA,FRA
Services:
MAKE  the change of hostname and IP
You can chenge the IP and the hostname for a server using the command gui system-config-network. Also change the /etc/hosts file for the new IP and hostname.

old IP : 192.168.254.128 ----------new IP : 192.168.254.129
old hostname : rhel5       ----------new hostname : stndby
After we reboot the server, we see that HAS features are not functioning properly. High availabilty services has to be reconfigured.

[oracle@stndby ~]$ crsctl check has
CRS-4639: Could not contact Oracle High Availability Services
[oracle@stndby ~]$ srvctl start asm
PRCR-1070 : Failed to check if resource ora.asm is registered
Cannot communicate with crsd
Reconfigure HAS
Goto $GRID_HOME/crs/install directory and run the roothas.pl script for deconfiguration. It has to be run by the root user.

[root@stndby install]# ./roothas.pl -deconfig -force
Using configuration parameter file: ./crsconfig_params
CRS-4639: Could not contact Oracle High Availability Services
CRS-4000: Command Stop failed, or completed with errors.
CRS-4639: Could not contact Oracle High Availability Services
CRS-4000: Command Delete failed, or completed with errors.
CLSU-00100: Operating System function: opendir failed with error data: 2
CLSU-00101: Operating System error message: No such file or directory
CLSU-00103: error location: scrsearch1
CLSU-00104: additional error information: cant open scr home dir scls_scr_getval
CRS-4544: Unable to connect to OHAS
CRS-4000: Command Stop failed, or completed with errors.
Successfully deconfigured Oracle Restart stack

Goto $GRID_HOME/crs/install directory and run the roothas.pl script for reconfiguration. It has to be run by the root user.

[root@stndby install]# ./roothas.pl
Using configuration parameter file: ./crsconfig_params
LOCAL ADD MODE
Creating OCR keys for user 'oracle', privgrp 'dba'..
Operation successful.
LOCAL ONLY MODE
Successfully accumulated necessary OCR keys.
Creating OCR keys for user 'root', privgrp 'root'..
Operation successful.
CRS-4664: Node stndby successfully pinned.
Adding Clusterware entries to inittab


stndby 2013/01/31 04:07:34 /oracle/app/oracle/product/11.2.0/grid/cdata/stndby/backup_20130131_040734.olr
Successfully configured Oracle Grid Infrastructure for a Standalone Server
Now lets check the configuration. As you can see, has has been enabled but the resources are not started, ASM and database are not registered as a resource.

[oracle@stndby ~]$ . .grid_env
[oracle@stndby ~]$ crsctl config has
CRS-4622: Oracle High Availability Services autostart is enabled.
[oracle@stndby ~]$ crs_stat
NAME=ora.cssd
TYPE=ora.cssd.type
TARGET=OFFLINE
STATE=OFFLINE


NAME=ora.diskmon
TYPE=ora.diskmon.type
TARGET=OFFLINE
STATE=OFFLINE


NAME=ora.evmd
TYPE=ora.evm.type
TARGET=ONLINE
STATE=ONLINE on stndby


NAME=ora.ons
TYPE=ora.ons.type
TARGET=OFFLINE
STATE=OFFLINE
Register and start the resources

[oracle@stndby ~]$ crsctl start resource "ora.cssd"
CRS-2672: Attempting to start 'ora.cssd' on 'stndby'
CRS-2672: Attempting to start 'ora.diskmon' on 'stndby'
CRS-2676: Start of 'ora.diskmon' on 'stndby' succeeded
CRS-2676: Start of 'ora.cssd' on 'stndby' succeeded
[oracle@stndby ~]$ crs_stat
NAME=ora.cssd
TYPE=ora.cssd.type
TARGET=ONLINE
STATE=ONLINE on stndby


NAME=ora.diskmon
TYPE=ora.diskmon.type
TARGET=OFFLINE
STATE=OFFLINE


NAME=ora.evmd
TYPE=ora.evm.type
TARGET=ONLINE
STATE=ONLINE on stndby


NAME=ora.ons
TYPE=ora.ons.type
TARGET=OFFLINE
STATE=OFFLINE
lets add the listener as a resource but before we do that we need to change the listening IP of the listener.
before :

[oracle@stndby ~]$ cat /oracle/app/oracle/product/11.2.0/grid/network/admin/listener.ora
LISTENER =
(DESCRIPTION_LIST =
(DESCRIPTION =
(ADDRESS = (PROTOCOL = IPC)(KEY = EXTPROC1521))
(ADDRESS = (PROTOCOL = TCP)(HOST = rhel5)(PORT = 1521))
)
)

after

[oracle@stndby ~]$ cat /oracle/app/oracle/product/11.2.0/grid/network/admin/listener.ora
LISTENER =
(DESCRIPTION_LIST =
(DESCRIPTION =
(ADDRESS = (PROTOCOL = IPC)(KEY = EXTPROC1521))
(ADDRESS = (PROTOCOL = TCP)(HOST = stndby)(PORT = 1521))
)
)
now we can add the listener as a resource and after that we can start it

[oracle@stndby ~]$ srvctl add listener -l LISTENER
[oracle@stndby ~]$ srvctl start listener
[oracle@stndby ~]$ srvctl status listener
Listener LISTENER is enabled
Listener LISTENER is running on node(s): stndby
[oracle@stndby ~]$ crs_stat ora.LISTENER.lsnr
NAME=ora.LISTENER.lsnr
TYPE=ora.listener.type
TARGET=ONLINE
STATE=ONLINE on stndby
now we can add the asm we do not need to create spfile for asm. we can use the one before.

[oracle@stndby ~]$ srvctl add asm -l LISTENER -p "/oracle/app/oracle/product/11.2.0/grid/dbs/spfile+ASM.ora"
[oracle@stndby ~]$ srvctl start asm
[oracle@stndby ~]$ srvctl status asm
ASM is running on stndby

Finally we can add or database TEST11G

[oracle@stndby ~]$ srvctl add database -d TEST11G -o /oracle/app/oracle/product/11.2.0/dbhome_1 -p +DATA/TEST11G/spfileTEST11G.ora -r PRIMARY -s open -t immediate -a "DATA,FRA"
[oracle@stndby ~]$ srvctl start database -d TEST11G
[oracle@stndby ~]$ srvctl status database -d TEST11G
Database is running.
After the addition of all resources

[oracle@stndby ~]$ crs_stat
NAME=ora.DATA.dg
TYPE=ora.diskgroup.type
TARGET=ONLINE
STATE=ONLINE on stndby


NAME=ora.FRA.dg
TYPE=ora.diskgroup.type
TARGET=ONLINE
STATE=ONLINE on stndby


NAME=ora.LISTENER.lsnr
TYPE=ora.listener.type
TARGET=ONLINE
STATE=ONLINE on stndby


NAME=ora.asm
TYPE=ora.asm.type
TARGET=ONLINE
STATE=ONLINE on stndby


NAME=ora.cssd
TYPE=ora.cssd.type
TARGET=ONLINE
STATE=ONLINE on stndby


NAME=ora.diskmon
TYPE=ora.diskmon.type
TARGET=OFFLINE
STATE=OFFLINE


NAME=ora.evmd
TYPE=ora.evm.type
TARGET=ONLINE
STATE=ONLINE on stndby


NAME=ora.ons
TYPE=ora.ons.type
TARGET=OFFLINE
STATE=OFFLINE


NAME=ora.test11g.db
TYPE=ora.database.type
TARGET=ONLINE
STATE=ONLINE on stndby

Thursday, June 16, 2016

Oracle X4-2L and X5-2L

Oracle X4-2L and X5-2L

Set Up the Remote Console

  1. View or establish an IP address for the server SP.To log in to Oracle ILOM remotely using either the command-line interface (CLI) or the web interface, you must know the IP address of the server SP. For instructions on determining the server's IP address, refer to Viewing or Modifying the Service Processor Network Settings in Oracle Server X5-2 Installation Guide .
  2. If you are using a web-based client connection, perform these steps; otherwise go to the next step.
    1. In a web browser, type the IP address for the server SP.
    2. Log in to the Oracle ILOM web interface.The default Oracle ILOM user name is root and the default password is changeme.
      The Oracle ILOM Summary Information page appears.
    3. Redirect the video output from the server to the web client by launching the Oracle ILOM Remote System Console Plus application.
  3. If you are using an SSH client connection, perform these steps.
    1. From a serial console, establish an SSH connection to the server SP. Type: ssh root@hostname, where hostname can be the DNS name or the IP address for the server SP.
    2. Log in to Oracle ILOM.The default Oracle ILOM is root and the password is changeme.
    3. Redirect the serial output from the server to the SSH client. Type:-> start /HOST/console

Wednesday, June 8, 2016

How To Find My Public IP Address From Command Line On a Linux

How To Find My Public IP Address From Command Line On a Linux


Explain IP addresses

An IP is short for Internet Protocol. It is used to identify computers or mobile devices on the Internet. Each device connected to the Internet has an IP address. IP address can be used to personalize information.

Use dig command for determining my public IP address:

  1. Open the Terminal application.
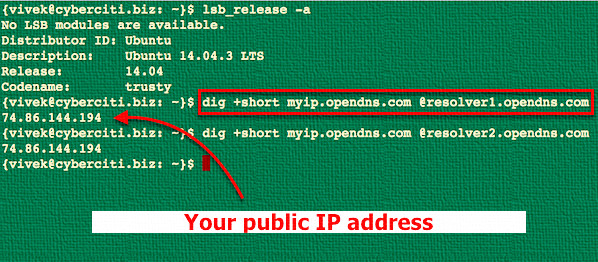
  2. Type the following dig (domain information groper) command on a Linux, OS X, or Unix-like operating systems to see your own public IP address assigned by the ISP:
  3. dig +short myip.opendns.com @resolver1.opendns.com
  4. Or dig TXT +short o-o.myaddr.l.google.com @ns1.google.com
  5. You should see your IP address on screen. This is the fastest way to find out your IP address without using 3rd party site.
Sample outputs:
Fig.01: Use dig command to find your IP address
You can try host command to see the same information:
host myip.opendns.com resolver1.opendns.com
You can also use the Google server to get the same info using dig command:
dig TXT +short o-o.myaddr.l.google.com @ns1.google.com | awk -F'"' '{ print $2}'

How do I store my IP address in a shell variable?

The syntax is:
myip="$(dig +short myip.opendns.com @resolver1.opendns.com)"
echo "My WAN/Public IP address: ${myip}"
Sample outputs:
My WAN/Public IP address: 74.86.144.194

Finding Public/WAN IP address on a router

A few ADSL/Cable router allows you to login to your router using telnet or ssh:
telnet your-router-ip-here
ssh user@your-router-ip-here
telnet 192.168.0.254
ssh admin@192.168.1.254
[admin@dd-wrt ~]#  ifconfig eth1 | grep 'inet addr:' 
[admin@dd-wrt ~]#  ip addr show nas01

Use 3rd party web-sites to get your IP

Please note that I do not recommend following curl/wget method due to security reasons. You have been warned:
curl ifconfig.me
curl icanhazip.com
curl ipecho.net/plain
curl ifconfig.co


Tuesday, May 10, 2016

Oracle VM 3.x: Convert Oracle Linux 6.x PVM guest to a HVM guest (Doc ID 1917613.1)

Oracle VM 3.x: Convert Oracle Linux 6.x PVM guest to a HVM guest (Doc ID 1917613.1)

APPLIES TO:

Oracle VM - Version 3.0.1 and later
x86_64

GOAL

This document descript how to convert an installed PVM guest to a HVM guest.

An Oracle Linux 6.x PVM guest has PV drivers loaded:
[root@ol6vm ~]# lsmod | grep xen
xen_netfront           19533  0
xen_blkfront           17065  4

SOLUTION

1. Append kernel boot argument "xen_emul_unplug=never" in /boot/grub/grub.conf.
Note: This argument is valid under both UEK and RHCK kernels.
Before modification:
[root@ol6vm ~]# grep -v "#" /boot/grub/grub.conf
default=1
timeout=5
splashimage=(hd0,0)/grub/splash.xpm.gz
hiddenmenu
title Oracle Linux Server (2.6.32-279.9.1.el6.x86_64)
    root (hd0,0)
    kernel /vmlinuz-2.6.32-279.9.1.el6.x86_64 ro root=LABEL=/ SYSFONT=latarcyrheb-sun16 LANG=en_US.UTF-8 KEYTABLE=us numa=off crashkernel=auto
    initrd /initramfs-2.6.32-279.9.1.el6.x86_64.img
title Oracle Linux Server (2.6.39-200.32.1.el6uek.x86_64)
    root (hd0,0)
    kernel /vmlinuz-2.6.39-200.32.1.el6uek.x86_64 ro root=LABEL=/ SYSFONT=latarcyrheb-sun16 LANG=en_US.UTF-8 KEYTABLE=us numa=off
    initrd /initramfs-2.6.39-200.32.1.el6uek.x86_64.img
After modification (Blod for highlights):
[root@ol6vm ~]# grep -v "#" /boot/grub/grub.conf
default=1
timeout=5
splashimage=(hd0,0)/grub/splash.xpm.gz
hiddenmenu
title Oracle Linux Server (2.6.32-279.9.1.el6.x86_64) HVM
    root (hd0,0)
    kernel /vmlinuz-2.6.32-279.9.1.el6.x86_64 ro root=LABEL=/ SYSFONT=latarcyrheb-sun16 LANG=en_US.UTF-8 KEYTABLE=us numa=off crashkernel=autoxen_emul_unplug=never
    initrd /initramfs-2.6.32-279.9.1.el6.x86_64.img
title Oracle Linux Server (2.6.39-200.32.1.el6uek.x86_64) HVM
    root (hd0,0)
    kernel /vmlinuz-2.6.39-200.32.1.el6uek.x86_64 ro root=LABEL=/ SYSFONT=latarcyrheb-sun16 LANG=en_US.UTF-8 KEYTABLE=us numa=offxen_emul_unplug=never
    initrd /initramfs-2.6.39-200.32.1.el6uek.x86_64.img

2. Shutdown VM guest, update VM guest properties via Oracle VM Manager BUI: Domain Type: Xen PVM to Xen HVM, save changes.

3. Start VM guest and confirm conversion.

i. Kernel argument "xen_emul_unplug=never" is correctly loaded:
[root@ol6vm ~]# cat /proc/cmdline
ro root=LABEL=/ SYSFONT=latarcyrheb-sun16 LANG=en_US.UTF-8 KEYTABLE=us numa=off xen_emul_unplug=never

ii. No "xen_netfront" or "xen_blkfront" loaded:
[root@ol6vm ~]# lsmod | grep xen
[root@ol6vm ~]# lspci
00:00.0 Host bridge: Intel Corporation 440FX - 82441FX PMC [Natoma] (rev 02)
00:01.0 ISA bridge: Intel Corporation 82371SB PIIX3 ISA [Natoma/Triton II]
00:01.1 IDE interface: Intel Corporation 82371SB PIIX3 IDE [Natoma/Triton II]
00:01.3 Bridge: Intel Corporation 82371AB/EB/MB PIIX4 ACPI (rev 01)
00:02.0 VGA compatible controller: Cirrus Logic GD 5446
00:03.0 Unassigned class [ff80]: XenSource, Inc. Xen Platform Device (rev 01)
00:04.0 Ethernet controller: Realtek Semiconductor Co., Ltd. RTL-8139/8139C/8139C+ (rev 20)

iii. DMI table decoder output indicates a HVM domU:
[root@ol6vm ~]# dmidecode | grep -A4 "System Information"
System Information
    Manufacturer: Xen
    Product Name: HVM domU
    Version: 4.3.1OVM
    Serial Number: 0004fb00-0006-0000-fb9c-fbc14b9f6b58

REFERENCES

NOTE:1606398.1 - Oracle VM 3.x: Oracle Linux 6 guest VM conversion from HVM to PVM
NOTE:1664681.1 - How to Initiate a PVM Guest OS Installation in Oracle VM Release 3

  DAILY CHECKLIST Oracle Database instance is running or not select name,open_mode from V$database; Note: Check the Oracle databases are ru...