Using sp_change_users_login to fix SQL Server orphaned users
In this post, I’m going to be looking at sp_change_users_login in order to fix SQL Server orphaned users as a continuation to a previous article. There I looked at a couple of ways to transfer logins from one SQL Server to another and touched upon the issue of the orphaned “security identifier” (SID).
A typical scenario that arises is when the DBA quickly realises that the logins on the SQL Server cannot access the database. They try and add the login to the database as a user and are presented with the error:
Error 15023: User already exists in current database.
The root cause of this problem can be when a login is deleted or the database has been moved or restored to another server but the login transported in the database does not exist on the destination server.
Through SQL Server Management Studio, the database user properties will show the User type: as SQL user without login
sp_change_users_login to the rescue!
I first saw this error a number of years ago and due to my complete lack of experience at the time, one of my first thoughts was that I would have to remove the database users, re-add them all for each login requiring access and then proceed to add the permissions back in for user.
I quickly realised that this would be a massive waste of my time and that there had to a better way and so I proceeded to consult the search engines for a resolution. Unsurprisingly I quickly found many other people who had been in the same situation as me and that sp_change_users_login had been the cure to all their woes.
And here I am writing a post about it Well I never would have imagined that but it was a long time ago and only clever people could put a website together back in those days when blogging platforms were a twinkle in some programmers eye.
How to use sp_change_users_login to fix SQL Server orphaned users
The best thing to do is run the following code against each database you are checking. Run this against each database. It will help you to find all the orphaned logins in your database.
1
USE DatabaseName
2
EXECsp_change_users_login 'Report';
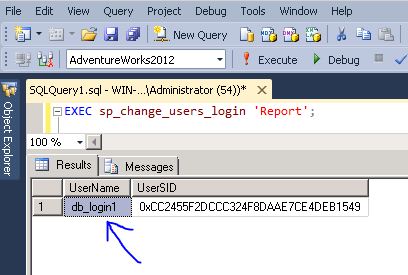
You will see output like the screenshot attached if there are any sql orphaned users. In this example, user “db_login1” is showing up as an orphaned user.
If you already have a login which you want to map your database user to, you could run the following (note that the first instance of ‘db_login1’ is the user in the database, the second instance is the login to be mapped to) :
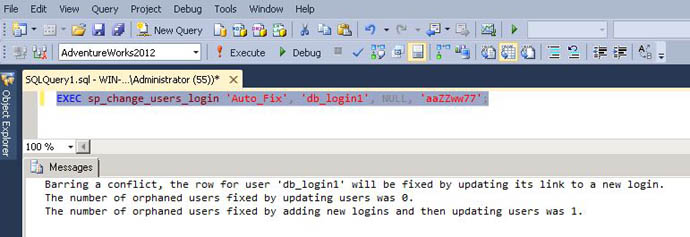
If you don’t already have a login to map to, you can have sp_change_users_login create one for you and with a password. The following code does this and creates a login with the same name and a password of ‘aaZZww77’ as an example.
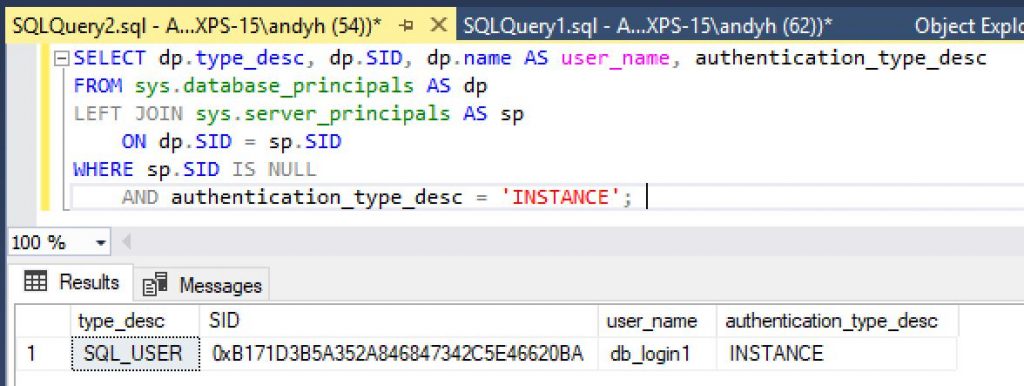
Compare the two lists to see if there are user SID’s in sys.database_principals which are not found in sys.sql_logins
Fix SQL Orphaned Users Using CREATE LOGIN
You can take the SID’s identified in the previous section and use them as part of the CREATE LOGIN statement, example:
1
CREATELOGIN db_login_1
2
WITHPASSWORD= 'use_a_strong_password_here',
3
SID = 0xB171D3B5A352A846847342C5E46620BA;
If you’re mapping an orphaned user to a login which already exists in master, run this:
1
ALTERUSER<user_name> WITHLogin = <login_name>;
For more info on how to fix orphaned users, check sp_change_users_login procedure and this one on troubleshooting orphaned users to view the documentation from Microsoft.
IDENTIFY AND FIX THE ORPHANED USERS IN SQL SERVER:
Orphan user are the one which are present in the database level but their relevant logins not present in the server level.
Orphan users are generated when you take a database backup from one server and restored on another server (Mostly during DB migration).
Basically SQL Server login is mapped to database user and this mapping is not properly defined for SQL Server principals then login will not be successfully for that specific user of database on that specific instance and this user is called orphan user.
To find the orphaned users in SQL Server use below command.
USE
USER DATABASE
EXEC SP_CHANGE_USERS_LOGIN ‘REPORT’
GO
We can fix orphaned users by using different methods.
METHOD 1: USING WITH ORPHANED USER SID
If you find any orphaned users, then create login by using orphaned user SID.
Syntax:
USE
MASTER
CREATE LOGIN [LoginName] WITH PASSWORD = ‘login@123’,
SID = 0xF0C10D1C8EDD1C40A735B07DAD54FFAE
METHOD 2: USING UPDATE_ONE
UPDATE_ONE can be used to change user’s SID with Logins SID.
It can be used to map even if Login name and User name are different (or) same.
Now we can create new login.
CREATE LOGIN [LoginName] WITH PASSWORD = ’login@123'
After creating login, we can fix the orphaned user using UPDATE_ONE.
When you restore a Microsoft SQL Server database on a different machine, you cannot access the database until you fix the permissions.
Detail
The problem is that the user in the database is an "orphan". This means that there is no login id or password associated with the user. This is true even if there is a login id that matches the user, since there is a GUID (called a SID in Microsoft-speak) that has to match as well.
This used to be a pain to fix, but currently (SQL Server 2000, SP3) there is a stored procedure that does the heavy lifting.
All of these instructions should be done as a database admin, with the restored database selected.
First, make sure that this is the problem. This will lists the orphaned users:
EXEC sp_change_users_login 'Report'
If you already have a login id and password for this user, fix it by doing:
EXEC sp_change_users_login 'Auto_Fix', 'user'
If you want to create a new login id and password for this user, fix it by doing:
1 . Clusterware Resource Status\start\stop commands Check
============================================================
crsctl status resource -t
crsctl status res -t
crsctl check crs
crsctl start\stop crs
(or)
#/etc/init.d/init.crs start\stop
crsctl start/stop cluster -all csr services on all nodes of clusterware (run as root)
2. to check\start\stop ohasd configuration\status and enable autostart (run as root)
============================================================
crsctl config has
crsctl check has
crsctl enable has
crsctl disable has
crsctl start has
crsctl stop has
4. to check the votedisk informations
========================================================================
crsctl -- to get help
crsctl query crs activeversion
crsctl query crs softwareversion [node_name]
#crsctl check css votedisk
#crsctl query css votedisk -- lists the voting disks used by CSS
#crsctl add css votedisk PATH
#crsctl add css votedisk PATH -force -- if Clusterware is not running
#crsctl delete css votedisk PATH
#crsctl delete css votedisk PATH -force -- if Clusterware is not running
5. Status of a single instance
========================================================================
srvctl status instance -d orcl -i orcl2
6. Check STATUS/configuration of service
====================================================================
srvctl status service -d orcl -s orcltest
srvctl config service -d orcl
7. Check STATUS/configuration of resources (database/listner/nodeapplications/asm instance)
============================================================
srvctl status database -d ORCL
srvctl config database -d orcl
srvctl status listener -l LISTENER_NAME
srvctl status nodeapps -n node1
$ srvctl status asm -n node1
srvctl config asm -n node1
#crsctl start\stop resources -- starts Clusterware resources
./crsctl start resource ora.DATA.dg
crsctl status resource
crsctl status resource -t
crsctl stat resource -t
8. Display the configuration for node applications - (VIP, GSD, ONS, Listener)
==========================================================
srvctl config nodeapps -n node1 -a -g -s -l
9. LISTENER STATUS Check\START\STOP\config local and scan listener
============================================================
ps -ef | grep tns -- to find listener name
srvctl status listener -l LISTENER_NAME
srvctl start listener -l LISTENER_NAME
srvctl stop listener -l LISTENER_NAME
srvctl config scan_listener
10. Start / Stop All Instances with SRVCTL
==============================================
srvctl start database -d orcl
srvctl stop database -d orcl
11. List all configured databases
================================
srvctl config database
12. check status and start/stop nodesapps
======================================================
srvctl status nodeapps -n rac1
./crs_stat -p ora.myrac1.LISTENER_MYRAC1.lsnr
srvctl stop nodeapps -n rac1
srvctl start nodeapps -n rac1
In this article I will explain how to start and stop a cluster (RAC). To find out how to start and stop High Availability Services (HAS) and other Grid Infrastructure resources in a standalone GI installation, check this article.
We can either use “crsctl stop/start cluster” command or “crsctl start/stop crs” command to accomplish this task. The difference between both method is as follows
OHASD (Oracle High Availability Service Daemon”) needs to be running while using “crsctl start/stop cluster” command. So if OHASD is not running, we will not be able to “crsctl stop/start cluster”. This also means that if we stop “crs” on a node using “crsctl stop crs” command, the OHASD will stop here and we will not be able to execute commands remotely from any other node to this node, and we would need to log into this node to execute any “crsctl” command
If we use “crsctl stop crs” to stop cluster, last service to be stopped will be OHASD, and if we use “crsctl start crs” to start the cluster, first service to start will be OHASD.
“crsctl stop/start cluster” can be used to stop/start cluster (services) on other nodes whereas “crsctl stop/start crs” works only on local node.
In the following, I would be using “crsctl stop/start cluster” to perform the stop and start of cluster
Stop database service first. Either you can stop all instances one by one using “-i” option, or you can stop whole database(s) at once by omitting “–i” option from the following command.
[oracle]$ srvctl stop instance –i mydb1 –d mydb
If you don’t stop database manually before stopping whole cluster, the “cractl stop cluster” would do a SHUTDOWN ABORT to the database, so it is recommended to stop database gracefully before proceeding to the following step to stop the cluster.
Stop cluster while logged in as root. I am using “-n” option to specify the node name where I want to stop all cluster services. Alternatively we can use –all option instead of –n option to stop cluster on all nodes.
CRS-2672: Attempting to start 'ora.cssdmonitor' on 'myracnode1'
CRS-2676: Start of 'ora.cssdmonitor' on 'myracnode1' succeeded
CRS-2672: Attempting to start 'ora.cssd' on 'myracnode1'
CRS-2672: Attempting to start 'ora.diskmon' on 'myracnode1'
CRS-2676: Start of 'ora.diskmon' on 'myracnode1' succeeded
CRS-2676: Start of 'ora.cssd' on 'myracnode1' succeeded
CRS-2672: Attempting to start 'ora.ctssd' on 'myracnode1'
CRS-2672: Attempting to start 'ora.cluster_interconnect.haip' on 'myracnode1'
CRS-2676: Start of 'ora.ctssd' on 'myracnode1' succeeded
CRS-2672: Attempting to start 'ora.evmd' on 'myracnode1'
CRS-2676: Start of 'ora.evmd' on 'myracnode1' succeeded
CRS-2676: Start of 'ora.cluster_interconnect.haip' on 'myracnode1' succeeded
CRS-2672: Attempting to start 'ora.asm' on 'myracnode1'
CRS-2676: Start of 'ora.asm' on 'myracnode1' succeeded
CRS-2672: Attempting to start 'ora.crsd' on 'myracnode1'
CRS-2676: Start of 'ora.crsd' on 'myracnode1' succeeded
Start database(s). Either start each instance one by one, or omit “-i” option to so start all instances at once
[oracle]$ srvctl start instance –i mydb1 –d mydb
Using crsctl stop crs
You can also use "crsctl stop crs" command to stop all the cluster services, and it will also stop the OHASD, but it may also relocate certain RAC resources to other available nodes. So the preferred way is to always use "crsctl stop cluster" command to sop the cluster resources.
If somehow you need to stop OHASD using "crsctl stop crs", then first stop all resources using "crsctl stop cluster", and once all resources have stopped, use "crsctl stop crs" command to stop the OHASD.
Starting and Stopping Grid Infrastructure on a Standalone GI Installation
To start and stop Grid Infrastructure services for a standalone installation, there are slightly different commands. Using same commands as RAC to start and stop the GI resources would return errors as follows
[root@~]$ /u01/app/11203/grid/bin/crsctl stop crs
CRS-4013: This command is not supported in a single-node configuration.
CRS-4000: Command Stop failed, or completed with errors.
Stopping Grid Infrastructure and HAS (High Availability Service)
To stop all services (including database services running from database home registered with this Grid Infrastructure), use following command. After stopping all resources, we will also stop High Availability Service (has).
grid ~]$ crsctl stop res -all
CRS-2500: Cannot stop resource 'ora.diskmon' as it is not running
CRS-2500: Cannot stop resource 'ora.ons' as it is not running
CRS-2673: Attempting to stop 'ora.evmd' on 'dbserver01'
CRS-2673: Attempting to stop 'ora.ORADATA.dg' on 'dbserver01'
CRS-2673: Attempting to stop 'ora.ORAFRA.dg' on 'dbserver01'
CRS-2673: Attempting to stop 'ora.ORAREDO.dg' on 'dbserver01'
CRS-2673: Attempting to stop 'ora.myproddb.myservice.svc' on 'dbserver01'
CRS-2673: Attempting to stop 'ora.LISTENER.lsnr' on 'dbserver01'
CRS-2677: Stop of 'ora.myproddb.myservice.svc' on 'dbserver01' succeeded
CRS-2673: Attempting to stop 'ora.myproddb.db' on 'dbserver01'
CRS-2677: Stop of 'ora.LISTENER.lsnr' on 'dbserver01' succeeded
CRS-2677: Stop of 'ora.evmd' on 'dbserver01' succeeded
CRS-2677: Stop of 'ora.myproddb.db' on 'dbserver01' succeeded
CRS-2677: Stop of 'ora.ORADATA.dg' on 'dbserver01' succeeded
CRS-2677: Stop of 'ora.ORAREDO.dg' on 'dbserver01' succeeded
CRS-2677: Stop of 'ora.ORAFRA.dg' on 'dbserver01' succeeded
CRS-2673: Attempting to stop 'ora.asm' on 'dbserver01'
CRS-2677: Stop of 'ora.asm' on 'dbserver01' succeeded
CRS-2673: Attempting to stop 'ora.cssd' on 'dbserver01'
CRS-2677: Stop of 'ora.cssd' on 'dbserver01' succeeded
CRS-4000: Command Stop failed, or completed with errors.
grid ~]$ crsctl stop has
CRS-4133: Oracle High Availability Services has been stopped.
Stopping Grid Infrastructure and HAS (High Availability Service)
grid ~]$ crsctl start has
CRS-4123: Oracle High Availability Services has been started.
grid ~]$ crsctl start res -all
CRS-5702: Resource 'ora.evmd' is already running on 'dbserver01'
CRS-2501: Resource 'ora.ons' is disabled
CRS-2672: Attempting to start 'ora.LISTENER.lsnr' on 'dbserver01'
CRS-2672: Attempting to start 'ora.cssd' on ' dbserver 01'
CRS-2672: Attempting to start 'ora.diskmon' on 'dbserver01'
CRS-2676: Start of 'ora.diskmon' on 'dbserver01' succeeded
CRS-2676: Start of 'ora.LISTENER.lsnr' on 'dbserver01' succeeded
CRS-2676: Start of 'ora.cssd' on 'dbserver01' succeeded
CRS-2672: Attempting to start 'ora.asm' on 'dbserver01'
CRS-2676: Start of 'ora.asm' on 'dbserver01' succeeded
CRS-2672: Attempting to start 'ora.ORADATA.dg' on 'dbserver01'
CRS-2672: Attempting to start 'ora.ORAFRA.dg' on 'dbserver01'
CRS-2672: Attempting to start 'ora.ORAREDO.dg' on 'dbserver01'
CRS-2676: Start of 'ora.ORADATA.dg' on 'dbserver01' succeeded
CRS-2676: Start of 'ora.ORAFRA.dg' on 'dbserver01' succeeded
CRS-2676: Start of 'ora.ORAREDO.dg' on 'dbserver01' succeeded
CRS-2672: Attempting to start 'ora.myproddb.db' on 'dbserver01'
CRS-2676: Start of 'ora.myproddb.db' on 'dbserver01' succeeded
CRS-2672: Attempting to start 'ora.myproddb.myservice.svc' on 'dbserver01'
CRS-2676: Start of 'ora.myproddb.myservice.svc' on 'dbserver01' succeeded
Stopping and Starting a single Grid Infrastructure Resource
A single resources, such as Listener can be stopped and started as follows.
grid~]$ crsctl stop res ora.LISTENER.lsnr
CRS-2673: Attempting to stop 'ora.LISTENER.lsnr' on 'dbserver01'
CRS-2677: Stop of 'ora.LISTENER.lsnr' on 'dbserver01' succeeded
grid ~]$ crsctl start res ora.LISTENER.lsnr
CRS-2672: Attempting to start 'ora.LISTENER.lsnr' on 'dbserver01'
CRS-2676: Start of 'ora.LISTENER.lsnr' on 'dbserver01' succeeded
Step by Step Oracle 11gR2 RAC Standby Database Manual Failover
Oracle 11gR2 RAC to RAC Standby Database Manual Failover Steps Description:-
In this article we are going to performing the Oracle 11gR2 two node RAC to RAC manual failover steps to a physical standby database.
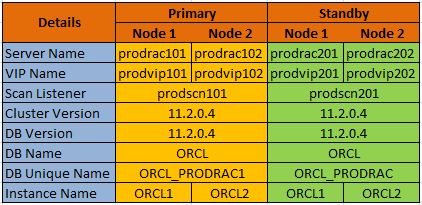
Let us consider, we have primary site with two node RAC and standby site also configured with two node RAC in 11gR2. You can refer here, for two node RAC to RAC dataguard setup in 11gR2 and also we are using the same configuration from the referred one.
Here, we can see the primary and standby configuration:-
Let us verify the status and configuration of the RAC database:-
$ srvctl config database -d ORCL_PRODRAC1 -a
Database unique name: ORCL_PRODRAC1
Database name: ORCL
Oracle home: /oradb/app/oracle/product/11.2.0.4/db_1
Oracle user: oracle
Spfile: +DBWR_DATA/ORCL_PRODRAC1/spfileORCL_PRODRAC1.ora
Domain:
Start options: open
Stop options: immediate
Database role: PRIMARY
Management policy: AUTOMATIC
Server pools: ORCL_PRODRAC1
Database instances: ORCL1,ORCL2
Disk Groups: DBWR_DATA,DBWR_FRA
Mount point paths:
Services:
Type: RAC
Database is enabled
Database is administrator managed
$ srvctl config database -d ORCL_PRODRAC2 -a
Database unique name: ORCL_PRODRAC2
Database name: ORCL
Oracle home: /oradb/app/oracle/product/11.2.0.4/db_1
Oracle user: oracle
Spfile: +DBWR_DATA/ORCL_PRODRAC2/spfileORCL_PRODRAC2.ora
Domain:
Start options: read only
Stop options: immediate
Database role: PHYSICAL_STANDBY
Management policy: AUTOMATIC
Server pools: ORCL_PRODRAC2
Database instances: ORCL1,ORCL2
Disk Groups: DBWR_DATA,DBWR_FRA
Mount point paths:
Services:
Type: RAC
Database is enabled
Database is administrator managed
Let us assume, the primary and standby sites are geographical segmented and due to a natural disaster or some power outage issue both the nodes of the primary site become unavailable for the application and we may not be able to restore/recover the primary site within a reasonable period of time,. In this situation, we will be pushed to make the available standby database which is with most recent recovery to be converted into primary and reduce the downtime of the database and make the database available for continuation of the business.
So, let’s follow the below steps for the above scenario. A) Pre-Checks for Failover
1) Ensure primary is using Flashback for reinstate the failed primary
2) Flush any unsent redo in primary
3) Verify the standby database has the most recent archived redo log from each primary redo thread
4) Identify and resolve any archived redo log gaps
5) Repeat Step 4 until all gaps are resolved for each thread B) Failover
1) Stop Redo Apply
2) Finish applying all received redo data
3) Verify that the target standby database is ready to become a primary database
4) Switch the physical standby database to the primary role
5) Open the new primary database Let us verify the status and configuration of the RAC database:-
$ srvctl config database -d ORCL_PRODRAC1 -a
Database unique name: ORCL_PRODRAC1
Database name: ORCL
Oracle home: /oradb/app/oracle/product/11.2.0.4/db_1
Oracle user: oracle
Spfile: +DBWR_DATA/ORCL_PRODRAC1/spfileORCL_PRODRAC1.ora
Domain:
Start options: open
Stop options: immediate
Database role: PRIMARY
Management policy: AUTOMATIC
Server pools: ORCL_PRODRAC1
Database instances: ORCL1,ORCL2
Disk Groups: DBWR_DATA,DBWR_FRA
Mount point paths:
Services:
Type: RAC
Database is enabled
Database is administrator managed
$ srvctl config database -d ORCL_PRODRAC2 -a
Database unique name: ORCL_PRODRAC2
Database name: ORCL
Oracle home: /oradb/app/oracle/product/11.2.0.4/db_1
Oracle user: oracle
Spfile: +DBWR_DATA/ORCL_PRODRAC2/spfileORCL_PRODRAC2.ora
Domain:
Start options: read only
Stop options: immediate
Database role: PHYSICAL_STANDBY
Management policy: AUTOMATIC
Server pools: ORCL_PRODRAC2
Database instances: ORCL1,ORCL2
Disk Groups: DBWR_DATA,DBWR_FRA
Mount point paths:
Services:
Type: RAC
Database is enabled
Database is administrator managed
A) Pre-Failover Checks Step 1 – Ensure primary is using Flashback for reinstate the failed primary:- (Primary Side)
In order to reinstate the failed primary database, the flashback option must be enabled in the primary
SQL> select flashback_on from v$database;

FLASHBACK_ON
------------------
NO
If the flashback is disabled, follow the below step to enable flashback in the primary. This should be done before the failover. I) Ensure db_recovery_file_dest is set
SQL> show parameter db_recovery_file_dest

NAME                          TYPE        VALUE
--------------------------    ----------- ------------------
db_recovery_file_dest         string      +DBWR_FRA
db_recovery_file_dest_size    big integer 12000M
If the above command returns any value, go for step III. Else set a proper directory or diskgroups.
SQL> alter system set db_recovery_file_dest='+DBWR_FRA' SCOPE=spfile sid='*';

System altered.
II) Ensure db_recovery_file_dest_size is set
SQL> alter system set db_recovery_file_dest_size=20G SCOPE=spfile sid='*';

System altered.
III) Stop and start the database
$ srvctl stop database -d ORCL_PRODRAC1
$ srvctl start database -d ORCL_PRODRAC1 -o mount
SQL> alter database flashback on;

Database altered.
SQL> alter database open; <--- Both Nodes

Database altered.
SQL> alter system set db_flashback_retention_target=2880 sid='*';

System altered.
Let our scenario Primary Database Crush Due to several reason like Hardware failure. B) Failover Step 1 – Stop Redo Apply:- (Standby Side)
Issue the following SQL statement on the target standby database.
SQL> ALTER DATABASE RECOVER MANAGED STANDBY DATABASE CANCEL;

Database altered.
Step 2 – Finish applying all received redo data:-
Issue the following SQL statement on the target standby database
SQL> ALTER DATABASE RECOVER MANAGED STANDBY DATABASE FINISH;

Database altered.
Step 3 – Verify that the target standby database is ready to become a primary database:-
Query the SWITCHOVER_STATUS column of the V$DATABASE view on the target standby database
SQL> SELECT SWITCHOVER_STATUS FROM V$DATABASE;

SWITCHOVER_STATUS
--------------------
TO PRIMARY
A value of either TO PRIMARY or SESSIONS ACTIVE indicates that the standby database is ready to be switched to the primary role. If neither of these values is returned, verify that Redo Apply is active and continue to query this view until either TO PRIMARY or SESSIONS ACTIVE is returned. Step 4 – Switch the physical standby database to the primary role:-
Issue the following SQL statement on the target standby database
SQL> ALTER DATABASE COMMIT TO SWITCHOVER TO PRIMARY WITH SESSION SHUTDOWN;

Database altered.
Note:-
The WITH SESSION SHUTDOWN clause can be omitted from the switchover statement if the query of the SWITCHOVER_STATUS column performed in the previous step returned a value of TO PRIMARY. Step 5 – Open the new primary database:-
SQL> ALTER DATABASE OPEN;  <-- Both Nodes

Database altered.
$ srvctl status database -d ORCL_PRODRAC2 -v
Instance ORCL1 is running on node prodrac201. Instance status: Open.
Instance ORCL2 is running on node prodrac202. Instance status: Open.
Do not use srvctl command to start the secondary instance in the new primary database, since we configured the “Start options as read only” and Oracle Cluster Register do not recognize the switchover/failover automatically. So, if we use srvctl the secondary instance will shutdown as below
$ tail -f alert_ORCL2.log
Lost write protection disabled
Completed: ALTER DATABASE MOUNT /* db agent *//* {1:13107:16648} */
ALTER DATABASE OPEN READ ONLY /* db agent *//* {1:13107:16648} */
AUDIT_TRAIL initialization parameter is changed to OS, as DB is NOT compatible for database opened with read-only access
Errors in file /oradb/app/oracle/diag/rdbms/orcl_prodrac2/ORCL2/trace/ORCL2_ora_5999.trc:
ORA-16002: database already open for read/write access by another instance
ORA-16002 signalled during: ALTER DATABASE OPEN READ ONLY /* db agent *//* {1:13107:16648} */...
Sun Aug 19 16:15:39 2018
Shutting down instance (abort)
License high water mark = 1
USER (ospid: 6022): terminating the instance
Instance terminated by USER, pid = 6022
Sun Aug 19 16:15:39 2018
Instance shutdown complete
Note:-
We can modify the database configuration details as below and use srvctl if we need.
$ srvctl modify database -d ORCL_PRODRAC2 -r PRIMARY -s OPEN
$ srvctl config database -d ORCL_PRODRAC2 -a
Database unique name: ORCL_PRODRAC2
Database name: ORCL
Oracle home: /oradb/app/oracle/product/11.2.0.4/db_1
Oracle user: oracle
Spfile: +DBWR_DATA/ORCL_PRODRAC2/spfileORCL_PRODRAC2.ora
Domain:
Start options: open
Stop options: immediate
Database role: PRIMARY
Management policy: AUTOMATIC
Server pools: ORCL_PRODRAC2
Database instances: ORCL1,ORCL2
Disk Groups: DBWR_DATA,DBWR_FRA
Mount point paths:
Services:
Type: RAC
Database is enabled
Database is administrator managed
After this we will start the new primary Database using SRVCTL
After failover take fresh rman backup of New primary database