Consolidating Error Logs from multiple SQL Servers using SSIS
Problem
SQL Server stores all informational messages, warning messages, and errors in operating system and application log files. As a database administrator (DBA), it is our responsibility to review the information in the error log files on a daily basis for any errors that have occurred in our SQL Server environment. However, manually reviewing the log files daily is not an easy task in a busy SQL Server environment, and it can quickly consume a large part of your day. Therefore, most DBAs tend to skip this when they are busy with other production problems. In this tip, I'll show you how we can consolidate error log entries from multiple servers into a central location, and then report on them from central location.
Solution
Before we talk about our custom solution for consolidating SQL error log, I will first state the purpose of SQL Server error log and show different ways for viewing it on SQL Server.
Purpose of SQL Server ErrorLog
SQL Server keeps logs for Database Mail, SQL Server (database server) and SQL Server Agent (error log) in operating system and application log files. SQL Server maintains a current log and archive logs. By default, it keeps six archive logs. Only logins that are members of the
sysadmin and
securityadmin fixed server role are able to view SQL Server logs.
Viewing SQL Server Logs Using SQL Server Management Studio
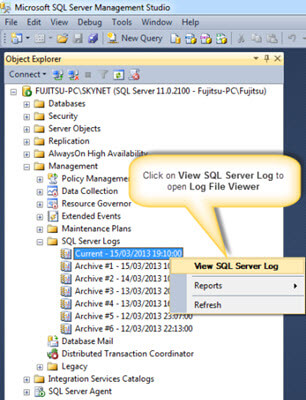
To open the Log File Viewer in Management Studio:
- Launch SQL Server Management Studio and then connect to a SQL Server instance.
- In Object Explorer, expand Management, SQL Server Logs.
- Right-click the current log or an archive log and choose View SQL Server Log.
To open the Log File Viewer from the SQL Server Agent Error Logs:
- Expand SQL Server Agent, Error Logs.
- Right-click the current log or an archive log and choose View Agent Log.
Log File Viewer
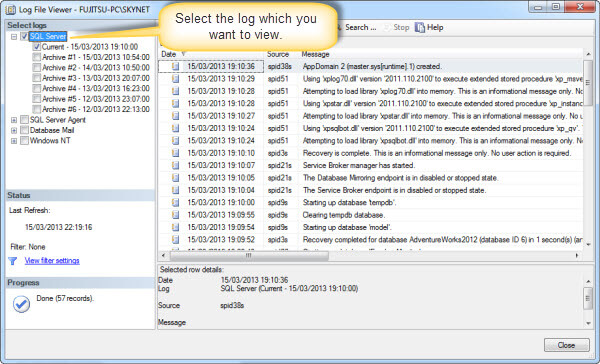
The Log File Viewer is shown below:
The Select logs window lets you choose from:
- SQL Server
- SQL Server Agent
- Database Mail
- Windows logs
You can view the Windows Application and System log and with sufficient permissions the Security logs too. Log entry details display in the lower pane when you select a log entry. Most of the messages in the SQL Server logs are informational only and require no corrective action.
Viewing SQL Server Logs Using T-SQL
You can use
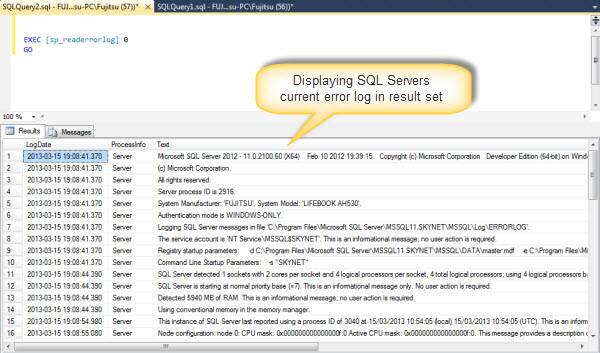
sp_readerrorlog that is an undocumented stored procedure to view SQL Server error logs. It accepts log file number as a parameter. For example, to view the current log file, execute the sp_readerrorlog as follow:
EXEC [sp_readerrorlog] 0
GO
Solution for Consolidating SQL Server Logs
Now that we understand the purpose of SQL Server logs, let's begin with our solution. This solution is built using SSIS, and will help you consolidate and merge error logs from multiple SQL Servers.
For the purpose of this article, create a database called ErrorLogMonitor on a SQL Server instance, where you want to consolidate the error logs.
Execute the following T-SQL script to create this database:
CREATE DATABASE [ErrorLogMonitor]
 ON  PRIMARY
( NAME = N'ErrorLogMonitor'
, FILENAME = N'\ErrorLogMonitor.mdf'
, SIZE = 4160KB , MAXSIZE = UNLIMITED, FILEGROWTH = 1024KB )
 LOG ON
( NAME = N'ErrorLogMonitor_log'
, FILENAME = N'\ErrorLogMonitor_log.ldf'
, SIZE = 1040KB , MAXSIZE = 2048GB , FILEGROWTH = 10%)
GO
Next, create the following two tables inside this database:
- SSISServersList- The table stores the names of each SQL Server for which you want to read SQL Server error log.
- ErrorLog- The table will store the error log data for all of the SQL Servers you are monitoring.
To create the tables, execute the following:
USE [ErrorLogMonitor]
GO
CREATE TABLE [dbo].[SSISServersList](
 [ServerName] [nvarchar](128) NOT NULL,
 [IsTest] [bit] NULL,
 [Active] [bit] NULL,
 [Port] [int] NULL) ON [PRIMARY]
GO
CREATE TABLE [dbo].[ErrorLog](
 [Server] [nvarchar](128) NOT NULL,
 [Date] [datetime] NULL,
 [ProcessInfo] [varchar](50) NULL,
 [Message] [nvarchar](4000) NULL,
 [AuditDate] [smalldatetime] NOT NULL,
 [LoadID] [int] NOT NULL
) ON [PRIMARY]
GO
Finally, we are ready to design our SSIS package. To do that launch SQL Server Data tools and create a new Integration Services project. Once the package is created, it will create an empty package. Rename this package to
ConsolidateErrorLog_Package.dtsx.
Follow these steps to configure the package.
1: Defining Package Variables
Add the following two variables for the SSIS package:
- Variable 1: SQLServer_Connection
- Scope: ConsolidateErrorLog_Package
- Data Type: String
- Value:<You SQL Server instance name> (Specify the instance name where ErrorLogMonitor database is located).
- Variable 2: SQLServer_ResultSet
- Scope: ConsolidateErrorLog_Package
- Data Type: Object
- Value: System.Object
To do that, right-click anywhere on the empty panel on the Control Flow Tab, then select Variables and then click Add Variables icon (see below).
2: Defining Package Connections
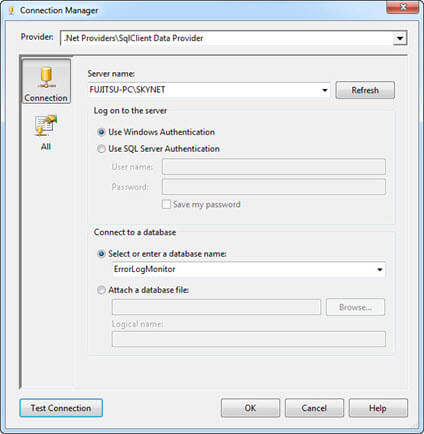
First create a new ADO.NET connection to the ErrorLogMonitor database on your SQL Server. To do this, click anywhere on the Connection Managers, and choose New ADO.NET Connection. Configure the ADO.NET connection as follow:
Rename the connection to ADO_ErrorLogMonitor.
Next, create the dynamic OLE-DB connection, this connection allows us to connect to the different SQL Server instances. This connection is passed with SQLServer_Connection variable that contains SQL Server instance name from the SSISServerList table, which was created earlier. Rename the connection to Dynamic_ErrorLogMonitor.
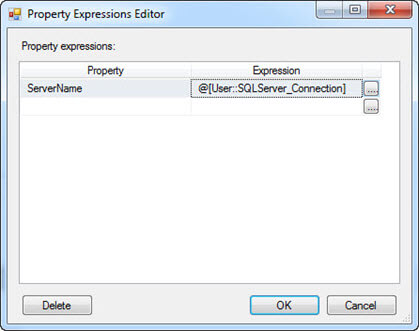
Now right-click the Dynamic_ErrorLogMonitor connection and then choose Properties. First change the initial catalog to master, and then click (...) box next to expression and specify the following expression for ServerName property:
@[User::SQLServer_Connection]
3: Defining Package Tasks
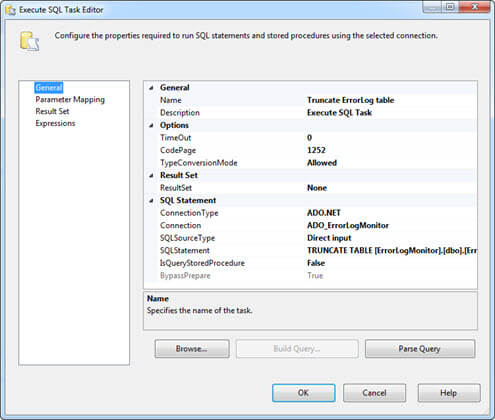
3.1: Configuring "Truncate ErrorLog table" - Execute SQL Task
Add an "Execute SQL Task" to the control flow. Double-click the task and configure properties in the "General" page of the task as follows:
- Rename "Execute SQL Task" to "Get SQL Server ErrorLog".
- Set "ResultSet" property to "None".
- Set "Connection Type" property to "ADO.NET".
- Set "Connection" property to "ADO_ErrorLogMonitor".
- Set "BypassPrepare" to "True".
- Set "SQLStatement" property with the error log collection script below:
TRUNCATE TABLE [dbo].[ErrorLog]
3.2: Configuring "Get Server Names" - Execute SQL Task
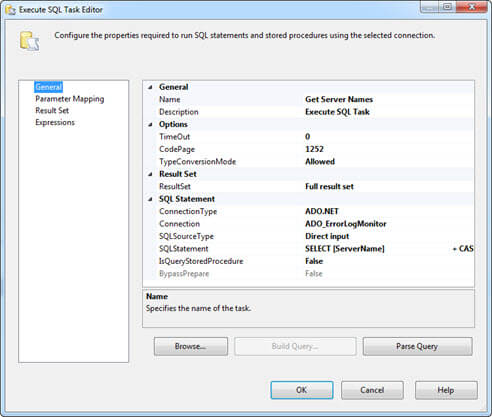
Add "Execute SQL Task" to control flow. Double-click the task and configure properties in the "General" page of the task as follows:
- Rename "Execute SQL Task" to "Get SQL Server Names".
- Set "ResultSet" property to "Full result set".
- Set "Connection Type" property to "ADO.NET".
- Set "Connection" property to "ADO_ErrorLogMonitor".
- Set "BypassPrepare" to "False".
- Set "SQLStatement" to the following:
SELECT [ServerName]
  + CASE ISNULL(CAST([Port] AS [varchar](10)), '')
   WHEN ''
    THEN ''
   ELSE ',' + CAST([Port] AS [varchar](10))
    END AS [ServerName]
FROM [dbo].[SSISServersList]
WHERE [Active] = 1
GO
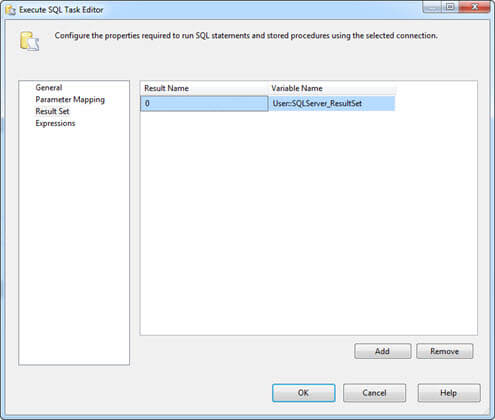
Click ResultSet in left pane and then click Add to add the "User::SQLServer_ResultSet" variable as shown below. Change Result Name value to 0, and then click OK to save the configuration for the task.
Then in the SSIS package, connect the "Truncate ErrorLog table" task to the "Get Server Names" task.
3.3: Configuring - ForEach loop container
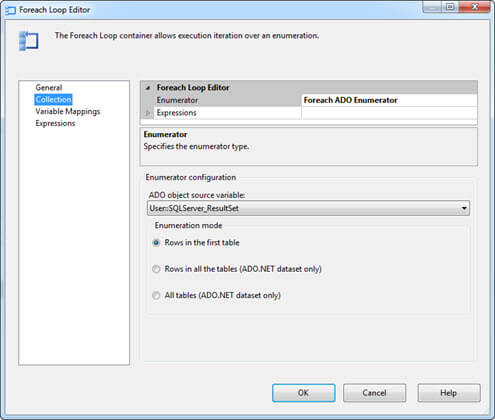
Drag and drop a ForEach loop container to the package control flow. Double-click the ForEach loop container, and then click Collection in left pane. Here configure the properties of this window as follows:
- Change "Enumerator" property to "Foreach ADO Enumerator".
- Set "Enumeration Mode" to "Rows in the first table".
- Specify "ADO object source variable" to the "User::SQLServer_ResultSet" package variable.
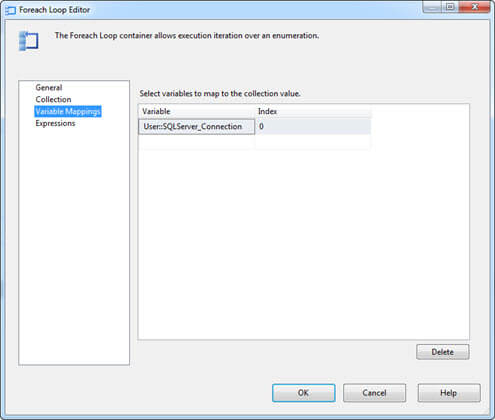
Now click "Variable Mappings" and select "User::SQLServer_Connection" package variable to map to the collection value.
Then in the SSIS package, connect the "Get Server Names" task with the "ForEach loop" container.
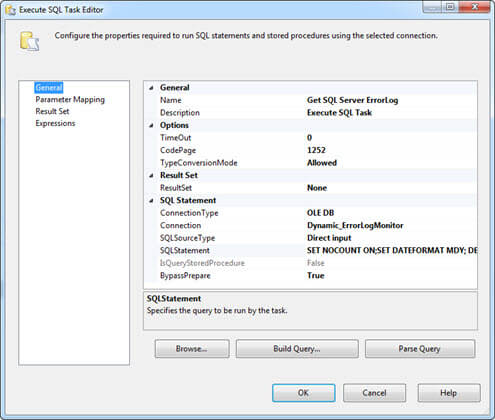
3.4: Configuring "Get SQL Server ErrorLog" - Execute SQL Task
Add an "Execute SQL Task" inside the ForEach loop container. Double-click the task and configure properties in the "General" page of the task as follows:
- Rename "Execute SQL Task" to "Get SQL Server ErrorLog".
- Set "ResultSet" property to "None".
- Set "Connection Type" property to "OLE DB".
- Set "Connection" property to "Dynamic_ErrorLogMonitor".
- Set "BypassPrepare" to "True".
- Set "SQLStatement" property with the error log collection script below:
SET NOCOUNT ON;
SET DATEFORMAT MDY;
DECLARE @LoadID   [int]
    ,@FileNumber  [tinyint]
    ,@ErrorLogSize [bigint]
    ,@ExtractDate [datetime]
    ,@SQLServer  [nvarchar](128)
IF NOT EXISTS (SELECT * FROM [tempdb].[sys].[objects]
    WHERE [name] = 'ERROR_LOG' AND [type] IN (N'U'))
BEGIN
 CREATE TABLE [tempdb].[dbo].[ERROR_LOG]
  ([Server]  [nvarchar](128) NULL
  ,[LogDate]  [datetime] NULL
  ,[ProcessInfo]  [varchar](50) NULL
  ,[Text]   [nvarchar](4000) NULL)
END
ELSE
BEGIN
 TRUNCATE TABLE [tempdb].[dbo].[ERROR_LOG]
END
IF OBJECT_ID('tempdb..#ErrorLogs') IS NOT NULL
    DROP TABLE #ErrorLogs
CREATE TABLE #ErrorLogs
 ([ArchiveNumber]  [int]
 ,[DateLastChanged]  [datetime] NOT NULL
 ,[LogFileSizeInBytes]  [bigint])
-- Reading the error logs files details
INSERT INTO #ErrorLogs
EXEC [master]..[xp_enumerrorlogs]
-- Assigning values to variables
SELECT @FileNumber = [ArchiveNumber]
   ,@ErrorLogSize = [LogFileSizeInBytes]
FROM #ErrorLogs
WHERE [ArchiveNumber] = 0
-- Set extract date for 1 day
SET @ExtractDate = DATEADD(dd, -1, CURRENT_TIMESTAMP)
IF (@ErrorLogSize <= 536870912)
BEGIN
 -- Loading the latest errorlog information inside table
 INSERT INTO [tempdb].[dbo].[ERROR_LOG]
      ([LogDate]
      ,[ProcessInfo]
      ,[Text])
 EXEC [sp_readerrorlog] 0
END
ELSE
BEGIN
 INSERT INTO [tempdb].[dbo].[ERROR_LOG]
   ([LogDate]
   ,[ProcessInfo]
   ,[Text])
 VALUES (CURRENT_TIMESTAMP
     ,'Server'
     ,'ErrorLog is two big to load.')
END
DELETE FROM [tempdb].[dbo].[ERROR_LOG]
WHERE [LogDate] < @ExtractDate
DELETE FROM [tempdb].[dbo].[ERROR_LOG]
WHERE [ProcessInfo] = 'Backup'
DELETE FROM [tempdb].[dbo].[ERROR_LOG]
WHERE [ProcessInfo] = 'Logon'
UPDATE [tempdb].[dbo].[ERROR_LOG]
SET  [Server] = CAST(SERVERPROPERTY('ServerName') AS [nvarchar](128))
SET NOCOUNT OFF;
GO
3.5: Configuring "Process ErrorLog" - Data Flow Task
Add a "Data Flow Task" inside the ForEach loop container and rename it to "Process ErrorLog". Connect the "Data Flow Task" with the "Get SQL Server ErrorLog".
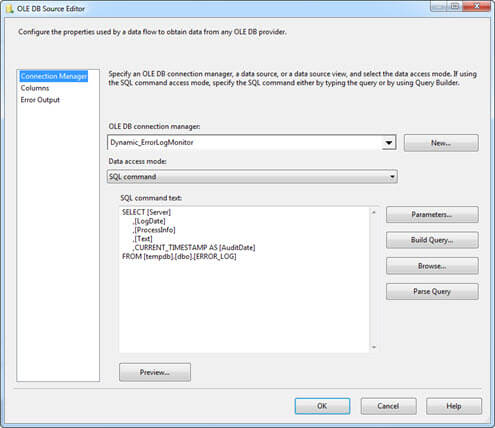
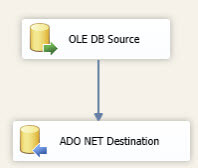
Now, double-click the "Data Flow Task", and drag the "OLE DB Source" and "ADO NET Destination" to the "Data Flow Task". Next, connect the "OLE DB Source" with the "ADO NET Destination. Then double-click "OLE DB Source" and specify the settings as follows:
- Set "OLE DB Connection Manager" to "Dynamic_ErrorLogMonitor".
- Change "Data access mode" to "SQL command"
- Specify the following query in "SQL command text":
SELECT [Server]
      ,[LogDate]
      ,[ProcessInfo]
      ,[Text]
      ,CURRENT_TIMESTAMP AS [AuditDate]
FROM [tempdb].[dbo].[ERROR_LOG]
GO
Once done, click OK to save the settings and return to Data Flow.
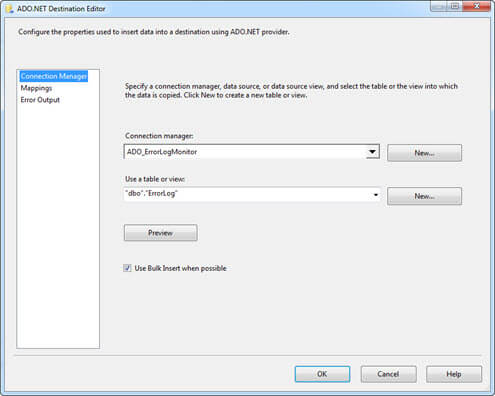
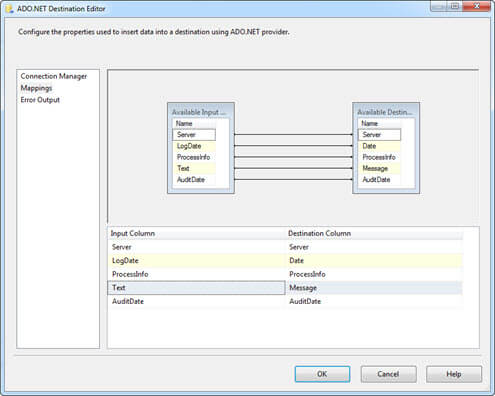
Finally, double-click "ADO NET Destination" and configure as follow:
- Set "Connection manager" to "ADO_ErrorLogMonitor".
- Select "dbo.ErrorLog" table in our "ErrorLogMonitor" database, where data will be copied.
- Then map source table to destination table.
Click OK to save settings.
Package Review
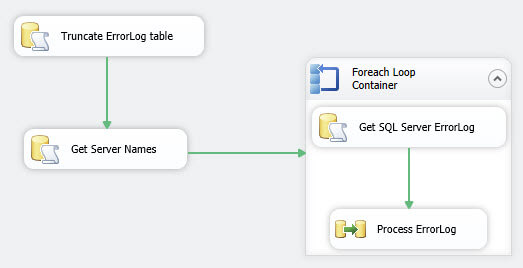
All done, our package is fully configured, and it is now ready for us to execute the package. The package control flow and data flow look similar to the following figures:
Control Flow - ConsolidateErrorLog_Package.dtsx
Data Flow - ConsolidateErrorLog_Package.dtsx
Testing
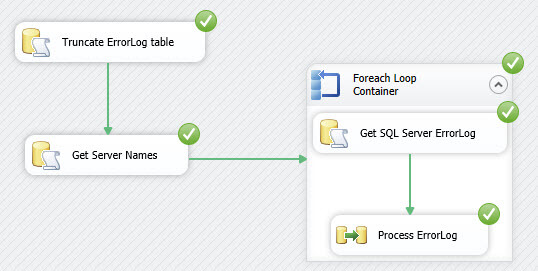
To test the package, simply add a few servers in the SSISServerList table and then execute the package using the play button in SQL Server Data Tools (see below):
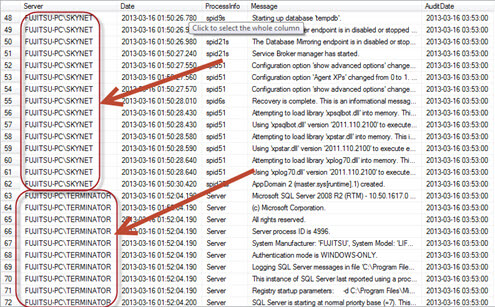
Once successfully executed, query the data of dbo.ErrorLog inside our ErrorLogMonitor database to retrieve all SQL servers error logs (see below):
Next Steps
- Download this SSIS solution
- No matter how well you have designed and tested a database, errors will occur. You can use SQL Server error log files to view information about errors that have occurred because SQL Server stores all informational messages, warning messages, and errors in operating system and application log files.
- Take the next steps and write some queries that can then pull key errors from this consolidated table.
- Create a job that finds key errors and sends you emails notifications.
- Check out these related tips: