Thursday, November 1, 2018

Linux Administration for DBA’s: Checking Disk I/O

Linux Administration for DBA’s: Checking Disk I/O

Problem
With the upcoming release of SQL Server, Microsoft has decided to expand operating system support to Linux servers. We as Database Administrators need to know how the underlying disks subsystems are performing. Since most of the SQL Server Administrators are not used to work with Linux, you may not know how to do this task. In this tip I will show you some tools that will help you.
Solution
One of the duties of a Database Administrator is to ensure that the storage subsystem that supports our databases is performing properly. Of course, we have the I/O Related Dynamic Management Views and Functions like sys.dm_io_pending_io_requests and sys.dm_io_virtual_file_stats, but sometimes that is not enough. In fact, we are used to looking at disk related performance counters on servers running on Windows and even use other tools like the one explained by Ben Snaidero in the following tip: Gather Storage Subsystem Performance Metrics Using the Diskspd Utility for SQL Server Applications.

Available Linux Tools

Now that SQL Server also runs on Linux we must get familiar with the existing tools that will allow us to do our work just like we do on Windows.

iostat

This is the most basic command to check for disk I/O and you will generally have it installed by default, but if not you can install the sysstat package that includes the iostat tool.
apt-get install sysstat
   
Basically this command shows CPU and I/O statistics for devices and partitions as two separate reports, but with arguments –c and –d you can force it to only display either the CPU or the devices report respectively. For the purposes of this tip, I will focus the attention to the I/O report.
Screen capture of the iostat command execution
As you can see on the previous image the command shows a table with one row for each installed device and four columns that informs us about the Transfer per Second (tps), reads and writes per second expressed in kilobytes and the amount of kilobytes read and written.
By now we have seen a static picture of our I/O performance, but this command also allows us to keep it running at a specified interval of time (in seconds). When we run iostat with an interval it changes its behavior, and for every run it will show us the delta of reads and writes from the previous execution. The following command shows every four seconds the device usage report until Control + C is pressed.
iostat –d 4
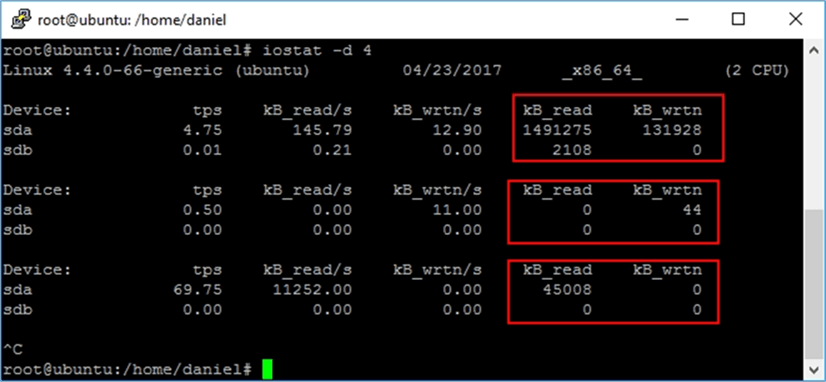
   
On the following screen capture is the output of the previous command execution.
Execution of iostat with a four seconds interval.
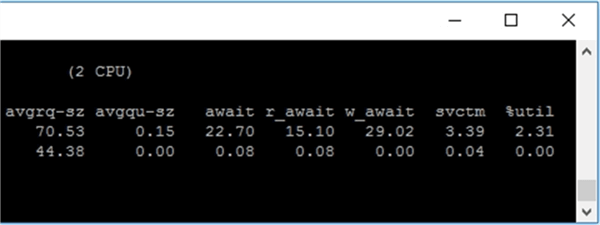
But this tool has already more features. When iostat is executed with the –x parameter it returns extended statistics. The most helpful statistics are in the columns avgqu-sz, which is the average queue length; and a wait that refers to the time spent queuing and servicing a request. Below are two screen captures with the output of this command.
iostat Extended Statistics Left - Description: Screen capture of the execution of iostat with extended statistics, left part.

iostat Extended Statistics Right - Description: Screen capture of the execution of iostat with extended statistics, right part.
On the next table I copied the man page description of each column from the pictures.
Column Description
rrqm/s The number of read requests merged per second that were queued to the device.
wrqm/s The number of write requests merged per second that were queued to the device.
r/s The number of read requests that were issued to the device per second.
w/s The number of write requests that were issued to the device per second.
rkB/s The number of kilobytes read from the device per second.
wkB/s The number of kilobytes written to the device per second.
avgrq-sz The average size (in sectors) of the requests that were issued to the device.
avgqu-sz The average queue length of the requests that were issued to the device.
await The average time (in milliseconds) for I/O requests issued to the device to be served. This includes the time spent by the requests in queue and the time spent servicing them.
r_await The average time (in milliseconds) for read requests issued to the device to be served. This includes the time spent by the requests in queue and the time spent servicing them.
w_await The average time (in milliseconds) for write requests issued to the device to be served. This includes the time spent by the requests in queue and the time spent servicing them.
svctm The average service time (in milliseconds) for I/O requests that were issued to the device. Warning! Do not trust this field any more. This field will be removed in a future sysstat version.
%util Percentage of CPU time during which I/O requests were issued to the device (bandwidth utilization for the device). Device saturation occurs when this value is close to 100%.

iotop

This utility displays the I/O usage per process or threads on an interactive grid that resembles the htop utility.
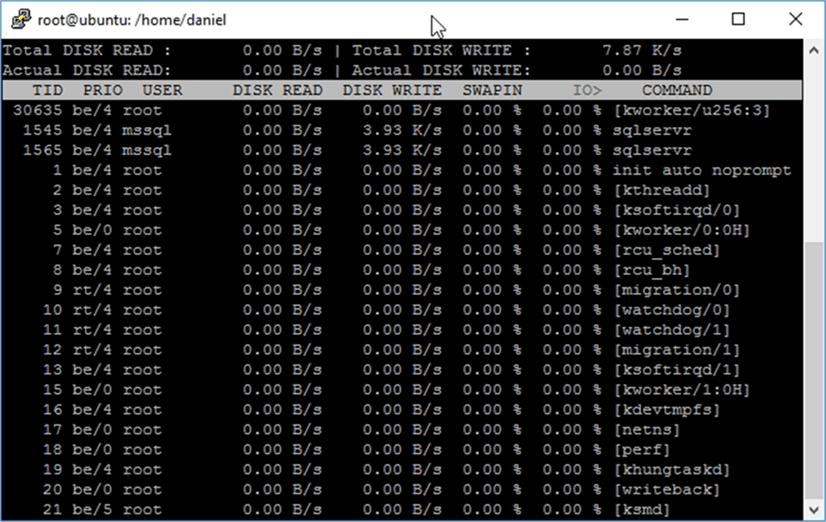
iotop - Description: This is how iotop utility looks like.
As you can see on the previous image, this utility shows the threads or processes (I will show you how to change amongst the two shortly when I outline its arguments). Most of the columns are self-explanatory, just to mention that the IO column lists the total I/O for each process including disk use and swap; and SwapIn lists the swap activity for each process.
Following is a table with the most used parameters.
Parameter Description
-oOnly show processes or threads actually doing I/O, instead of showing all processes or threads. This can be dynamically toggled by pressing o.
-b Turn on non-interactive mode (batch mode). Useful for logging I/O usage over time.
-P Only show processes. Normally iotop shows all threads.
-a Show accumulated I/O instead of bandwidth. In this mode, iotop shows the amount of I/O processes have done since iotop started.
But being iotop an interactive utility, there are some keyboard shortcuts that are helpful.
Key Description
left and right arrows Changes the sorting column.
r Reverses the sorting order.
o Shows only processes or threads actually doing I/O.
p Show processes instead of threads.
a Display accumulated I/O instead of bandwidth.
i Changes the priority of a thread or process.

Wednesday, October 31, 2018

Getting exclusive access to restore SQL Server databases

Getting exclusive access to restore SQL Server databases

Problem
A task that you may be faced with as a DBA is the need to refresh a test or development database on a periodic basis. This may be a scheduled process or it may be an ad hoc process. One of the things that you need to do when restoring a database is to ensure you have exclusive access to the database otherwise the restore process will not work. What options are there to ensure you have exclusive database access, so the restore process will work without issue?
Solution
There are a couple of options that you have to ensure that you have exclusive access to the database. The following outlines a few of these options and how this task can be simplified.

Kill Users

For this option to work you need to ensure that once you kill the connection, that the connection doesn't reconnect. In some systems where you have automated connections occurring, this may not be the best option. Take a look at this prior tip, Die Sucker - Killing SQL Server Process Ids (spids).

Using GUI to do restore

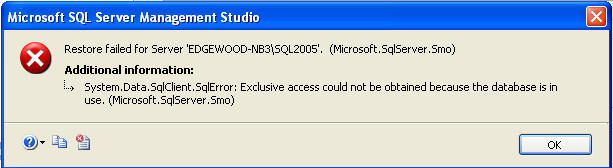
In Enterprise Manager and SQL Server Management Studio there is not an option to kill all of the users when restoring a database. You can go through the restore steps, but if you click on restore the process will start, but it will not complete. Eventually it will time out and you will get an error message like this: So this is not an option if you have open transactions and connections to the database.
sql server error exclusive access

Detach Database, Reattach and Restore

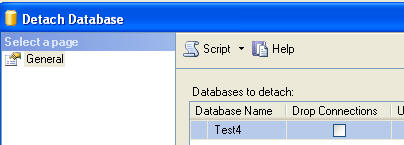
Another possible approach would be to detach the database. When doing this through the GUI you have the option of dropping existing connections first. The way this is done is that the existing connections are killed first, the database is put into single user mode and then the database is taken offline.
With this method you could detach with drop connections, reattach the database, put the database is single user mode and then do the restore, but there is still a chance that a connection could be made and you would be back in the same spot. So this is not really a good option either, plus there are too many steps.
detach database

ALTER DATABASE

The best approach for doing this would be to use the ALTER DATABASE command to set the database to single user mode along with rolling back any open transactions. The command looks something like one of the following.
ALTER DATABASE [Test4] SET SINGLE_USER WITH ROLLBACK IMMEDIATE 
OR 
ALTER DATABASE [Test4] SET SINGLE_USER WITH ROLLBACK AFTER 30 
OR 
ALTER DATABASE [Test4] SET SINGLE_USER WITH NO_WAIT 
  • WITH ROLLBACK IMMEDIATE - this option doesn't wait for transactions to complete it just begins rolling back all open transactions
  • WITH ROLLBACK AFTER nnn - this option will rollback all open transactions after waiting nnn seconds for the open transactions to complete. In our example we are specifying that the process should wait 30 seconds before rolling back any open transactions.
  • WITH NO_WAIT - this option will only set the database to single user mode if all transactions have been completed. It waits for a specified period of time and if the transactions are not complete the process will fail. This is the cleanest approach, because it doesn't rollback any transactions, but it will not always work if there are open transactions.
Once the database has been put in single user mode, you have exclusive access to the database and can then do the restore without a problem.
Note: when using the ROLLBACK option you are rolling back any open transactions that still exist for the database. The rollback process should work without issue, but if you have very long running transactions the rollback process could take a long time, so be aware of what is running on your systems. For test and development systems since you are doing a restore you don't care about the transactions anyway, so rolling things back should not be an issue, but you still need to be aware that long running transactions may take some time to rollback.

Summary

Once the database is in single user mode it is now easy to perform the restore process. Here is a sample set of code that puts the database in single user mode and does the restore.
ALTER DATABASE [Test4] SET SINGLE_USER WITH ROLLBACK IMMEDIATE 

RESTORE DATABASE [Test4] 
FROM DISK = 'c:\test4.BAK' 
WITH MOVE 'Test4_Data' TO 'c:\data\Test4.mdf', 
MOVE 'Test4_Log' TO 'c:\data\Test4_log.ldf' 
Once the database has been restored you can put the database back into multi-user access mode using this command:
ALTER DATABASE [Test4] SET MULTI_USER
Next Steps
  • If you need to refresh test and development environments on a set schedule, put this technique in place on your systems. This can be setup as a scheduled job and run unattended.
  • Take a look at these other backup and restore tips

Kill SQL Server Process Ids (spids)

Kill SQL Server Process Ids (spids)

ProblemI have noticed some of my processes are failing because spids are already connected to the database.  This happens specifically when I need to a restore database.  I catch this problem pretty quick when I am working on it during the data and can fix it, but during nightly processing existing spids become problematic.  I have also noticed existing spids causing problems for my SQL Server 2000 Database Maintenance Plans.  I have found this issue in my logs specifically related to performing integrity checks (DBCC CHECKDB ('YourDatabaseName') REPAIR_FAST) when the database needs to be in single user mode before the integrity check commands run.  How can I kill these spids prior to running my processes?

Solution
Killing the spids is the process that needs to occur prior to issuing DBCC CHECKDB (when repairing) or performing the database restore process.  Killing the spids can be accomplished by adding another step to your SQL Server Agent Jobs or in your script\stored procedure calling the code below to perform the KILL  process prior to executing code that needs exclusive use of the database.

SQL Server 2000 and SQL Server 2005
USE Master
GO

SET NOCOUNT ON

-- 1 - Variable Declaration
DECLARE @DBID int
DECLARE @CMD1 varchar(8000)
DECLARE @spidNumber int
DECLARE @SpidListLoop int
DECLARE @SpidListTable table
(UIDSpidList int IDENTITY (1,1),
SpidNumber int)

-- 2 - Populate @SpidListTable with the spid information
INSERT INTO @SpidListTable (SpidNumber)
SELECT spid
FROM Master.dbo.sysprocesses
WHERE DBID NOT IN (1,2,3,4) -- Master, Tempdb, Model, MSDB
AND spid > 50
AND <> @@spid

ORDER BY spid DESC

-- 3b - Determine the highest UIDSpidList to loop through the records
SELECT @SpidListLoop = MAX(UIDSpidList) FROM @SpidListTable

-- 3c - While condition for looping through the spid records
WHILE @SpidListLoop > 0
BEGIN

-- 3d - Capture spids location
SELECT @spidNumber = spidnumber
FROM @spidListTable
WHERE UIDspidList = @SpidListLoop

-- 3e - String together the KILL statement
SELECT @CMD1 = 'KILL ' + CAST(@spidNumber AS varchar(5))

-- 3f - Execute the final string to KILL the spids
-- SELECT @CMD1
EXEC (@CMD1)

-- 3g - Descend through the spid list
SELECT @SpidListLoop = @SpidListLoop - 1
END

SET NOCOUNT OFF
GO
Next Steps
  • Check your Database Maintenance Plan logs or SQL Server Agent Job Step History to determine when existing spids are preventing your automated processes from succeeding.
  • Depending on the user and/or automated processes that are running dictates how the scripts above should be modified to meet your needs.
  • Although the scripts above are beneficial for you to execute your process, you may also need to consider the other processes that are running and determine if 1 or more of the processes need to be executed at another time period for all of the processes to complete in a reasonable time period.  For example, you may not want to kill a process at 4:00 AM that needs 4 hours to complete and must be finished by 8:00 AM.  In this circumstance, re-scheduling the process may be a better bet.
  • Check out these related tips from MSSQLTips.com:
  • Stay tuned for another tip on situational alternatives to issuing the KILL command.

Tuesday, October 30, 2018

Script to start/stop the Oracle Enterprise Manager 12C

Script to start/stop the Oracle Enterprise Manager 12C

The scripts can automate start and stop routines.  make sure you have this setup so you do not waste time when something goes bad and you have to do maintenance on your Oracle Enterprise Management System.

Script to start the Oracle Enterprise Manager 12C

Make sure the you alter the script to match with your environment.

Script to stop the Oracle Enterprise Manager 12C

Make sure the you alter the script to match with your environment.

Friday, October 26, 2018

SQL Server Transaction Log Backup

SQL Server Transaction Log Backup

Overview

There are only two commands for backup, the primary is BACKUP DATABASE which backs up the entire database and BACKUP LOG which backs up the transaction log.  The following will show different options for doing transaction log backups.

Explanation

The BACKUP LOG command gives you many options for creating transaction log backups.  Following are different examples.

Create a simple transaction log backup to disk

The command is BACKUP LOG databaseName.  The "TO DISK" option specifies that the backup should be written to disk and the location and filename to create the backup is specified.  The file extension is "TRN".  This helps me know it is a transaction log backup, but it could be any extension you like.  Also, the database has to be in the FULL or Bulk-Logged recovery model and at least one Full backup has to have occurred.
BACKUP LOG AdventureWorks 
TO DISK = 'C:\AdventureWorks.TRN'
GO

Create a log backup with a password

This command creates a log backup with a password that will need to be supplied when restoring the database.
BACKUP LOG AdventureWorks 
TO DISK = 'C:\AdventureWorks.TRN'
WITH PASSWORD = 'Q!W@E#R$'
GO

Create a log backup with progress stats

This command creates a log backup and also displays the progress of the backup.  The default is to show progress after every 10%.
BACKUP LOG AdventureWorks 
TO DISK = 'C:\AdventureWorks.TRN'
WITH STATS
GO
Here is another option showing stats after every 1%.
BACKUP LOG AdventureWorks 
TO DISK = 'C:\AdventureWorks.TRN'
WITH STATS = 1
GO

Create a backup and give it a description

This command uses the description option to give the backup a name.  This can later be used with some of the restore commands to see what is contained with the backup.  The maximum size is 255 characters.
BACKUP LOG AdventureWorks 
TO DISK = 'C:\AdventureWorks.TRN'
WITH DESCRIPTION = 'Log backup for AdventureWorks'
GO

Create a mirrored backup

This option allows you to create multiple copies of the backups, preferably to different locations.
BACKUP LOG AdventureWorks 
TO DISK = 'C:\AdventureWorks.TRN'
MIRROR TO DISK =  'D:\AdventureWorks_mirror.TRN'
WITH FORMAT
GO

Specifying multiple options

This example shows how you can use multiple options at the same time.
BACKUP LOG AdventureWorks 
TO DISK = 'C:\AdventureWorks.TRN'
MIRROR TO DISK =  'D:\AdventureWorks_mirror.TRN'
WITH FORMAT, STATS, PASSWORD = 'Q!W@E#R$'
GO

SQL Server Database Backup 

SQL Server Database Backup 

Overview

There are only two commands for backup, the primary is BACKUP DATABASE.  This allows you to do a complete backup of your database as well as differential, file, etc. backups depending on the options that you use.

Explanation

The BACKUP DATABASE command gives you many options for creating backups.  Following are different examples.

Create a full backup to disk

The command is BACKUP DATABASE databaseName.  The "TO DISK" option specifies that the backup should be written to disk and the location and filename to create the backup is specified.
BACKUP DATABASE AdventureWorks 
TO DISK = 'C:\AdventureWorks.BAK'
GO

Create a differential backup

This command adds the "WITH DIFFERENTIAL" option.
BACKUP DATABASE AdventureWorks 
TO DISK = 'C:\AdventureWorks.BAK' 
WITH DIFFERENTIAL 
GO

Create a file level backup

This command uses the "WITH FILE" option to specify a file backup.  You need to specify the logical filename within the database which can be obtained by using the command sp_helpdb 'databaseName', specifying the name of your database.
BACKUP DATABASE TestBackup FILE = 'TestBackup' 
TO DISK = 'C:\TestBackup_TestBackup.FIL'
GO

Create a filegroup backup

This command uses the "WITH FILEGROUP" option to specify a filegroup backup.  You need to specify the filegroup name from the database which can be obtained by using the command sp_helpdb 'databaseName', specifying the name of your database.
BACKUP DATABASE TestBackup FILEGROUP = 'ReadOnly' 
TO DISK = 'C:\TestBackup_ReadOnly.FLG'
GO

Create a full backup to multiple disk files

This command uses the "DISK" option multiple times to write the backup to three equally sized smaller files instead of one large file.
BACKUP DATABASE AdventureWorks 
TO DISK = 'C:\AdventureWorks_1.BAK',
DISK = 'D:\AdventureWorks_2.BAK',
DISK = 'E:\AdventureWorks_3.BAK'
GO

Create a full backup with a password

This command creates a backup with a password that will need to be supplied when restoring the database.
BACKUP DATABASE AdventureWorks 
TO DISK = 'C:\AdventureWorks.BAK'
WITH PASSWORD = 'Q!W@E#R$'
GO

Create a full backup with progress stats

This command creates a full backup and also displays the progress of the backup.  The default is to show progress after every 10%.
BACKUP DATABASE AdventureWorks 
TO DISK = 'C:\AdventureWorks.BAK'
WITH STATS
GO
Here is another option showing stats after every 1%.
BACKUP DATABASE AdventureWorks 
TO DISK = 'C:\AdventureWorks.BAK'
WITH STATS = 1
GO

Create a backup and give it a description

This command uses the description option to give the backup a name.  This can later be used with some of the restore commands to see what is contained with the backup.  The maximum size is 255 characters.
BACKUP DATABASE AdventureWorks 
TO DISK = 'C:\AdventureWorks.BAK'
WITH DESCRIPTION = 'Full backup for AdventureWorks'
GO

Create a mirrored backup

This option allows you to create multiple copies of the backups, preferably to different locations.
BACKUP DATABASE AdventureWorks 
TO DISK = 'C:\AdventureWorks.BAK'
MIRROR TO DISK =  'D:\AdventureWorks_mirror.BAK'
WITH FORMAT
GO

Specifying multiple options

This next example shows how you can use multiple options at the same time.
BACKUP DATABASE AdventureWorks 
TO DISK = 'C:\AdventureWorks.BAK'
MIRROR TO DISK =  'D:\AdventureWorks_mirror.BAK'
WITH FORMAT, STATS, PASSWORD = 'Q!W@E#R$'
GO

Friday, October 12, 2018

The Beginners Guide To Cron Jobs

The Beginners Guide To Cron Jobs

Cron is one of the most useful utility that you can find in any Unix-like operating system. It is used to schedule commands at a specific time. These scheduled commands or tasks are known as “Cron Jobs”. Cron is generally used for running scheduled backups, monitoring disk space, deleting files (for example log files) periodically which are no longer required, running system maintenance tasks and a lot more. In this brief guide, we will see the basic usage of Cron Jobs in Linux.

The typical format of a cron job is:
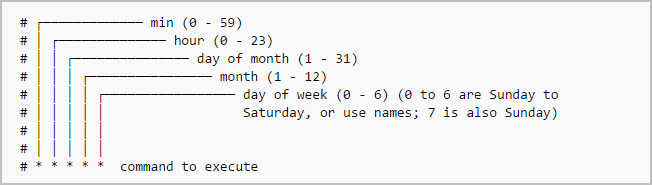
Minute(0-59) Hour(0-24) Day_of_month(1-31) Month(1-12) Day_of_week(0-6) Command_to_execute
Just memorize the cron job format or print the following illustration and keep it in your desk.

In the above picture, the asterisks refers the specific blocks of time.
To display the contents of the crontab file of the currently logged in user:
$ crontab -l
To edit the current user’s cron jobs, do:
$ crontab -e
If it is the first time, you will be asked to editor to edit the jobs.
no crontab for sk - using an empty one

Select an editor. To change later, run 'select-editor'.
 1. /bin/nano <---- easiest
 2. /usr/bin/vim.basic
 3. /usr/bin/vim.tiny
 4. /bin/ed

Choose 1-4 [1]:
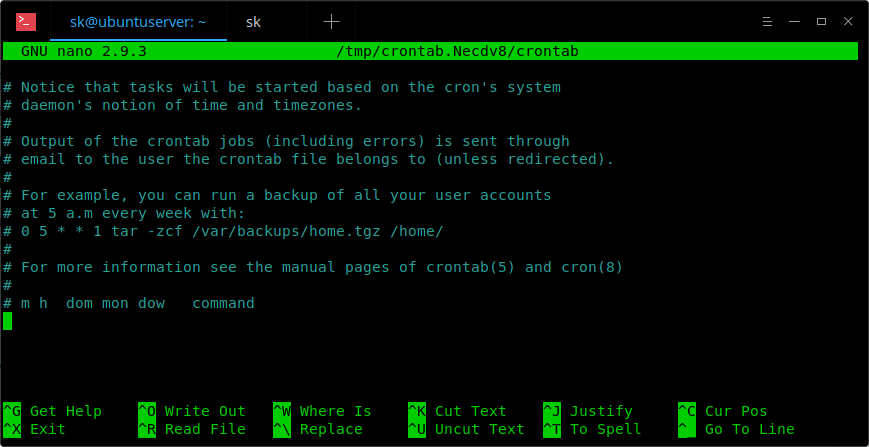
Choose any one that suits you. Here it is how a sample crontab file looks like.

In this file, you need to add your cron jobs.
To edit the crontab of a different user, for example ostechnix, do:
$ crontab -u ostechnix -e
Let us see some examples.
To run a cron job every minute, the format should be like below.
* * * * * <command-to-execute>
To run cron job every 5 minute, add the following in your crontab file.
*/5 * * * * <command-to-execute>
To run a cron job at every quarter hour (every 15th minute), add this:
*/15 * * * * <command-to-execute>
To run a cron job every hour at 30 minutes, run:
30 * * * * <command-to-execute>
You can also define multiple time intervals separated by commas. For example, the following cron job will run three times every hour, at minutes 0, 5 and 10:
0,5,10 * * * * <command-to-execute>
Run a cron job every half hour:
*/30 * * * * <command-to-execute>
Run a job every hour:
0 * * * * <command-to-execute>
Run a job every 2 hours:
0 */2 * * * <command-to-execute>
Run a job every day (It will run at 00:00):
0 0 * * * <command-to-execute>
Run a job every day at 3am:
0 3 * * * <command-to-execute>
Run a job every sunday:
0 0 * * SUN <command-to-execute>
Or,
0 0 * * 0 <command-to-execute>
It will run at exactly at 00:00 on Sunday.
Run a job on every day-of-week from Monday through Friday i.e every weekday:
0 0 * * 1-5 <command-to-execute>
The job will start at 00:00.
Run a job every month:
0 0 1 * * <command-to-execute>
Run a job at 16:15 on day-of-month 1:
15 16 1 * * <command-to-execute>
Run a job at every quarter i.e on day-of-month 1 in every 3rd month:
0 0 1 */3 * <command-to-execute>
Run a job on a specific month at a specific time:
5 0 * 4 * <command-to-execute>
The job will start at 00:05 in April.
Run a job every 6 months:
0 0 1 */6 * <command-to-execute>
This cron job will start at 00:00 on day-of-month 1 in every 6th month.
Run a job every year:
0 0 1 1 * <command-to-execute>
This cron job will start at 00:00 on day-of-month 1 in January.
We can also use the following strings to define job.
@rebootRun once, at startup.
@yearlyRun once a year.
@annually(same as @yearly).
@monthlyRun once a month.
@weeklyRun once a week.
@dailyRun once a day.
@midnight(same as @daily).
@hourlyRun once an hour.
For example, to run a job every time the server is rebooted, add this line in your crontab file.
@reboot <command-to-execute>
To remove all cron jobs for the current user:
$ crontab -r
There is also a dedicated website named crontab.guru for learning cron jobs examples. This site provides a lot of cron job examples.
Also, there is web-based tool named “Crontab UI” to easily and safely create cronjobs. Do check it in the following link.
For more details, check man pages.
$ man crontab
And, that’s all for now. At this point, you might have a basic understanding of cron jobs and how to use them in real time. More good stuffs to come. Stay tuned!!
Cheers!

  DAILY CHECKLIST Oracle Database instance is running or not select name,open_mode from V$database; Note: Check the Oracle databases are ru...