Wednesday, March 1, 2017

Downgrade from SQL Server Enterprise Edition to Standard Edition

Downgrade from SQL Server Enterprise Edition to Standard Edition


Problem
I have a SQL Server that was installed as Enterprise Edition. I don't need the Enterprise features and I don't want to pay for the licensing. What is the best way to downgrade to Standard Edition?
Solution
I've came across a lot of SQL Server's in my career that were installed using the Enterprise Edition and never utilized the Enterprise features. Downgrading to a lower edition cannot be done in place. This tip will describe the steps needed to downgrade.

Create Database Backups

As always, before doing anything drastic (or non-drastic), BACKUP all the databases (system and user)! Also, if you have a development environment, please test on it first.

Check for Enterprise features

After backing up the databases run the following query on each database:
SELECT * FROM sys.dm_db_persisted_sku_features
This DMV will tell you whether or not the database is utilizing any of the Enterprise features. You can find more information regarding this DMV from this tip.

Check Version and Build Number

Because you never know when an install may fail, check the version and build number of the current SQL Server. After the downgrade, you will need to bring the new SQL Server back to the patch level. You can view this information by executing the following command:
SELECT @@VERSION


Check Version and Build Number
Save the results to a text editor.

Decision...

There are two different directions we can go from here.
  1. We can do the traditional uninstall Enterprise, install Standard, patch, restore databases
  2. Or we can do what I call "The Jonathan Kehayias" approach. (I saw this method awhile back from a forum post by Jonathan):

Copy System Databases

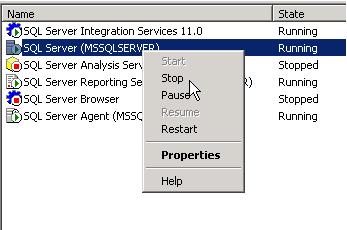
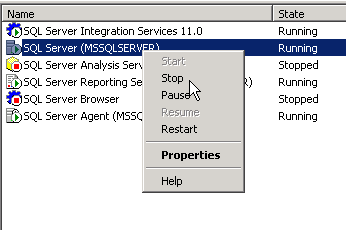
Shutdown the SQL Server service and copy the master, model and msdb database files (.mdf and .ldf) to another location. We will need these later:
hutdown the SQL Server service and copy the master, model and msdb database files


Copy System Databases

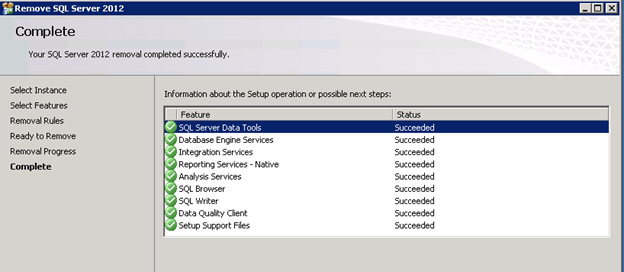
Uninstall SQL Server

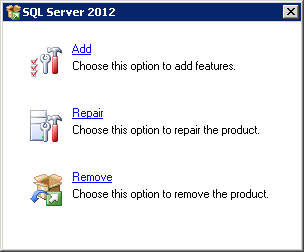
Uninstall SQL Server from Control Panel:
Uninstall SQL Server from Control Panel
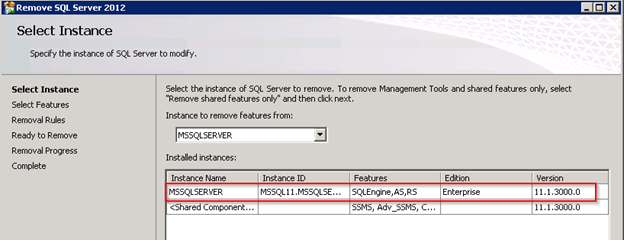
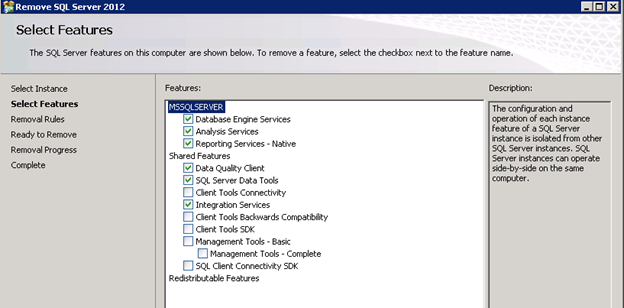
You only need to uninstall the Instance (includes SSIS, SSAS, SSRS, SSDT). There is no need to uninstall the Shared Components (SSMS, Client Tools, and Connectivity).
You only need to uninstall the Instance (includes SSIS, SSAS, SSRS, SSDT)


There is no need to uninstall the Shared Components (SSMS, Client Tools, and Connectivity)


Reboot

Reboot

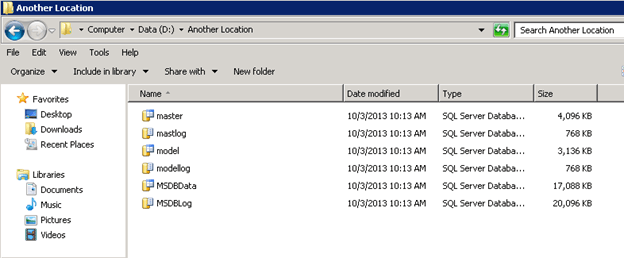
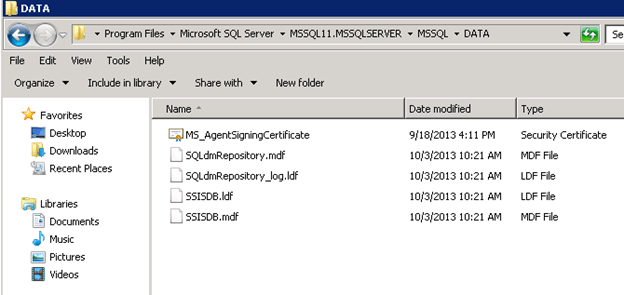
Reboot the server. After rebooting, browse to the location of the data files and you will notice that the user databases weren't removed with the uninstall, but the system databases were. This is why we copied them in the step above:
After rebooting, browse to the location of the data files and you will notice that the user databases weren't removed with the uninstall, but the system databases were.

Install New SQL Server Edition

Enterprise Edition should be completely removed from the system now. Insert/Mount the media for SQL Server Standard and install. The install should be pretty straight forward. To make things easier in the end, make sure the name of the instance remains the same and the Data Directories point to the correct location.
Once SQL Server is finished installing, open SQL Management Studio and connect to the newly installed instance.
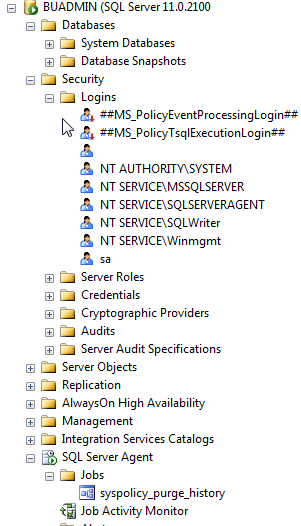
If you expand Databases, Security/Logins, SQL Server Agent/Jobs, etc. you will see it looks like a fresh copy of SQL Server.
If you expand Databases, Security/Logins, SQL Server Agent/Jobs, etc. you will see it looks like a fresh copy of SQL Server
Also, if you run the following command you will see that the version has changed to Standard Edition:
SELECT @@VERSION


Also, if you run the following command you will see that the version has changed to Standard Edition

Install SQL Server Patches

In this example, you will also notice that the build number has changed from 11.0.3000.0 to 11.0.2100.60 so I will need to install the correct patches to bring this server back to 11.0.3000.0.
(11.0.3000.0 is SQL Server 2012 SP1)
Download the correct patches and install on the server before doing anything else.
Once the patches are installed check the server to make sure it's at the same build number as it was before.

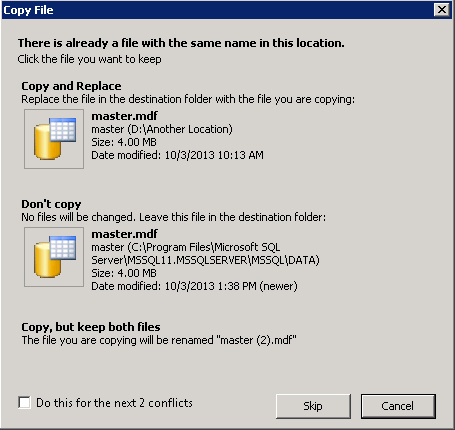
Copy System Databases

Shutdown the SQL Server service and copy the master, model and msdb database files (.mdf and .ldf) from the location you saved them in to the new location for the new install.
Copy System Databases


Shutdown the SQL Server service and copy the master, model and msdb database files

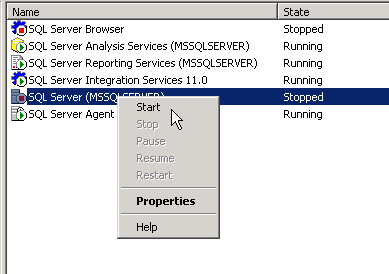
Start SQL Server

After copying the system files to the new location you can start SQL Server again:
After copying the system files to the new location you can start SQL Server again
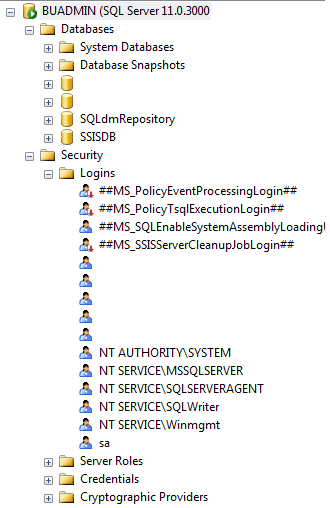
Once SQL Server comes back online, you should see all the databases, logins, jobs, etc. back to normal:
Once SQL Server comes back online, you should see all the databases, logins, jobs, etc. back to normal
Next Steps
  • The example I showed was downgrading Enterprise to Standard, however, this should work in any downgrade scenario
  • Starting in SQL Server 2008, Microsoft added an "Edition Upgrade" wizard to help with upgrading editions. You can view more information from this tip.

REPLACING AN LSI RAID DISK WITH MEGACLI

REPLACING AN LSI RAID DISK WITH MEGACLI

# cd /opt/MegaRAID/MegaCli

1) First we set the original disk offline if an error has not already cause the controller to set it offline

[root@ndelta MegaCli] # ./MegaCli64 -pdoffline -physdrv[15:4] -a0

2) Mark the failed disk as missing

[root@ndelta MegaCli] # ./MegaCli64 -pdmarkmissing -physdrv[15:4] -aAll  ---  -a0 for adapter 0

3) Mark the failed disk as prepared for removal

[root@ndelta MegaCli] # ./MegaCli64 -pdprprmv -physdrv[15:4] -a0

4) Now you can go replace the faulty disk, it might help to use the hdd identify command to locate the disk

[root@ndelta MegaCli] # ./MegaCli64 -pdlocate -start -physdrv[15:4] -a0

*** Step 5 has two options below ***
#### 5) If you use hot spares and the original hot spare was already put into the raid array, set the new disk
 to replace the hot spare that just went into service
#### [root@ndelta MegaCli] # ./MegaCli64 -PDHSP -Set -PhysDrv[15:4] -a0
#### Don't use above commands

5) If you don’t use hot spares you will need to add the disk to the array and start the rebuild manually

[root@ndelta MegaCli]# ./MegaCli64 -CfgDsply -a0   --- Displays information

****Span Reference: 0x01 is the number of the array (strip the 0x0 part).
****We can see that Physical Disk: 4 has no information, which means the drive is missing.
****The number N of the array parameter is the Span Reference you get using "MegaCli -CfgDsply -aALL"
****and the number N of the row parameter is the Physical Disk in that span or array starting with zero
****(it’s not the physical disk’s slot!).

[root@ndelta MegaCli] # ./MegaCli64 -PdReplaceMissing -PhysDrv[15:4] -Array1 -row4 -a0
Adapter: 0: Missing PD at Array 1, Row 4 is replaced

[root@ndelta MegaCli] # ./MegaCli64 -PDRbld -Start -PhysDrv[15:4] -a0

6) Optional: We can watch the rebuild progress. Depending on the size of the array this may take a considerabl
e amount of time. Also the raid array is usable during this time, but you can expect to encounter performance
hits while the raid array is rebuilding.

[root@ndelta MegaCli] # ./MegaCli64 -PDRbld -ShowProg -PhysDrv[15:4] -a0


#############################################################################
Replace a Failed Drive

# MegaCli64 -PDOffline -PhysDrv [15:4] -a0

# MegaCli64 -PDPrpRmv -PhysDrv [15:4] -a0

Pull the drive, insert a new one
# MegaCli64 -Pdgetmissing -a0

Adapter 0 – Missing Physical drives
No. Array Row Size Expected
0 1 4 1907200 MB

# MegaCli64 -PdReplaceMissing -PhysDrv [15:4] -Array1 -row4 -a0


Wednesday, February 1, 2017

Exadata X5/X6 reports "Disk controller was hung.  Cell was power cycled to stop the hang."  and SAS HBA logs report correctable errors on  SW images prior to 12.1.2.3.2 (Doc ID 2176276.1)


(Doc ID 2176276.1)

In this Document
Symptoms
Cause
Solution
References


APPLIES TO:

Oracle SuperCluster T5-8 Hardware - Version All Versions and later
Exadata X6-2 Hardware - Version All Versions and later
Exadata X6-8 Hardware - Version All Versions and later
Exadata X5-2 Hardware - Version All Versions and later
Oracle SuperCluster M6-32 Hardware - Version All Versions and later
Information in this document applies to any platform.

SYMPTOMS

Exadata X5/X6 reports "Disk controller was hung. Cell was power cycled to stop the hang." and SAS HBA logs 
report correctable errors on SW images prior to 12.1.2.3.2
Note: Exadata X5-2L/X6-2L Extreme Flash Storage Servers do not have a SAS HBA and are not affected.
Note: Exadata systems older than X5-2 use a different SAS HBA and are not affected.
Note: Exadata X4-8 systems with X5-2L Storage Servers only applies to the Storage Servers; the X4-8 DB nodes 
use a different SAS HBA and is not affected.

Issue: The server's logging a reset event due to HBA controller fatal error, with a Correctable Error that is 
repeated thousands of times in the SAS HBA firmware terminal log (fwtermlog) such as:

# /opt/MegaRAID/MegaCli/MegaCli64 /c0 show termlog | more
Firmware Term Log Information on controller 0:
05/16/16 22:47:51: C0:SRAM errAddr c01af1e0 errAttrib 00000023
05/16/16 22:47:51: C0:Correctable err, continuing...
05/16/16 22:47:51: C0:SRAM errAddr c01af1e0 errAttrib 00000023
05/16/16 22:47:51: C0:Correctable err, continuing...
05/16/16 22:47:51: C0:SRAM errAddr c01af1e0 errAttrib 00000023
05/16/16 22:47:51: C0:Correctable err, continuing...
... <~8100 entries is typical>..........
05/16/16 22:47:51: C0:SRAM errAddr c01af1e0 errAttrib 00000023
05/16/16 22:47:51: C0:Correctable err, continuing...
05/16/16 22:47:51: C0:SRAM errAddr c01a
MonSetAllowChipReset: MonAllowResetChip 1
05/16/16 22:47:51: C0:In MonTask; Seconds from powerup = 0x00fd125b
05/16/16 22:47:51: C0:Max Temperature = 80 on Channel 4
Firmware crash dump feature enabled
Crash dump collection will start immediately
copied 75 MB in 71957 Microseconds
[0]: fp=c03ffe00, lr=c13243c8 - _MonTask+200
... <reset output>
IMPORTANT NOTE: It is possible due to another image issue in 12.1.2.2.2 and earlier that the SAS HBA 
firmware logs do not contain the above information regarding a correctable error. Most likely the logs were 
recycled on the power cycle, and the errors are no longer in the log. If this is the case, please ensure also the 
procedure in Note 2135119.1 is completed to ensure persistent logging is enabled in addition to this solution. 
The additional steps are included below.
The server will alert with this (cellcli or dbmcli - depending on server type that saw the event):

CellCLI> list alerthistory
...
2 2016-05-16T10:07:39-04:00 critical "Disk controller was hung. Cell
was power cycled to stop the hang."

Workaround: None, the power cycle recovers the HBA and is functional again, as designed by Exadata server 
monitoring service (MS). The error is only a single error, but the firmware gets into an infinite loop and hangs 
after ~8100 times trying to complete the error correction.

CAUSE

Unpublished HBA Firmware bug 21669752 causes the controller to hang while correcting an error.


SOLUTION

The solution is to update the SAS HBA firmware to version 24.3.0-0083 (or later).
If a controller hang or reset event has occurred with other messages logged, or the event occurs on a system 
that already has SAS HBA firmware 24.3.0-0083, then a SR should be opened and a Sundiag and diagpack 
provided for the event uploaded for analysis and action plan.

1. Check the image version of the server and firmware version of the SAS HBA:

# imageinfo -ver
12.1.2.1.1.150316.2
# /opt/MegaRAID/MegaCli/MegaCli64 -adpallinfo -a0 | grep -i package
FW Package Build: 24.3.0-0081
If the server is running SW Image 12.1.2.3.2 or later, or 12.1.2.2.3 or later, then the problem does not apply.
These images have the firmware fix in "FW Package Build: 24.3.0-0083".
If a controller hang or reset event has occurred with other messages logged, or the event occurs on a system 
that already has SAS HBA firmware 24.3.0-0083, then a SR should be opened and a Sundiag and diagpack 
provided for the event uploaded for analysis and action plan.

2. Update the SW image to 12.1.2.2.3 or 12.1.2.3.2 or later, which contains the firmware fix 24.3.0-0083 per the 
example above. For how to update image, refer to MOS Note 888828.1.
If the server is not able to be updated with a later image at this time, then the SAS HBA firmware only may be 
updated to address this issue as follows, using the firmware package "MR_6.3.8.3_24.3.0-0083.rom" attached to 
this Note as follows:
a) Download the firmware package "MR_6.3.8.3_24.3.0-0083.rom" attached to this Note, and copy it to the /tmp 
directory on the server to be updated.

b) Prepare the server for maintenance as follows:
Exadata Storage Servers (based on X5-2L and X6-2L)

NOTE: If updating firmware on multiple storage servers in a rolling manner, do not reboot and apply the
firmware update to multiple storage servers at the same time - only do them one at a time and ensure all disks
are re-synchronized with ASM before proceeding to the next storage server.

i. ASM drops a disk shortly after it/they are taken offline. The default DISK_REPAIR_TIME
attribute value of 3.6hrs should be adequate for replacing components, but may have been
changed by the Customer. To check this parameter, have the Customer log into ASM and
perform the following query:
SQL> select dg.name,a.value from v$asm_attribute a, v$asm_diskgroup dg
where a.name = 'disk_repair_time' and a.group_number = dg.group_number;
As long as the value is large enough to comfortably perform the upgrade in a
storage cell, there is no need to change it.
ii. Check if ASM will be OK if the grid disks go OFFLINE.
# cellcli -e list griddisk attributes name,asmmodestatus,asmdeactivationoutcome
...snipit ...
DATA_CD_09_cel01 ONLINE Yes
DATA_CD_10_cel01 ONLINE Yes
DATA_CD_11_cel01 ONLINE Yes
RECO_CD_00_cel01 ONLINE Yes
etc....
If one or more disks return asmdeactivationoutcome='No', you should wait for some time
and repeat the query until all disks return asmdeactivationoutcome='Yes'.
NOTE: Taking the storage server offline while one or more disks return a status of
asmdeactivationoutcome='No' will cause Oracle ASM to dismount the affected disk group,
causing the databases to shut down abruptly.
iii. Run cellcli command to Inactivate all grid disks on the cell you wish to power down/reboot.
(this could take up to 10 minutes or longer)
# cellcli -e alter griddisk all inactive
GridDisk DATA_CD_00_dmorlx8cel01 successfully altered
GridDisk DATA_CD_01_dmorlx8cel01 successfully altered
GridDisk DATA_CD_02_dmorlx8cel01 successfully altered
GridDisk RECO_CD_00_dmorlx8cel01 successfully altered
...etc...
iv. Execute the command below and the output should show asmmodestatus='UNUSED' or
'OFFLINE' and ‘asmdeactivationoutcome=Yes’ for all griddisks once the disks are offline and
inactive in ASM.
# cellcli -e list griddisk attributes name,status,asmmodestatus,asmdeactivationoutcome
DATA_CD_00_dmorlx8cel01 inactive OFFLINE Yes
DATA_CD_01_dmorlx8cel01 inactive OFFLINE Yes
DATA_CD_02_dmorlx8cel01 inactive OFFLINE Yes
RECO_CD_00_dmorlx8cel01 inactive OFFLINE Yes
...etc...
 v) Disable Exadata Storage Server services with the following command as 'root' user:
# cellcli -e alter cell shutdown services all

Exadata DB Nodes (based on X5-2, X6-2 and X5-8)
Linux DB Nodes:
i) Shutdown and disable auto-start of CRS services:
# . oraenv
ORACLE_SID = [root] ? +ASM1
The Oracle base for ORACLE_HOME=/u01/app/11.2.0/grid is /u01/app/oracle
# $ORACLE_HOME/bin/crsctl disable crs
# $ORACLE_HOME/bin/crsctl stop crs
or
# <GI_HOME>/bin/crsctl stop crs
where GI_HOME environment variable is typically set to “/u01/app/11.2.0/grid” but will depend on the
customer's environment.
In the above output the “1” of “+ASM1” refers to the DB node number. For example, Db node #3 the
value would be +ASM3.
ii)  Validate CRS is down cleanly. There should be no processes running.
# ps -ef | grep css
iii)  Disable Exadata DB Node management services with the following command as 'root' user:
# dbmcli -e alter dbserver shutdown services all

OVM DB Nodes:
 i) See what user domains are running (record result)
Connect to the management domain (domain zero, or dom0).  This is an example with just two 
domains and the management domain Domain-0
# xm list
Name ID Mem VCPUs State Time(s)
Domain-0 0 8192 4 r----- 409812.7
dm01db01vm01 8 8192 2 -b---- 156610.6
dm01db01vm02 9 8192 2 -b---- 152169.8
ii) Connect to each domain using the command:
# xm console domainname
where domainname would be dm01db01vm01 or dm01db01vm02 if using the above examples.
iii) Shut down any instances of CRS on that domain:
# . oraenv
ORACLE_SID = [root] ? +ASM1
The Oracle base for ORACLE_HOME=/u01/app/11.2.0/grid is /u01/app/oracle
# $ORACLE_HOME/bin/crsctl stop crs
or
# <GI_HOME>/bin/crsctl stop crs
where GI_HOME environment variable is typically set to “/u01/app/11.2.0/grid” but will depend on
 the customer's environment.
In the above output the “1” of “+ASM1” refers to the DB node number. For example, Db node #3 the 
value would be +ASM3.
iv) Validate CRS is down cleanly. There should be no processes running.
# ps -ef | grep css
v) Press CTRL+] to disconnect from the console.
vi) Repeat steps ii - v on each running domain.
vii) Shutdown all user domains from dom0
viii) Repeat step 1 to see what user domains are running. It should be only Domain-0.
ix) Disable user domains from auto starting during dom0 boot after firmware has been updated.
# chkconfig xendomains off
 x) Disable Exadata DB Node management services with the following command as 'root' user:
# dbmcli -e alter dbserver shutdown services all

c) Upgrade the server's SAS HBA firmware with the following command as 'root' user:
# /opt/oracle.cellos/CheckHWnFWProfile -action updatefw  -mode diagnostic -component
DiskController -attribute DiskControllerFirmwareRevision -diagnostic_version 24.3.0-0083
-fwpath /tmp/MR_6.3.8.3_24.3.0-0083.rom
Upon completion of the firmware upgrade, the server will automatically reboot. There may be periods of time 
during the update where the output to the screen stops, which is expected - please be patient. This takes ~10 
minutes to get to the reboot, and ~15 minutes to complete the entire process including rebooting the cell, 
excluding disk re-synchronization or CRS start time. The time may be longer on X5-8 DB nodes.  There may be 
2 reboots during the process.
d) Verify the server's SAS HBA firmware is updated:

# /opt/MegaRAID/MegaCli/MegaCli64 -adpallinfo -a0 | grep -i package
FW Package Build: 24.3.0-0083
 The firmware package with the correctable error bug fix is 24.3.0-0083.
3. Verify the server's disks after firmware update and bring back online its services as follows:
Exadata Storage Servers (based on X5-2L and X6-2L):
i. Verify the 12 disks are visible. The following command should show 12 disks:
# lsscsi | grep -i LSI
[0:2:0:0]    disk    LSI      MR9361-8i        4.23  /dev/sda
[0:2:1:0]    disk    LSI      MR9361-8i        4.23  /dev/sdb
[0:2:2:0]    disk    LSI      MR9361-8i        4.23  /dev/sdc
[0:2:3:0]    disk    LSI      MR9361-8i        4.23  /dev/sdd
[0:2:4:0]    disk    LSI      MR9361-8i        4.23  /dev/sde
[0:2:5:0]    disk    LSI      MR9361-8i        4.23  /dev/sdf
[0:2:6:0]    disk    LSI      MR9361-8i        4.23  /dev/sdg
[0:2:7:0]    disk    LSI      MR9361-8i        4.23  /dev/sdh
[0:2:8:0]    disk    LSI      MR9361-8i        4.23  /dev/sdi
[0:2:9:0]    disk    LSI      MR9361-8i        4.23  /dev/sdj
[0:2:10:0]   disk    LSI      MR9361-8i        4.23  /dev/sdk
[0:2:11:0]   disk    LSI      MR9361-8i        4.23  /dev/sdl
ii. Activate the grid disks.
# cellcli -e alter griddisk all active
GridDisk DATA_CD_00_dmorlx8cel01 successfully altered
GridDisk DATA_CD_01_dmorlx8cel01 successfully altered
GridDisk RECO_CD_00_dmorlx8cel01 successfully altered
GridDisk RECO_CD_01_dmorlx8cel01 successfully altered
...etc...
iii. Verify all grid disks show 'active':
# cellcli -e list griddisk
DATA_CD_00_dmorlx8cel01 active
DATA_CD_01_dmorlx8cel01 active
RECO_CD_00_dmorlx8cel01 active
RECO_CD_01_dmorlx8cel01 active
...etc...
iv. Verify all grid disks have been successfully put online using the following command. Wait until
asmmodestatus is ONLINE for all grid disks. The following is an example of the output early in the
activation process.
# cellcli -e list griddisk attributes name,status,asmmodestatus,asmdeactivationoutcome
DATA_CD_00_dmorlx8cel01 active ONLINE Yes
DATA_CD_01_dmorlx8cel01 active ONLINE Yes
DATA_CD_02_dmorlx8cel01 active ONLINE Yes
RECO_CD_00_dmorlx8cel01 active SYNCING Yes
...etc...
Notice in the above example that RECO_CD_00_dmorlx8cel01 is still in the 'SYNCING' process. Oracle ASM
synchronization is only complete when ALL grid disks show ‘asmmodestatus=ONLINE’. This process can take
some time depending on how busy the machine is, and has been while this individual server was down for
repair.
Exadata DB Nodes (based on X5-2, X6-2 and X5-8)
Linux DB Nodes:
i) Verify all the disks are visible to the system and in 'normal' status.
# dbmcli -e "list physicaldisk"
252:0 F1HHYP normal
252:1 F1K76P normal
252:2 F1GZ1P normal
252:3 F1K7GP normal
252:4 F1LHUP normal
252:5 F1A2JP normal
252:6 F1LH6P normal
252:7 F1LDSP normal
 There should be 4 or 8 disks depending on the DB node model.
ii) Startup CRS and re-enable autostart of crs. After the OS is up, the Customer DBA should validate
that CRS is running. As root execute:
# . oraenv
ORACLE_SID = [root] ? +ASM1
The Oracle base for ORACLE_HOME=/u01/app/11.2.0/grid is /u01/app/oracle
# $ORACLE_HOME/bin/crsctl start crs
# $ORACLE_HOME/bin/crsctl check crs
Now re-enable autostart
# $ORACLE_HOME/bin/crsctl enable crs
or
# <GI_HOME>/bin/crsctl check crs
# <GI_HOME>/bin/crsctl enable crs
where GI_HOME environment variable is typically set to “/u01/app/11.2.0/grid” but will depend on the
customer's environment.
In the above output the “1” of “+ASM1” refers to the DB node number. For example, Db node #3 
the value would be +ASM3.
Example output when all is online is: 
# /u01/app/11.2.0/grid/bin/crsctl check crs
CRS-4638: Oracle High Availability Services is online
CRS-4537: Cluster Ready Services is online
CRS-4529: Cluster Synchronization Services is online
CRS-4533: Event Manager is online
iii) Validate that instances are running:
# ps -ef |grep pmon
It should return a record for the ASM instance and a record for each database.

OVM DB Nodes:
i) Verify all the disks are visible to the system and in 'normal' status.
# dbmcli -e "list physicaldisk"
252:0 F1HHYP normal
252:1 F1K76P normal
252:2 F1GZ1P normal
252:3 F1K7GP normal
252:4 F1LHUP normal
252:5 F1A2JP normal
252:6 F1LH6P normal
252:7 F1LDSP normal
There should be 4 or 8 disks depending on the DB node model. 
ii) Re-enable user domains to autostart during Domain-0 boot:
# chkconfig xendomains on
iii) Startup all user domains that are marked for auto start:
# service xendomains start
iv)  See what user domains are running (compare against result from previously collected data):
# xm list
Name ID Mem VCPUs State Time(s)
Domain-0 0 8192 4 r----- 409812.7
dm01db01vm01 8 8192 2 -b---- 156610.6
dm01db01vm02 9 8192 2 -b---- 152169.8
 v) if any did not auto-start then Startup a single user domain:
# xm create -c /EXAVMIMAGES/GuestImages/DomainName/vm.cfg
vi)  Check that CRS has started in user domains:
a) Connect to each domain using the command:
# xm console domainname
where domainname would be dm01db01vm01 or dm01db01vm02 if using the above examples.
b) Any instances of CRS on that domain should have automatically started:
# . oraenv
ORACLE_SID = [root] ? +ASM1
The Oracle base for ORACLE_HOME=/u01/app/11.2.0/grid is /u01/app/oracle
# $ORACLE_HOME/bin/crsctl check crs
CRS-4638: Oracle High Availability Services is online
CRS-4537: Cluster Ready Services is online
CRS-4529: Cluster Synchronization Services is online
CRS-4533: Event Manager is online
c) Validate that instances are running:
# ps -ef |grep pmon
It should return a record for the ASM instance and a record for each database.
d) Press CTRL+] to disconnect from the console.
vii) Repeat step (vi) on each running domain.

4. Repeat the above steps to update the firmware on each storage server and DB node, as needed.
NOTE: If updating firmware on multiple storage server in a rolling manner, do not reboot and apply the
firmware update to multiple storage servers at the same time - only do them one at a time and ensure all disks
are re-synchronized with ASM completely before proceeding to the next storage server.

If the image is version 12.1.2.3.0 or later, then the procedure is complete.  The following additional steps are 
required for images 12.1.2.2.2 or below (as taken from Note 2135119.1):
5. To verify the current battery status for the fwtermlog setting, on each server, as 'root' login, execute:

# /opt/MegaRAID/MegaCli/MegaCli64 -fwtermlog -bbuget -a0
  Battery is OFF for TTY history on Adapter 0
  Exit Code: 0x00
We should see that the battery mode is off for the fwtermlog.

6. Turn on use of the battery for maintaining the fwtermlog across server reboots and power cycles:
# /opt/MegaRAID/MegaCli/MegaCli64 -fwtermlog -bbuon -a0
Battery is set to ON for TTY history on Adapter 0
Running the above command on the server will not have any impact on running services.
This change is persistent across server reboots or power cycles and is only unset by command.


REFERENCES

NOTE:2135119.1 - SAS HBA does not maintain logs over a reboot on Exadata X5-2L High Capacity Storage 
Servers on SW Image versions below 12.1.2.3.0
NOTE:888828.1 - Exadata Database Machine and Exadata Storage Server Supported Versions
Didn't find what you are looking for?

Wednesday, December 14, 2016

How to use standby backup to restore primary db

How to use standby backup to restore primary db

–Propose: Backup db from physical standby db by using RMAN, recove datafile of primary standby db.
–enviroment:
Three machines:
Machine A: 172.16.100.29 Linux ES3
Machine B: 172.16.100.21 Linux ES3
Machine C: 172.16.100.31 Linux ES3
–step1. build Machine A as primary db and Machine B as standby db
–create another db on Machine C
Machine DB_TNSNAME
A STD1.29
B STD1.21
C STD1.31
–step2. create recovery catalog on Machine C
Machine C:
SQL> conn / as sysdba
SQL> create tablespace rcat datafile ‘/opt/oracle/oradata/rcat01.dbf’ size 50M;
SQL> create user rcat identified by rcat default tablespace rcat temporary tablesapce temp;
SQL> grant connect, resource, recovery_catalog_owner to rcat;
Machine A:
rman catalog=rcat/rcat@STD1.31
RMAN> create catalog tablespace rcat;
RMAN> connect target sys/oracle@STD1.29
RMAN> register database;
RMAN> configure channel 1 device type disk format ‘/opt/oracle/rman/std1_%U’;
RMAN> exit;
–step3.backup standby database
Machine C:
rman catalog=rcat/rcat@STD1.31 target=sys/oracle@STD1.21
RMAN> backup database;
RMAN> exit;
–step4. test recover on primary datafile
–move system tablespace’s file to another space
Machine A:
SQL> shutdown immediate
mv /opt/oracle/oradata/std1/system01.dbf /tmp/system01.dbf
SQL> startup mount
–step5. restore by rman
Machine C:
copy rman backup files from Machine B to Machine A , using the same directory
–set NLS_CHARACTERSET value to be the same as Machine A
export NLS_CHARACTERSET=AL32UTF8
rman catalog=rcat/rcat@STD1.31 target=sys/oracle@STD1.29
RMAN> restore datafile 1;
RMAN> recover datafile 1;
RMAN> exit
–step6.startup primary database
SQL> alter database startup;
–step7.backup from standby database and recover the primary database without redo logs
Machine C:
–1.backup datafiles at standby database
rman catalog=rcat/rcat@STD1_31 target=sys/oracle@STD1_21
RMAN> backup database;
…….
channel ORA_DISK_1: starting piece 1 at 05-AUG-05
channel ORA_DISK_1: finished piece 1 at 05-AUG-05
piece handle=/opt/oracle/rman/std1_06gradfv_1_1 comment=NONE
channel ORA_DISK_1: backup set complete, elapsed time: 00:03:17
Finished backup at 05-AUG-05
RMAN-06497: WARNING: controlfile is not current, controlfile autobackup skipped
RMAN> exit
shell> rman catalog=rcat/rcat@STD1_31 target=sys/oracle@STD1_29
–2.backup control file from primary db
RMAN> backup current controlfile;
Starting backup at 05-AUG-05
using channel ORA_DISK_1
channel ORA_DISK_1: starting full datafile backupset
channel ORA_DISK_1: specifying datafile(s) in backupset
including current controlfile in backupset
channel ORA_DISK_1: starting piece 1 at 05-AUG-05
channel ORA_DISK_1: finished piece 1 at 05-AUG-05
piece handle=/opt/oracle/rman/std1_03grae2o_1_1 comment=NONE
channel ORA_DISK_1: backup set complete, elapsed time: 00:00:01
Finished backup at 05-AUG-05
–3.backup spfile from primary db
RMAN> backup spfile;
Starting backup at 05-AUG-05
using channel ORA_DISK_1
channel ORA_DISK_1: starting full datafile backupset
channel ORA_DISK_1: specifying datafile(s) in backupset
including current SPFILE in backupset
channel ORA_DISK_1: starting piece 1 at 05-AUG-05
channel ORA_DISK_1: finished piece 1 at 05-AUG-05
piece handle=/opt/oracle/rman/std1_04grae3f_1_1 comment=NONE
channel ORA_DISK_1: backup set complete, elapsed time: 00:00:01
Finished backup at 05-AUG-05
RMAN> exit
–4.delete datafile, control files and spfile from primary db
— copy the backup datafile from Machine B to Machine A
Machine A:
lsnrctl stop
mkdir /tmp/orabak
mv product/9.2.0/dbs/spfilestd1.ora /tmp/orabak/
mv oradata/std1/*.ctl /tmp/orabak/
mv oradata/std1/*.dbf /tmp/orabak/
mv oradata/std1/redo*.log /tmp/orabak/
sftp 172.16.100.21
Connecting to 172.16.100.21…
oracle@172.16.100.21’s password:
sftp> get /opt/oracle/rman/std1_06gradfv_1_1 /opt/oracle/rman/std1_06gradfv_1_1
std1_06gradfv_1_1 100% 231MB 3.3MB/s 01:08
sftp> exit
lsnrctl start
Machine C:
–5.get the dbid from standby db
rman catalog=rcat/rcat@std1_31 target=sys/oracle@std1_21
Recovery Manager: Release 9.2.0.6.0 – Production
Copyright (c) 1995, 2002, Oracle Corporation. All rights reserved.
connected to target database: STD1 (DBID=3008965527)
connected to recovery catalog database
RMAN> exit
–the dbid id 3008965527
–6.startup primary db with no spfile
rman catalog=rcat/rcat@std1_31 target=sys/oracle@std1_29
Recovery Manager: Release 9.2.0.6.0 – Production
Copyright (c) 1995, 2002, Oracle Corporation. All rights reserved.
connected to target database (not started)
connected to recovery catalog database
RMAN> startup nomount;
startup failed: ORA-01078: failure in processing system parameters
LRM-00109: could not open parameter file ‘/opt/oracle/product/9.2.0/dbs/initstd1.ora’
trying to start the Oracle instance without parameter files …
Oracle instance started
Total System Global Area 97588624 bytes
Fixed Size 451984 bytes
Variable Size 46137344 bytes
Database Buffers 50331648 bytes
Redo Buffers 667648 bytes
RMAN> set dbid=3008965527
executing command: SET DBID
–7.using datafile backup to recove spfile
RMAN> restore spfile;
Starting restore at 05-AUG-05
using channel ORA_DISK_1
channel ORA_DISK_1: starting datafile backupset restore
channel ORA_DISK_1: restoring SPFILE
output filename=/opt/oracle/product/9.2.0/dbs/spfilestd1.ora
channel ORA_DISK_1: restored backup piece 1
piece handle=/opt/oracle/rman/std1_06gradfv_1_1 tag=TAG20050805T100107 params=NULL
channel ORA_DISK_1: restore complete
Finished restore at 05-AUG-05
–8.using backup controlfile(std1_03grae2o_1_1) to recover controlfile
RMAN> restore controlfile;
Starting restore at 05-AUG-05
using channel ORA_DISK_1
channel ORA_DISK_1: starting datafile backupset restore
channel ORA_DISK_1: restoring controlfile
output filename=/opt/oracle/product/9.2.0/dbs/cntrlstd1.dbf
channel ORA_DISK_1: restored backup piece 1
piece handle=/opt/oracle/rman/std1_03grae2o_1_1 tag=TAG20050805T100743 params=NULL
channel ORA_DISK_1: restore complete
replicating controlfile
input filename=/opt/oracle/product/9.2.0/dbs/cntrlstd1.dbf
Finished restore at 05-AUG-05
RMAN> shutdown immediate
Oracle instance shut down
RMAN> exit
–9.restart primary database
Machine A:
sqlplus /nolog
SQL> conn / as sysdba
SQL> startup nomount
SQL> show parameter control_files
NAME TYPE VALUE
———————————— ———– ——————————
control_files string /opt/oracle/oradata/physical_s
td1.ctl
SQL> host
mv /opt/oracle/product/9.2.0/dbs/cntrlstd1.dbf /opt/oracle/oradata/physical_std1.ctl
exit
SQL> alter database mount;
Database altered.
–10.restore primary database
Machine C:
rman catalog=rcat/rcat@std1_31 target=sys/oracle@std1_29
RMAN> restore database;
Starting restore at 05-AUG-05
using channel ORA_DISK_1
channel ORA_DISK_1: starting datafile backupset restore
channel ORA_DISK_1: specifying datafile(s) to restore from backup set
restoring datafile 00001 to /opt/oracle/oradata/std1/system01.dbf
restoring datafile 00002 to /opt/oracle/oradata/std1/undotbs01.dbf
restoring datafile 00003 to /opt/oracle/oradata/std1/indx01.dbf
restoring datafile 00004 to /opt/oracle/oradata/std1/tools01.dbf
restoring datafile 00005 to /opt/oracle/oradata/std1/users01.dbf
restoring datafile 00006 to /opt/oracle/oradata/std1/logmnrts.dbf
restoring datafile 00007 to /opt/oracle/oradata/std1/newlogminer.dbf
restoring datafile 00008 to /opt/oracle/oradata/std1/logmnrts_3.dbf
channel ORA_DISK_1: restored backup piece 1
piece handle=/opt/oracle/rman/std1_06gradfv_1_1 tag=TAG20050805T100107 params=NULL
channel ORA_DISK_1: restore complete
Finished restore at 05-AUG-05
–11.recover database
RMAN> recover database;
Starting recover at 05-AUG-05
using channel ORA_DISK_1
starting media recovery
unable to find archive log
archive log thread=1 sequence=14
RMAN-00571: ===========================================================
RMAN-00569: =============== ERROR MESSAGE STACK FOLLOWS ===============
RMAN-00571: ===========================================================
RMAN-03002: failure of recover command at 08/05/2005 10:52:13
RMAN-06054: media recovery requesting unknown log: thread 1 scn 252823
Machine A:
SQL> SELECT max(next_change#) FROM v$archived_log WHERE THREAD#=1 AND dest_id=1;
MAX(NEXT_CHANGE#)
—————–
252823
SQL> SELECT SEQUENCE# FROM v$archived_log WHERE next_change#=252823 AND dest_id=1
2 ;
SEQUENCE#
———-
13
SQL> SELECT first_change#, archived, status FROM v$log WHERE THREAD#=1 ORDER BY First_change#;
FIRST_CHANGE# ARC STATUS
————- — —————-
249961 YES INACTIVE
250066 YES INACTIVE
252823 NO CURRENT
–that mean the change after 252823 is not archived, it’s lost in redo log,
— so we only can recove until 252823
RMAN> recover database until sequence 13 thread 1;
Starting recover at 05-AUG-05
using channel ORA_DISK_1
starting media recovery
media recovery complete
Finished recover at 05-AUG-05
–Appendix scenario:backup and recover the primary database with redo logs
–1.backup primary database
Machine C:
rman catalog=rcat/rcat@std1_31 target=sys/oracle@std1_29
Recovery Manager: Release 9.2.0.6.0 – Production
Copyright (c) 1995, 2002, Oracle Corporation. All rights reserved.
connected to target database: STD1 (DBID=3008965527)
connected to recovery catalog database
RMAN> backup database;
Starting backup at 05-AUG-05
allocated channel: ORA_DISK_1
channel ORA_DISK_1: sid=17 devtype=DISK
channel ORA_DISK_1: starting full datafile backupset
channel ORA_DISK_1: specifying datafile(s) in backupset
including current SPFILE in backupset
including current controlfile in backupset
input datafile fno=00001 name=/opt/oracle/oradata/std1/system01.dbf
input datafile fno=00002 name=/opt/oracle/oradata/std1/undotbs01.dbf
input datafile fno=00003 name=/opt/oracle/oradata/std1/indx01.dbf
input datafile fno=00005 name=/opt/oracle/oradata/std1/users01.dbf
input datafile fno=00006 name=/opt/oracle/oradata/std1/logmnrts.dbf
input datafile fno=00007 name=/opt/oracle/oradata/std1/newlogminer.dbf
input datafile fno=00008 name=/opt/oracle/oradata/std1/logmnrts_3.dbf
input datafile fno=00004 name=/opt/oracle/oradata/std1/tools01.dbf
channel ORA_DISK_1: starting piece 1 at 05-AUG-05
channel ORA_DISK_1: finished piece 1 at 05-AUG-05
piece handle=/opt/oracle/rman/std1_05grapd8_1_1 comment=NONE
channel ORA_DISK_1: backup set complete, elapsed time: 00:00:37
Finished backup at 05-AUG-05
RMAN> exit
Machine A:
SQL> shutdown immediate
SQL> exit
mv /opt/oracle/product/9.2.0/dbs/spfilestd1.ora /tmp/orabak/
mv /opt/oracle/oradata/physical_std1.ctl /tmp/orabak/
mv /opt/oracle/oradata/std1/*.dbf /tmp/orabak/
–remain the redo logs
ls -l /opt/oracle/oradata/std1/*
-rw-r—– 1 oracle dba 10486272 Aug 5 13:25 /opt/oracle/oradata/std1/redo01.log
-rw-r—– 1 oracle dba 10486272 Aug 5 13:13 /opt/oracle/oradata/std1/redo02.log
-rw-r—– 1 oracle dba 10486272 Aug 5 13:10 /opt/oracle/oradata/std1/redo03.log
Machine C:
rman catalog=rcat/rcat@std1_31 target=sys/oracle@std1_29
Recovery Manager: Release 9.2.0.6.0 – Production
Copyright (c) 1995, 2002, Oracle Corporation. All rights reserved.
connected to target database (not started)
connected to recovery catalog database
RMAN> set dbid=3008965527
RMAN> startup nomount
RMAN> restore spfile;
Starting restore at 05-AUG-05
allocated channel: ORA_DISK_1
channel ORA_DISK_1: sid=9 devtype=DISK
channel ORA_DISK_1: starting datafile backupset restore
channel ORA_DISK_1: restoring SPFILE
output filename=/opt/oracle/product/9.2.0/dbs/spfilestd1.ora
channel ORA_DISK_1: restored backup piece 1
piece handle=/opt/oracle/rman/std1_05grapd8_1_1 tag=TAG20050805T132104 params=NULL
channel ORA_DISK_1: restore complete
Finished restore at 05-AUG-05
RMAN> restore controlfile;
Starting restore at 05-AUG-05
using channel ORA_DISK_1
channel ORA_DISK_1: starting datafile backupset restore
channel ORA_DISK_1: restoring controlfile
output filename=/opt/oracle/product/9.2.0/dbs/cntrlstd1.dbf
channel ORA_DISK_1: restored backup piece 1
piece handle=/opt/oracle/rman/std1_05grapd8_1_1 tag=TAG20050805T132104 params=NULL
channel ORA_DISK_1: restore complete
replicating controlfile
input filename=/opt/oracle/product/9.2.0/dbs/cntrlstd1.dbf
Finished restore at 05-AUG-05
RMAN> shutdown immediate

SQL> startup nomount
SQL> show parameter control_files
NAME TYPE VALUE
———————————— ———– ——————————
control_files string /opt/oracle/oradata/physical_s
td1.ctl
SQL> host
mv /opt/oracle/product/9.2.0/dbs/cntrlstd1.dbf /opt/oracle/oradata/physical_std1.ctl
exit
SQL> alter database mount;
RMAN> restore database;
Starting restore at 05-AUG-05
allocated channel: ORA_DISK_1
channel ORA_DISK_1: sid=14 devtype=DISK
channel ORA_DISK_1: starting datafile backupset restore
channel ORA_DISK_1: specifying datafile(s) to restore from backup set
restoring datafile 00001 to /opt/oracle/oradata/std1/system01.dbf
restoring datafile 00002 to /opt/oracle/oradata/std1/undotbs01.dbf
restoring datafile 00003 to /opt/oracle/oradata/std1/indx01.dbf
restoring datafile 00004 to /opt/oracle/oradata/std1/tools01.dbf
restoring datafile 00005 to /opt/oracle/oradata/std1/users01.dbf
restoring datafile 00006 to /opt/oracle/oradata/std1/logmnrts.dbf
restoring datafile 00007 to /opt/oracle/oradata/std1/newlogminer.dbf
restoring datafile 00008 to /opt/oracle/oradata/std1/logmnrts_3.dbf
channel ORA_DISK_1: restored backup piece 1
piece handle=/opt/oracle/rman/std1_05grapd8_1_1 tag=TAG20050805T132104 params=NULL
channel ORA_DISK_1: restore complete
Finished restore at 05-AUG-05
RMAN> recover database;
Starting recover at 05-AUG-05
using channel ORA_DISK_1
starting media recovery
archive log thread 1 sequence 8 is already on disk as file /opt/oracle/oradata/std1/redo01.log
archive log filename=/opt/oracle/oradata/std1/redo01.log thread=1 sequence=8
media recovery complete
Finished recover at 05-AUG-05
RMAN> alter database open resetlogs;
database opened
new incarnation of database registered in recovery catalog
starting full resync of recovery catalog
full resync complete

QUESTION and ANSWERS
great article – this is the first article I have seen on how to use the standby database to recover the primary. thank you! I do have two questions: 1) is it possible to do this if you are not using a recovery catalog? If so, how would the steps differ? 2) why in step 7 isn’t the control file on the standby current. I would think that if you are using the standby to recover the primary that this would be the current control file. Most likely, your primary has probably been down for a while and datafiles could have been added to your standby. At least this is the situation I am in and I am trying to figure out how to restore the primary from the standby without shutting down the standby. Any advice would be greatly appreciated.
1)Yes, it’s ok without catalog. But you will need to catalog the backupfiles to the primary db control file.
In my example, use this
rman> catalog start with ‘/opt/oracle/rman/std1’;
2)The standby crontolfile is a standby controlfile on the point view of primary. That’s why rman says it is not a current controlfile. A current cotrolfile is always the primary db controlfile. After you active the standby db, its controlfile is current.
You do not need to stop the standby db to do recover. If you have questions, I’d like to help.
At the end we open the primary database with resetlogs, what will be the status of standby database? do you rebuild the standby database. Incase of all control/dbf/redo files lost, best option would be to failover to standby database and rebuild the standby. as the downtime will be very less.
starting with 11g control file can be taken backup from standby database, rman doesn’t throw RMAN-06497: WARNING: controlfile is not current, controlfile autobackup skipped error.
1. The standby database can sync with primary database automatically if you use dataguard. Dataguard will know and recover standby pass the resetlog point.
2. Agree. In case of primary fail, failover to standby is the standard solution to recover db. This post just provides another view.
 If I do not have primary controlfile backup, can we restore the standby controlfile backup to primary?
Also if db_unique_name is DBPRI on primary and dba_unique_name is DBSTBY on standby , is it not going to be an issue if we restore from standby backup as datafile headers may have db_unique_name details.
1. yes, you can restore the standby controlfile.
2. db_unique_name is not a problem. I don’t think it’s in datafile headers. Actually, you can change it in initial file. It’s at instance level.
When backuping my standby database i also backup its controlfile (standby controlfile) …. but i can’t use it to restore on my primary database. i got the following error :
RMAN-06026: some targets not found – aborting restore
RMAN-06023: no backup or copy of datafile 10 found to restore
are you sure i can use the backup of standby controlfile to restore my primary database? i yes how to do it? Thx again
yes. The error means you don’t have backup of datafile# 10. You’d better backup the controlfile and datafiles at the same time.

  DAILY CHECKLIST Oracle Database instance is running or not select name,open_mode from V$database; Note: Check the Oracle databases are ru...