Thursday, October 2, 2014

15 Greatest Open Source Terminal Applications Of 2012

15 Greatest Open Source Terminal Applications Of 2012


Linux on the desktop is making great progress. However, the real beauty of Linux and Unix like operating system lies beneath the surface at the command prompt. nixCraft picks his best open source terminal applications of 2012.

Most of the following tools are packaged by all major Linux distributions and can be installed on *BSD or Apple OS X.

#1: siege - An HTTP/HTTPS stress load tester
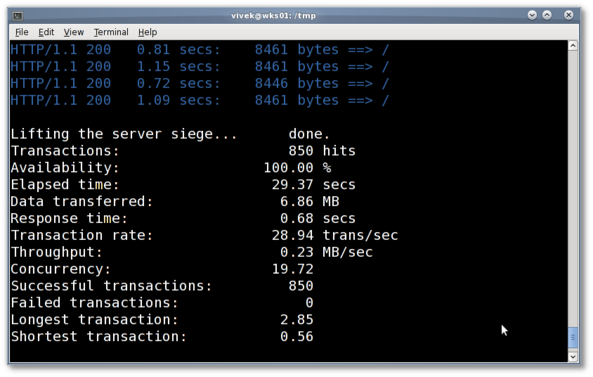
Fig.01: siege in action

Siege is a multi-threaded http or https load testing and benchmarking utility. This tool allows me to measure the performance of web apps under duress. I often use this tool test a web server and apps. I have had very good results with this tool. It can stress a single url such as example.com/foo.php or multiple urls. At the end of each test you will get all data about the web server performance, total data transferred, latency, server response time, concurrency and much more.

#2: abcde - A better CD encoder

Usually, the process of grabbing the data off a CD and encoding it, then tagging or commenting it, is very involved. abcde is designed to automate this. It will take an entire CD and convert it into a compressed audio format - Ogg/Vorbis, MPEG Audio Layer III, Free Lossless Audio Codec (FLAC), Ogg/Speex, MPP/MP+(Musepack) and/or M4A (AAC) format(s). It will do a CDDB query over the Internet to look up your CD or use a locally stored CDDB entry.

#3: ngrep - Network grep
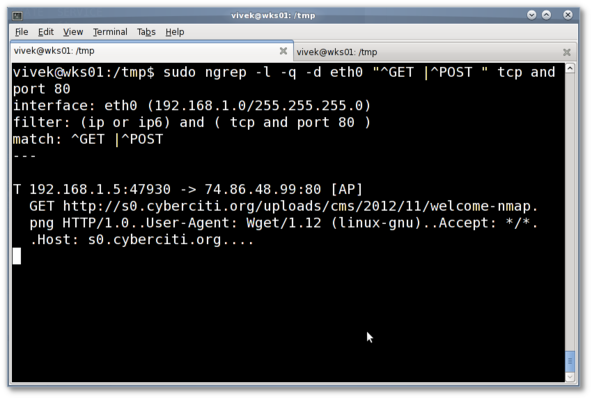
Fig.02: ngrep in action

Ngrep is a network packet analyzer. It follows most of GNU grep's common features, applying them to the network layer. Ngrep is not related to tcpdump. It is just an easy to use tool. You can run queries such as:
## grep all HTTP GET or POST requests from network traffic on eth0 interface  ##
sudo ngrep -l -q -d eth0 "^GET |^POST " tcp and port 80
 
I often use this tool to find out security related problems and tracking down other network and server related problems.

#4: pv

Fig.03: pv command in action

The pv command allows you to see the progress of data through a pipeline. It provides the following info:
  1. Time elapsed
  2. Percentage completed (with progress bar)
  3. Current throughput rate
  4. Total data transferred
  5. ETA
See how to install and use pv command under Linux. Or download pv by visiting this page.

#5: dtrx
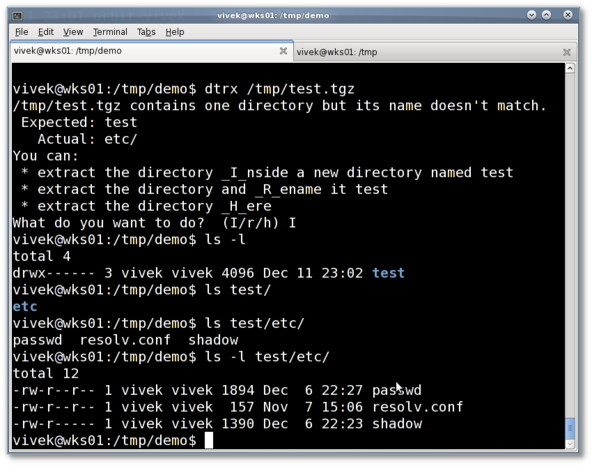
Fig.04: dtrx in action

dtrx is an acronmy for "Do The Right Extraction." It's a tool for Unix-like systems that take all the hassle out of extracting archives. As a sysadmin, I download source code and tar balls. This tool saves lots of time.
  • You only need to remember one simple command to extract tar, zip, cpio, deb, rpm, gem, 7z, cab, lzh, rar, gz, bz2, lzma, xz, and many kinds of exe files, including Microsoft Cabinet archives, InstallShield archives, and self-extracting zip files. If they have any extra compression, like tar.bz2 files, dtrx will take care of that for you, too.
  • dtrx will make sure that archives are extracted into their own dedicated directories.
  • dtrx makes sure you can read and write all the files you just extracted, while leaving the rest of the permissions intact.
  • Recursive extraction: dtrx can find archives inside the archive and extract those too.
  • Download dtrx

#6:dstat - Versatile resource statistics tool
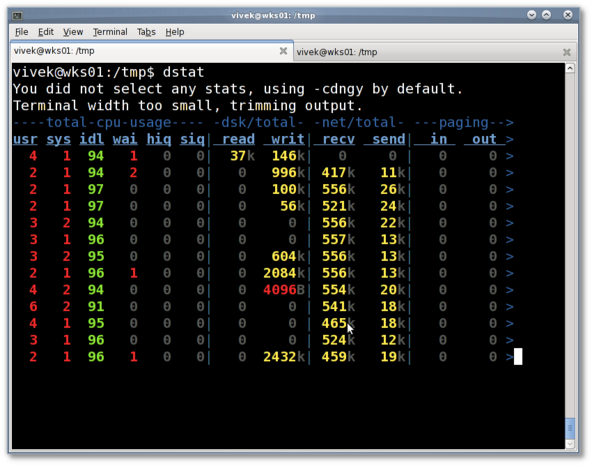
Fig.05: dstat in action

As a sysadmin, I heavily depends upon tools such as vmstat, iostat and friends for troubleshooting server issues. Dstat overcomes some of the limitations provided by vmstat and friends. It adds some extra features. It allows me to view all of my system resources instantly. I can compare disk usage in combination with interrupts from hard disk controller, or compare the network bandwidth numbers directly with the disk throughput and much more.

#7:ffmpeg - Record, convert, stream and play multimedia content
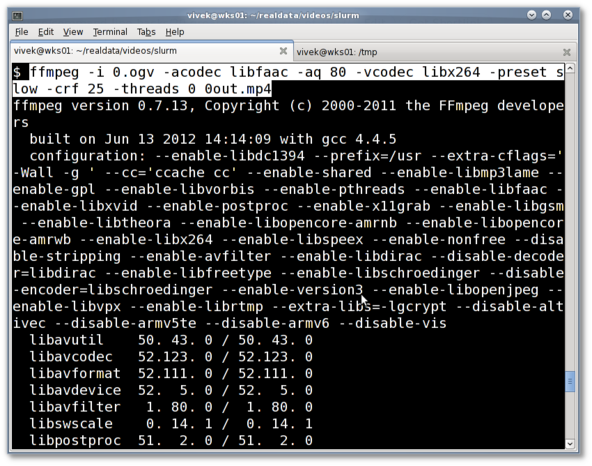
Fig.06: ffmpeg in action (ogv to mp4 conversion)

Recently, I started a youtube channel for nixCraft. I need to convert video and audio in various format such as Youtube HD web streaming format. This tool saves lots of my time. I often use this tool for audio/video conversion. This is the best tool for converting Audio, AVI, MP4, Ipod, Mobile phone, PSP, Quicktime, Rockbox, Web (Flash), WMV and much more.

#8:mtr - Traceroute+ping in a single network diagnostic tool
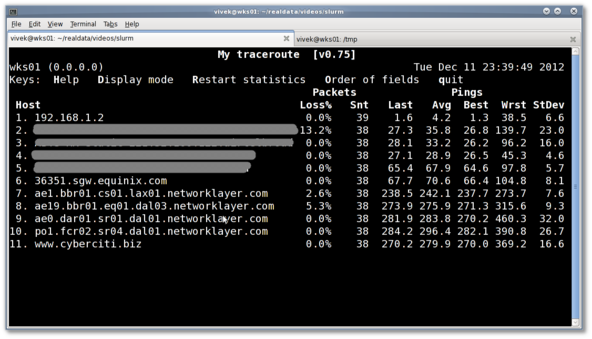
Fig.07: mtr in action

The mtr command combines the functionality of the traceroute and ping programs in a single network diagnostic tool. Use mtr to monitor outgoing bandwidth, latency and jitter in your network. A great little app to solve network problems. If you see a sudden increase in packetloss or response time is often an indication of a bad or simply overloaded link.

#9:multitail - Tail command on steroids
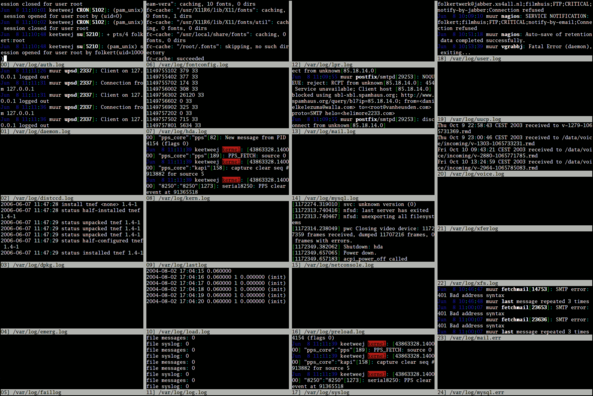
Fig.08: multitail in action (image credit - official project)

MultiTail is a program for monitoring multiple log files, in the fashion of the original tail program. This program lets you view one or multiple files like the original tail program. The difference is that it creates multiple windows on your console (with ncurses). I often use this tool when I am monitoring logs on my server.

#10: curl - Transfer data and see behind the scenes
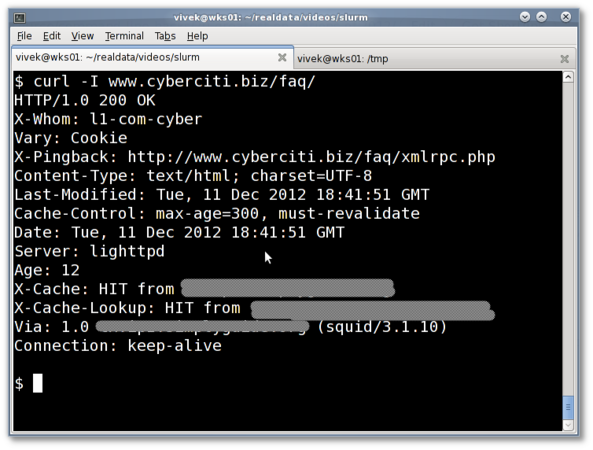
Fig.09: curl command in action

Curl is a command line tool to transfer data from or to a server, using one of the supported protocols. The command is designed to work without user interaction. curl offers a busload of useful tricks like proxy support, user authentication, FTP upload, and much more. I often use curl command to:
  1. Troubleshoot http/ftp/cdn server problems.
  2. Check or pass HTTP/HTTPS headers.
  3. Upload / download files using ftp protocol or to cloud account.
  4. Debug HTTP responses and find out exactly what an Apache/Nginx/Lighttpd/IIS server is sending to you without using any browser add-ons or 3rd party applications.
  5. Download curl

#11: netcat - TCP/IP swiss army knife
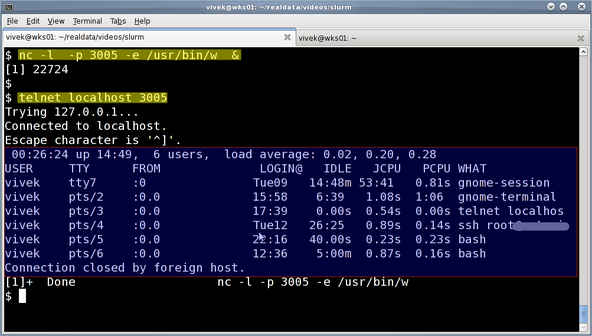
Fig.10: nc server and telnet client in action

Netcat or nc is a simple Linux or Unix command which reads and writes data across network connections, using TCP or UDP protocol. I often use this tool to open up a network pipe to test network connectivity, make backups, bind to sockets to handle incoming / outgoing requests and much more. In this example, I tell nc to listen to a port # 3005 and execute /usr/bin/w command when client connects and send data back to the client:
$ nc -l -p 3005 -e /usr/bin/w
From a different system try to connect to port # 3005:
$ telnet server1.cyberciti.biz.lan 3005

#12: nmap - Offensive and defensive network security scanner
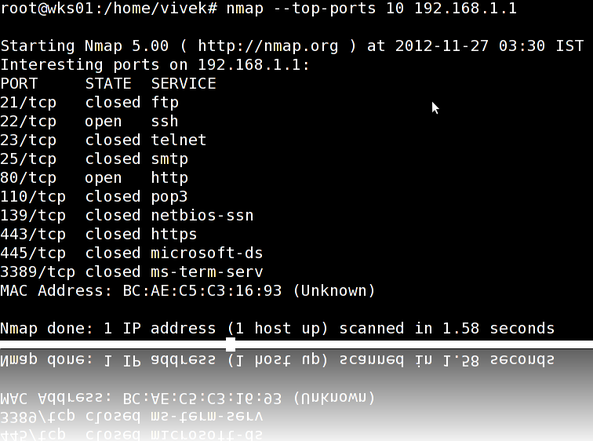
Fig.11: nmap in action

Nmap is short for Network Mapper. It is an open source security tool for network exploration, security scanning and auditing. However, nmap command comes with lots of options that can make the utility more robust and difficult to follow for new users.

#13: openssl command line tool

The openssl command is used for the various cryptography functions of OpenSSL's crypto library from the shell. I often use this tool to encrypt files, test/verify ssl connections, and check the integrity of downloaded files. Further, openssl can be used for:
  1. Creation of RSA, DH and DSA key parameters
  2. Creation of X.509 certificates, CSRs and CRLs
  3. Calculation of Message Digests
  4. Handling of S/MIME signed or encrypted mail
The following few examples demonstrate the power of openssl command:

File integrity verification (cryptographic hashing function)

Verify that a file called financial-records-fy-2011-12.dbx.aes has not been tampered with:
 
openssl dgst -sha1 -c financial-records-fy-2011-12.dbx.aes
openssl dgst -ripemd160 -c financial-records-fy-2011-12.dbx.aes
openssl dgst -md5 -c financial-records-fy-2011-12.dbx.aes
 
Sample outputs from the last command:
MD5(financial-records-fy-2011-12.dbx.aes)= d4:1d:8c:d9:8f:00:b2:04:e9:80:09:98:ec:f8:42:7e

Encryption and Decryption with Ciphers (files)

 
## encrypt file ##
openssl aes-256-cbc -salt -in financial-records-fy-2011-12.dbx   -out financial-records-fy-2011-12.dbx.aes
## decrypt file ##
openssl aes-256-cbc -d -in financial-records-fy-2011-12.dbx.aes -out financial-records-fy-2011-12.dbx
 

SSL/TLS client and server tests

## connect to gmail mail server for testing purpose ##
openssl s_client -connect smtp.gmail.com:995
openssl s_client -connect smtp.gmail.com:995 -CApath /etc/ssl
 

#14: lftp: A better command-line ftp/http/sftp client

This is the best and most sophisticated sftp/ftp/http download and upload client program. I often use this tool to:
  1. Recursively mirroring entire directory trees from a ftp server
  2. Accelerate ftp / http download speed
  3. Location bookmarks and resuming downloads.
  4. Backup files to a remote ftp servers.
  5. Transfers can be scheduled for execution at a later time.
  6. Bandwidth can be throttled and transfer queues can be set up.
  7. Lftp has shell-like command syntax allowing you to launch several commands in parallel in background (&).
  8. Segmented file transfer, that allows more than one connection for the same file.
  9. And much more.
  10. Download lftp

#15: Irssi - IRC client

Fig.#12: irssi in action (image credit wikipedia)

Irssi is a modular Internet Relay Chat client. It is highly extensible and very secure. Being a fullscreen, termcap based client with many features, Irssi is easily extensible through scripts and modules. I often use this client to get help about certain problmes from IRC rooms or just to hang out with old buddies.

#16: Rest...

  • Mutt - Email client and I often use mutt to send email attachments from my shell scripts.
  • bittorrent - Command line torrent client.
  • screen - A full-screen window manager and must have tool for all *nix admins.
  • rsync - Sync files and save bandwidth.
  • sar - Old good system activity collector and reporter.
  • lsof - List open files.
  • vim - Best text editor ever.
  • elinks or lynx - I use this browse remotely when some sites (such as RHN or Novell or Sun/Oracle) require registration/login before making downloads.
  • wget - Best download tool ever. I use wget all the time, even with Gnome desktop.
  • mplayer - Best console mp3 player that can play any audio file format.
  • newsbeuter - Text mode rss feed reader with podcast support.
  • parallel - Build and execute shell command lines from standard input in parallel.
  • iftop - Display bandwidth usage on network interface by host.
  • iotop - Find out what's stressing and increasing load on your hard disks.

Monday, September 29, 2014

How To Mount USB flash drive from Command Line

How To Mount USB flash drive from Command Line

Mounting a USB flash drive in GNOME (or another Linux desktop environment) is as easy as plug and play. Yet, occasionally, you need to mount one on a server which does not run X, then you must know how to do it on the command line. 

  1. Become root.
    $ sudo -s

  2. Plug in USB drive to a USB port. 

  3. Identify the correct partition name corresponding to the USB drive.

    For my Debian system, it is sda, and partition 1.
    $ dmesg |grep -i 'SCSI device'
    ...
    SCSI device sda: 3903488 512-byte hdwr sectors (1999 MB)

    Alternatively,
     $ grep  SCSI /var/log/messages
    ...
    Dec  1 11:52:26 tiger kernel: SCSI device sda: 3903488 512-byte hdwr sectors (1999 MB)

  4. Mount the partition to an existing mount point (directory).
    $ mkdir -p /mnt/myusb
    $ mount -t vfat -o rw,users /dev/sda1 /mnt/myusb

    users give non-root users the ability to unmount the drive.

    You can verify the drive is indeed mounted as follows:
     $ mount

    You should see a line in the output that looks like:
    
    /dev/sda1 on /mnt/myusb type vfat (rw,noexec,nosuid,nodev)

To retrieve the USB drive:


  1. You must unmount the partition before physically unplugging the USB device.
    
    $ umount /mnt/myusb

    You can run the mount command again (with no argument) to verify that the volume is indeed mounted.

  2. Unplug USB drive.

Monday, September 22, 2014

CRONTAB

Crontab - 


Commands: 
crontab -e     Edit your crontab file, or create one if it doesn’t already exist.
crontab -l      Display your crontab file.
crontab -r      Remove your crontab file.
crontab -v      Display the last time you edited your crontab file. (This option is only available on a few systems.)
Example
#############################################################
#
# Oracle broken jobs
#
0 9 * * *  /path/failingjobs.sh > /path/failingjobs.out  2>&1
Date time config for scheduling jobs
.---------------- minute (0 - 59) 
|  .------------- hour (0 - 23)
|  |  .---------- day of month (1 - 31)
|  |  |  .------- month (1 - 12) OR jan,feb,mar,apr ... 
|  |  |  |  .---- day of week (0 - 6) (Sunday=0 or 7)  OR sun,mon,tue,wed,thu,fri,sat 
|  |  |  |  |
*  *  *  *  *  command to be executed
There are several ways of specifying multiple date/time values in a field:
  • The comma (‘,’) operator specifies a list of values, for example: "1,3,4,7,8" (space inside the list must not be used)
  • The dash (‘-‘) operator specifies a range of values, for example: "1-6", which is equivalent to "1,2,3,4,5,6"
  • The asterisk (‘*’) operator specifies all possible values for a field. For example, an asterisk in the hour time field would be equivalent to ‘every hour’ (subject to matching other specified fields).
There is also an operator which some extended versions of cron support, the slash (‘/’) operator (called "step"), which can be used to skip a given number of values. For example, "*/3" in the hour time field is equivalent to "0,3,6,9,12,15,18,21".
So "*" specifies ‘every hour’ but the "*/3" means only those hours divisible by 3. The meaning of ‘/’ specifier, however, means "when the modulo is zero" rather than "every". For example, "*/61" in the minute will in fact be executed hourly, not every 61 minutes.
Example: the following will clear the Apache error log at one minute past midnight ( 00:01 of every day of the month, of every day of the week ).
1 0 * * *  echo -n "" > /www/apache/logs/error_log
Slash example: the following will run the script /home/user/test.pl every 5 minutes.
*/5 * * * *  /home/user/test.pl

Retrieve Oracle SPID from unix OS PID

Retrieve Oracle SPID from unix OS PID

The Unix/Linux PID that you see in ‘top’ is visible as SPID in V$PROCESS. Then, you’d have to join V$PROCESS to V$SESSION to get the SID. (Note : PID in V$PROCESS is the Oracle PID, not the OS PID).
--Replace bind variable with OS PID List
select s.sid, s.serial#, s.username,
       to_char(s.logon_time,'DD-MON HH24:MI:SS') logon_time,
       p.pid oraclepid, p.spid "ServerPID", s.process "ClientPID",
       s.program clientprogram, s.module, s.machine, s.osuser,
       s.status, s.last_call_et
from  gv$session s, gv$process p
where p.spid=nvl('&unix_process',' ')
and s.paddr=p.addr
order by s.sid

Thursday, September 18, 2014

16 commands to check hardware information on Linux

16 commands to check hardware information on Linux

Hardware information

Like for every thing, there are plenty of commands to check information about the hardware of your linux system. Some commands report only specific hardware components like cpu or memory while the rest cover multiple hardware units.

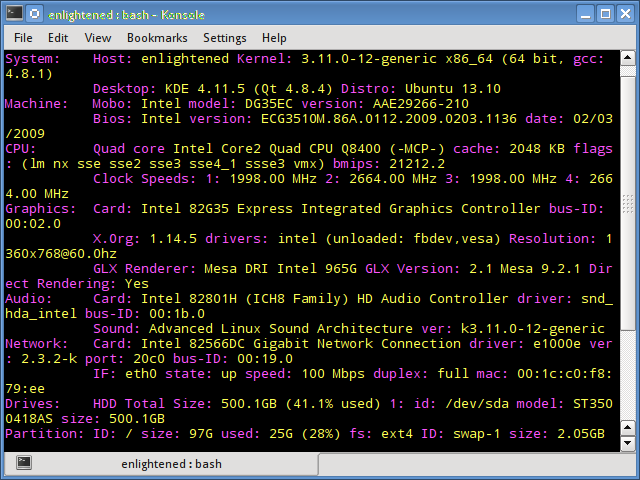
This post takes a quick look at some of the most commonly used commands to check information and configuration details about various hardware peripherals and devices. The list includes lscpu, hwinfo, lshw, dmidecode, lspci etc.

1. lscpu

The lscpu command reports information about the cpu and processing units. It does not have any further options or functionality.
$ lscpu
Architecture:          x86_64
CPU op-mode(s):        32-bit, 64-bit
Byte Order:            Little Endian
CPU(s):                4
On-line CPU(s) list:   0-3
Thread(s) per core:    1
Core(s) per socket:    4
Socket(s):             1
NUMA node(s):          1
Vendor ID:             GenuineIntel
CPU family:            6
Model:                 23
Stepping:              10
CPU MHz:               1998.000
BogoMIPS:              5302.48
Virtualization:        VT-x
L1d cache:             32K
L1i cache:             32K
L2 cache:              2048K
NUMA node0 CPU(s):     0-3

2. lshw - List Hardware

A general purpose utility, that reports detailed and brief information about multiple different hardware units such as cpu, memory, disk, usb controllers, network adapters etc. Lshw extracts the information from different /proc files.
$ sudo lshw -short

H/W path        Device      Class       Description
===================================================
                            system      ()
/0                          bus         DG35EC
/0/0                        processor   Intel(R) Core(TM)2 Quad CPU    Q8400  @ 2.66GHz
/0/0/1                      memory      2MiB L2 cache
/0/0/3                      memory      32KiB L1 cache
/0/2                        memory      32KiB L1 cache
/0/4                        memory      64KiB BIOS
/0/14                       memory      8GiB System Memory
/0/14/0                     memory      2GiB DIMM DDR2 Synchronous 667 MHz (1.5 ns)
/0/14/1                     memory      2GiB DIMM DDR2 Synchronous 667 MHz (1.5 ns)
/0/14/2                     memory      2GiB DIMM DDR2 Synchronous 667 MHz (1.5 ns)
/0/14/3                     memory      2GiB DIMM DDR2 Synchronous 667 MHz (1.5 ns)
/0/100                      bridge      82G35 Express DRAM Controller
/0/100/2                    display     82G35 Express Integrated Graphics Controller
/0/100/2.1                  display     82G35 Express Integrated Graphics Controller
/0/100/19       eth0        network     82566DC Gigabit Network Connection
/0/100/1a                   bus         82801H (ICH8 Family) USB UHCI Controller #4
/0/100/1a.1                 bus         82801H (ICH8 Family) USB UHCI Controller #5
/0/100/1a.7                 bus         82801H (ICH8 Family) USB2 EHCI Controller #2
/0/100/1b                   multimedia  82801H (ICH8 Family) HD Audio Controller
/0/100/1c                   bridge      82801H (ICH8 Family) PCI Express Port 1
/0/100/1c.1                 bridge      82801H (ICH8 Family) PCI Express Port 2
/0/100/1c.2                 bridge      82801H (ICH8 Family) PCI Express Port 3
/0/100/1c.2/0               storage     JMB368 IDE controller
/0/100/1d                   bus         82801H (ICH8 Family) USB UHCI Controller #1
/0/100/1d.1                 bus         82801H (ICH8 Family) USB UHCI Controller #2
/0/100/1d.2                 bus         82801H (ICH8 Family) USB UHCI Controller #3
/0/100/1d.7                 bus         82801H (ICH8 Family) USB2 EHCI Controller #1
/0/100/1e                   bridge      82801 PCI Bridge
/0/100/1e/5                 bus         FW322/323 [TrueFire] 1394a Controller
/0/100/1f                   bridge      82801HB/HR (ICH8/R) LPC Interface Controller
/0/100/1f.2                 storage     82801H (ICH8 Family) 4 port SATA Controller [IDE mode]
/0/100/1f.3                 bus         82801H (ICH8 Family) SMBus Controller
/0/100/1f.5                 storage     82801HR/HO/HH (ICH8R/DO/DH) 2 port SATA Controller [IDE m
/0/1            scsi3       storage     
/0/1/0.0.0      /dev/sda    disk        500GB ST3500418AS
/0/1/0.0.0/1    /dev/sda1   volume      70GiB Windows NTFS volume
/0/1/0.0.0/2    /dev/sda2   volume      395GiB Extended partition
/0/1/0.0.0/2/5  /dev/sda5   volume      97GiB HPFS/NTFS partition
/0/1/0.0.0/2/6  /dev/sda6   volume      97GiB Linux filesystem partition
/0/1/0.0.0/2/7  /dev/sda7   volume      1952MiB Linux swap / Solaris partition
/0/1/0.0.0/2/8  /dev/sda8   volume      198GiB Linux filesystem partition
/0/3            scsi4       storage     
/0/3/0.0.0      /dev/cdrom  disk        DVD RW DRU-190A
Check out the following post to learn more about lshw
Get hardware information on Linux with lshw command

3. hwinfo - Hardware Information

Hwinfo is another general purpose hardware probing utility that can report detailed and brief information about multiple different hardware components, and more than what lshw can report.
$ hwinfo --short
cpu:                                                            
                       Intel(R) Core(TM)2 Quad CPU    Q8400  @ 2.66GHz, 2000 MHz
                       Intel(R) Core(TM)2 Quad CPU    Q8400  @ 2.66GHz, 2000 MHz
                       Intel(R) Core(TM)2 Quad CPU    Q8400  @ 2.66GHz, 2666 MHz
                       Intel(R) Core(TM)2 Quad CPU    Q8400  @ 2.66GHz, 2666 MHz
keyboard:
  /dev/input/event2    AT Translated Set 2 keyboard
mouse:
  /dev/input/mice      Microsoft Basic Optical Mouse v2.0
graphics card:
                       Intel 965G-1
                       Intel 82G35 Express Integrated Graphics Controller
sound:
                       Intel 82801H (ICH8 Family) HD Audio Controller
storage:
                       Intel 82801H (ICH8 Family) 4 port SATA IDE Controller
                       Intel 82801H (ICH8 Family) 2 port SATA IDE Controller
                       JMicron JMB368 IDE controller
network:
  eth0                 Intel 82566DC Gigabit Network Connection
network interface:
  eth0                 Ethernet network interface
  lo                   Loopback network interface
disk:
  /dev/sda             ST3500418AS
partition:
  /dev/sda1            Partition
  /dev/sda2            Partition
  /dev/sda5            Partition
  /dev/sda6            Partition
  /dev/sda7            Partition
  /dev/sda8            Partition
cdrom:
  /dev/sr0             SONY DVD RW DRU-190A
usb controller:
                       Intel 82801H (ICH8 Family) USB UHCI Controller #4
                       Intel 82801H (ICH8 Family) USB UHCI Controller #5
                       Intel 82801H (ICH8 Family) USB2 EHCI Controller #2
                       Intel 82801H (ICH8 Family) USB UHCI Controller #1
                       Intel 82801H (ICH8 Family) USB UHCI Controller #2
                       Intel 82801H (ICH8 Family) USB UHCI Controller #3
                       Intel 82801H (ICH8 Family) USB2 EHCI Controller #1
bios:
                       BIOS

... TRUNCATED ...
Check out our previous post on hwinfo
Check hardware information on Linux with hwinfo command

4. lspci - List PCI

The lspci command lists out all the pci buses and details about the devices connected to them.
The vga adapter, graphics card, network adapter, usb ports, sata controllers, etc all fall under this category.
$ lspci
00:00.0 Host bridge: Intel Corporation 82G35 Express DRAM Controller (rev 03)
00:02.0 VGA compatible controller: Intel Corporation 82G35 Express Integrated Graphics Controller (rev 03)
00:02.1 Display controller: Intel Corporation 82G35 Express Integrated Graphics Controller (rev 03)
00:19.0 Ethernet controller: Intel Corporation 82566DC Gigabit Network Connection (rev 02)
00:1a.0 USB controller: Intel Corporation 82801H (ICH8 Family) USB UHCI Controller #4 (rev 02)
00:1a.1 USB controller: Intel Corporation 82801H (ICH8 Family) USB UHCI Controller #5 (rev 02)
00:1a.7 USB controller: Intel Corporation 82801H (ICH8 Family) USB2 EHCI Controller #2 (rev 02)
00:1b.0 Audio device: Intel Corporation 82801H (ICH8 Family) HD Audio Controller (rev 02)
00:1c.0 PCI bridge: Intel Corporation 82801H (ICH8 Family) PCI Express Port 1 (rev 02)
00:1c.1 PCI bridge: Intel Corporation 82801H (ICH8 Family) PCI Express Port 2 (rev 02)
00:1c.2 PCI bridge: Intel Corporation 82801H (ICH8 Family) PCI Express Port 3 (rev 02)
00:1d.0 USB controller: Intel Corporation 82801H (ICH8 Family) USB UHCI Controller #1 (rev 02)
00:1d.1 USB controller: Intel Corporation 82801H (ICH8 Family) USB UHCI Controller #2 (rev 02)
00:1d.2 USB controller: Intel Corporation 82801H (ICH8 Family) USB UHCI Controller #3 (rev 02)
00:1d.7 USB controller: Intel Corporation 82801H (ICH8 Family) USB2 EHCI Controller #1 (rev 02)
00:1e.0 PCI bridge: Intel Corporation 82801 PCI Bridge (rev f2)
00:1f.0 ISA bridge: Intel Corporation 82801HB/HR (ICH8/R) LPC Interface Controller (rev 02)
00:1f.2 IDE interface: Intel Corporation 82801H (ICH8 Family) 4 port SATA Controller [IDE mode] (rev 02)
00:1f.3 SMBus: Intel Corporation 82801H (ICH8 Family) SMBus Controller (rev 02)
00:1f.5 IDE interface: Intel Corporation 82801HR/HO/HH (ICH8R/DO/DH) 2 port SATA Controller [IDE mode] (rev 02)
03:00.0 IDE interface: JMicron Technology Corp. JMB368 IDE controller
04:05.0 FireWire (IEEE 1394): LSI Corporation FW322/323 [TrueFire] 1394a Controller (rev 70)
Filter out specific device information with grep.
$ lspci -v | grep "VGA" -A 12

5. lsscsi - List scsi devices

Lists out the scsi/sata devices like hard drives and optical drives.
$ lsscsi
[3:0:0:0]    disk    ATA      ST3500418AS      CC38  /dev/sda 
[4:0:0:0]    cd/dvd  SONY     DVD RW DRU-190A  1.63  /dev/sr0

6. lsusb - List usb buses and device details

This command shows the USB controllers and details about devices connected to them. By default brief information is printed. Use the verbose option "-v" to print detailed information about each usb port
$ lsusb
Bus 002 Device 001: ID 1d6b:0002 Linux Foundation 2.0 root hub
Bus 007 Device 001: ID 1d6b:0001 Linux Foundation 1.1 root hub
Bus 006 Device 001: ID 1d6b:0001 Linux Foundation 1.1 root hub
Bus 005 Device 002: ID 045e:00cb Microsoft Corp. Basic Optical Mouse v2.0
Bus 005 Device 001: ID 1d6b:0001 Linux Foundation 1.1 root hub
Bus 001 Device 001: ID 1d6b:0002 Linux Foundation 2.0 root hub
Bus 004 Device 001: ID 1d6b:0001 Linux Foundation 1.1 root hub
Bus 003 Device 001: ID 1d6b:0001 Linux Foundation 1.1 root hub
On the above system, 1 usb port is being used by the mouse.

7. Inxi

Inxi is a 10K line mega bash script that fetches hardware details from multiple different sources and commands on the system, and generates a beautiful looking report that non technical users can read easily.
$ inxi -Fx
inxi linux hardware information tool

8. lsblk - List block devices

List out information all block devices, which are the hard drive partitions and other storage devices like optical drives and flash drives
$ lsblk
NAME   MAJ:MIN RM   SIZE RO TYPE MOUNTPOINT
sda      8:0    0 465.8G  0 disk 
├─sda1   8:1    0    70G  0 part 
├─sda2   8:2    0     1K  0 part 
├─sda5   8:5    0  97.7G  0 part /media/4668484A68483B47
├─sda6   8:6    0  97.7G  0 part /
├─sda7   8:7    0   1.9G  0 part [SWAP]
└─sda8   8:8    0 198.5G  0 part /media/13f35f59-f023-4d98-b06f-9dfaebefd6c1
sr0     11:0    1  1024M  0 rom

9. df - disk space of file systems

Reports various partitions, their mount points and the used and available space on each.
$ df -H
Filesystem      Size  Used Avail Use% Mounted on
/dev/sda6       104G   26G   73G  26% /
none            4.1k     0  4.1k   0% /sys/fs/cgroup
udev            4.2G  4.1k  4.2G   1% /dev
tmpfs           837M  1.6M  835M   1% /run
none            5.3M     0  5.3M   0% /run/lock
none            4.2G   13M  4.2G   1% /run/shm
none            105M   21k  105M   1% /run/user
/dev/sda8       210G  149G   51G  75% /media/13f35f59-f023-4d98-b06f-9dfaebefd6c1
/dev/sda5       105G   31G   75G  30% /media/4668484A68483B47

10. Pydf - Python df

An improved df version written in python, that displays colored output that looks better than df
$ pydf
Filesystem Size Used Avail Use%          Mounted on                                 
/dev/sda6   96G  23G   68G 24.4 [#.....] /                                          
/dev/sda8  195G 138G   47G 70.6 [####..] /media/13f35f59-f023-4d98-b06f-9dfaebefd6c1
/dev/sda5   98G  28G   69G 29.2 [##....] /media/4668484A68483B47

11. fdisk

Fdisk is a utility to modify partitions on hard drives, and can be used to list out the partition information as well.
$ sudo fdisk -l

Disk /dev/sda: 500.1 GB, 500107862016 bytes
255 heads, 63 sectors/track, 60801 cylinders, total 976773168 sectors
Units = sectors of 1 * 512 = 512 bytes
Sector size (logical/physical): 512 bytes / 512 bytes
I/O size (minimum/optimal): 512 bytes / 512 bytes
Disk identifier: 0x30093008

   Device Boot      Start         End      Blocks   Id  System
/dev/sda1   *          63   146801969    73400953+   7  HPFS/NTFS/exFAT
/dev/sda2       146802031   976771071   414984520+   f  W95 Ext'd (LBA)
/dev/sda5       146802033   351614654   102406311    7  HPFS/NTFS/exFAT
/dev/sda6       351614718   556427339   102406311   83  Linux
/dev/sda7       556429312   560427007     1998848   82  Linux swap / Solaris
/dev/sda8       560429056   976771071   208171008   83  Linux

12. mount

The mount is used to mount/unmount and view mounted file systems.
$ mount | column -t
/dev/sda6    on  /                                            type  ext4             (rw,errors=remount-ro)
proc         on  /proc                                        type  proc             (rw,noexec,nosuid,nodev)
sysfs        on  /sys                                         type  sysfs            (rw,noexec,nosuid,nodev)
none         on  /sys/fs/cgroup                               type  tmpfs            (rw)
none         on  /sys/fs/fuse/connections                     type  fusectl          (rw)
none         on  /sys/kernel/debug                            type  debugfs          (rw)
none         on  /sys/kernel/security                         type  securityfs       (rw)
udev         on  /dev                                         type  devtmpfs         (rw,mode=0755)
devpts       on  /dev/pts                                     type  devpts           (rw,noexec,nosuid,gid=5,mode=0620)
tmpfs        on  /run                                         type  tmpfs            (rw,noexec,nosuid,size=10%,mode=0755)
none         on  /run/lock                                    type  tmpfs            (rw,noexec,nosuid,nodev,size=5242880)
none         on  /run/shm                                     type  tmpfs            (rw,nosuid,nodev)
none         on  /run/user                                    type  tmpfs            (rw,noexec,nosuid,nodev,size=104857600,mode=0755)
none         on  /sys/fs/pstore                               type  pstore           (rw)
/dev/sda8    on  /media/13f35f59-f023-4d98-b06f-9dfaebefd6c1  type  ext4             (rw,nosuid,nodev,errors=remount-ro)
/dev/sda5    on  /media/4668484A68483B47                      type  fuseblk          (rw,nosuid,nodev,allow_other,blksize=4096)
binfmt_misc  on  /proc/sys/fs/binfmt_misc                     type  binfmt_misc      (rw,noexec,nosuid,nodev)
systemd      on  /sys/fs/cgroup/systemd                       type  cgroup           (rw,noexec,nosuid,nodev,none,name=systemd)
gvfsd-fuse   on  /run/user/1000/gvfs                          type  fuse.gvfsd-fuse  (rw,nosuid,nodev,user=enlightened)
Again, use grep to filter out only those file systems that you want to see
$ mount | column -t | grep ext

13. free - Check RAM

Check the amount of used, free and total amount of RAM on system with the free command.
$ free -m
             total       used       free     shared    buffers     cached
Mem:          7975       5865       2110          0         24        622
-/+ buffers/cache:       5218       2757
Swap:         1951        921       1030

14. dmidecode

The dmidecode command is different from all other commands. It extracts hardware information by reading data from the SMBOIS data structures (also called DMI tables).
# display information about the processor/cpu
$ sudo dmidecode -t processor

# memory/ram information
$ sudo dmidecode -t memory

# bios details
$ sudo dmidecode -t bios
Check out the man page for more details.

15. /proc files

Many of the virtual files in the /proc directory contain information about hardware and configurations. Here are some of them
CPU/Memory information
# cpu information
$ cat /proc/cpuinfo

# memory information
$ cat /proc/meminfo
Linux/kernel information
$ cat /proc/version
Linux version 3.11.0-12-generic (buildd@allspice) (gcc version 4.8.1 (Ubuntu/Linaro 4.8.1-10ubuntu7) ) #19-Ubuntu SMP Wed Oct 9 16:20:46 UTC 2013
SCSI/Sata devices
$ cat /proc/scsi/scsi 
Attached devices:
Host: scsi3 Channel: 00 Id: 00 Lun: 00
  Vendor: ATA      Model: ST3500418AS      Rev: CC38
  Type:   Direct-Access                    ANSI  SCSI revision: 05
Host: scsi4 Channel: 00 Id: 00 Lun: 00
  Vendor: SONY     Model: DVD RW DRU-190A  Rev: 1.63
  Type:   CD-ROM                           ANSI  SCSI revision: 05
Partitions
$ cat /proc/partitions 
major minor  #blocks  name

   8        0  488386584 sda
   8        1   73400953 sda1
   8        2          1 sda2
   8        5  102406311 sda5
   8        6  102406311 sda6
   8        7    1998848 sda7
   8        8  208171008 sda8
  11        0    1048575 sr0

16. hdparm

The hdparm command gets information about sata devices like hard disks.
$ sudo hdparm -i /dev/sda

/dev/sda:

 Model=ST3500418AS, FwRev=CC38, SerialNo=9VMJXV1N
 Config={ HardSect NotMFM HdSw>15uSec Fixed DTR>10Mbs RotSpdTol>.5% }
 RawCHS=16383/16/63, TrkSize=0, SectSize=0, ECCbytes=4
 BuffType=unknown, BuffSize=16384kB, MaxMultSect=16, MultSect=16
 CurCHS=16383/16/63, CurSects=16514064, LBA=yes, LBAsects=976773168
 IORDY=on/off, tPIO={min:120,w/IORDY:120}, tDMA={min:120,rec:120}
 PIO modes:  pio0 pio1 pio2 pio3 pio4 
 DMA modes:  mdma0 mdma1 mdma2 
 UDMA modes: udma0 udma1 udma2 udma3 udma4 udma5 *udma6 
 AdvancedPM=no WriteCache=enabled
 Drive conforms to: unknown:  ATA/ATAPI-4,5,6,7

 * signifies the current active mode

Summary

Each of the command has a slightly different method of extracting information, and you may need to try more than one of them, while looking for specific hardware details. However they are available across most linux distros, and can be easily installed from the default repositories.
On the desktop there are gui tools, for those who do not want to memorise and type commands. Hardinfo, I-nex are some of the popular ones that provide detailed information about multiple different hardware components.

Thursday, September 4, 2014

srvctl stop listener: command syntax and example

srvctl stop listener: command syntax and example

Stops the specified Listener or Listeners.
Syntax:
srvctl stop listener -n node_name [-l listener_name_list]
Example:
An example of this command is:

srvctl stop listener -n node01

srvctl modify instance command syntax and example

The srvctl modify instance command is used to modify an instance configuration in the  OCR (Oracle cluster registry).
Used to modify the configuration for a database instance from its current node to another node or
changes the dependency between and ASM instance and a database instance.
Syntax:
srvctl modify instance -d db_unique_name -i inst_name {-n node_name | -s asm_instance_name | -r}
-d database name (unique name)
-i database instance name.
-n Node name.
-s asm_instance_name: name of the ASM instance (dependency to database instance).
-r : Remove ASM instance dependency from database instance.


Examples
An example of this command to relocate a database instance is:
srvctl modify instance -d crm -i crm1 -n my_new_node
The following example of this command establishes a dependency between an ASM instance and a database instance:
srvctl modify instance -d crm -i crm1 -s asm1

srvctl modify database syntax and example

The srvctl modify database command is used to modify a database configurations in the  OCR (Oracle cluster registry).
The OCR is the repository used by the CRS (cluster readu services) processes to run a database in RAC environment.

Syntax:
srvctl modify database -d db_unique_name [-n db_name] [-o oracle_home] [-m domain_name]
  [-p spfile] [-r {PRIMARY | PHYSICAL_STANDBY | LOGICAL_STANDBY}] [-s start_options] [-y {AUTOMATIC | MANUAL}]

-d database name (unique name)
-n db_name: database name if different from unique name
-o oracle_home:Oracle home
-m domain_name: Domain name of the database
-p spfile: server parameter file
-r role [PRIMARY | PHYSICAL_STANDBY | LOGICAL_STANDBY]: Role of the database
-s start_options:Startup options for the database.
-y Management policy for the database, either automatic or manual.
-h
Example:
srvctl modify database -d mndb -r logical_standby
This command makes the database mndb a LOGICAL_STANDBY database.
srvctl modify database -d mndb -r physical_standby
This command makes the database mndb a PHYSICAL_STANDBY database.

srvctl stop asm: command syntax and example

Stops ASM instances

Syntax:
srvctl stop asm -n node_name [-i inst_name] [-o stop_options] [-c connect_str | -q]
-n node_name:Node name.
-i inst_name:ASM instance name.
-o stop_options:Options for shutdown command, for example, normal, transactional, immediate, or abort.
-c connect_string:Connect string where the default is forward slash (/).
-q Query connect string from standard input.
-h Display help.
Example:
An example of this command is:
srvctl stop asm -n node01 -i asm1

srvctl stop nodeapps: command syntax and example

Stops the node-level applications
Syntax:
srvctl stop nodeapps -n node_name
The only option for this command is the -n option, which specifies the node name.
Example:
An example of this command is:
srvctl stop nodeapps -n node01

Oracle database startup stages and commands

Oracle database startup stages and commands

 Simply starting an Oracle database with startup command is not too complex. Actually it is just running a few commands and your database will come up happily and be ready for normal operation.
 For example to start your Oracle database you can just login and execute startup command as follows.
 $sqlplus / as sysdba
 SQL>startup

This command will start your database.
 But in the background there are a few stages that are hidden when you use the above command. Understanding these stages will help you to get a better insight view of Oracle startup process.
Oracle startup process consists of three stages
Stage 1: NOMOUNT
Stage 2: MOUNT
Stage 3: OPEN

 Stage 1: NOMOUNT
This is the first stage in the startup process.  You can start Oracle database in nomount mode using the command
SQL>startup nomount
When you execute the above command, an Oracle instance is started. When instance starts it will read the initialisation file (commonly known as parameter file) called init.ora file. From this parameter file the instance will know about the size of SGA, PGA, database buffer size and other configurable parameters. The instance will also start the Oracle background process such as (PMON, SMON, LGWR etc). This stage also opens the alert log and the trace files.

Stage 2: MOUNT
The next stage after NOMOUNT is called MOUNT. You can manually start an Oracle database in MOUNT stage using the command
SQL>startup mount
Or when database is already in nomount stage then you can change the stage by running the command
SQL>alter database mount;

When database goes into mount stage, it will read the control files specified in the parameter file. Remember the parameter file was read in the first stage (nomount). The control files contain the information about the physical structure of the database. So the control file will have the names and locations of all the datafiles and online redo log files. At this stage these datafiles and log files are not opened.

Some database administration operations can only be performed when the Oracle database is MOUNT stage. For example Oracle full database recovery can be done only when the database is in mount stage. If you want to rename a datafile you may need to take the database to mount stage unless the tablespace of the datafile is already offline.

Stage 3: OPEN
The final stage in the Oracle startup process. When the database is open then only normal database operations can takes place. Which means users and applications can login and start reading/writing data.
Running the command below will start the Oracle database and put into OPEN stage.  
SQL>startup
And if the database is already in MOUNT stage then you can open the database using the command
SQL> alter database open;

When database is open it will open the datafiles and redo log files. If any of these files are missing or corrupted then Oracle will not open successfully and will return error.

  DAILY CHECKLIST Oracle Database instance is running or not select name,open_mode from V$database; Note: Check the Oracle databases are ru...