Monday, March 13, 2017

How can I do traffic shaping in Linux by IP?

How can I do traffic shaping in Linux by IP?

The traffic shaping layer of the kernel is, basically, a packet scheduler attached to your network card. So one traffic shaping policy applies to one network card.
What you can do, in your case, is to create a list of IP and bandwidth attached, and then, for each IP, you create:
  • One traffic shaping rule identified by a classid
  • One netfilter rule that will mark packets to a specific mark value
  • One Filter that will bind that packets marks to the classid, thus applying the traffic control rule to the specified packets.
The example given by @Zoredache works, but I personnally prefer to use Netfilter capability instead of TC to filter packets, and HTB instead of CBQ for the shapping algorithm. So you can try something like this (requires Bash 4 for associative arrays):
#! /bin/bash
NETCARD=eth0
MAXBANDWIDTH=100000

# reinit
tc qdisc del dev $NETCARD root handle 1
tc qdisc add dev $NETCARD root handle 1: htb default 9999

# create the default class
tc class add dev $NETCARD parent 1:0 classid 1:9999 htb rate $(( $MAXBANDWIDTH ))kbit ceil $(( $MAXBANDWIDTH ))kbit burst 5k prio 9999

# control bandwidth per IP
declare -A ipctrl
# define list of IP and bandwidth (in kilo bits per seconds) below
ipctrl[192.168.1.1]="256"
ipctrl[192.168.1.2]="128"
ipctrl[192.168.1.3]="512"
ipctrl[192.168.1.4]="32"

mark=0
for ip in "${!ipctrl[@]}"
do
    mark=$(( mark + 1 ))
    bandwidth=${ipctrl[$ip]}

    # traffic shaping rule
    tc class add dev $NETCARD parent 1:0 classid 1:$mark htb rate $(( $bandwidth ))kbit ceil $(( $bandwidth ))kbit burst 5k prio $mark

    # netfilter packet marking rule
    iptables -t mangle -A INPUT -i $NETCARD -s $ip -j CONNMARK --set-mark $mark

    # filter that bind the two
    tc filter add dev $NETCARD parent 1:0 protocol ip prio $mark handle $mark fw flowid 1:$mark

    echo "IP $ip is attached to mark $mark and limited to $bandwidth kbps"
done

#propagate netfilter marks on connections
iptables -t mangle -A POSTROUTING -j CONNMARK --restore-mark

#!/bin/bash
set -x

DEV=eth0
export DEV

tc qdisc del dev $DEV root
tc qdisc add dev $DEV root handle 1: cbq avpkt 1000 bandwidth 100mbit

# setup a class to limit to 1500 kilobits/s
tc class add dev $DEV parent 1: classid 1:1 cbq rate 1500kbit \
   allot 1500 prio 5 bounded isolated

# add traffic from 10.2.1.37 to that class
tc filter add dev $DEV parent 1: protocol ip prio 16 u32 \
   match ip src 10.2.1.37 flowid 1:1

Wednesday, March 1, 2017

MegaCLI cheatsheet

MegaCLI cheatsheet


Recently I've had to do extensive work with Dell PowerEdge servers, and specifically Dell's that use the LSI MegaRAID controllers. Anyone who has ever had to work with the LSI RAID controllers knows that the MegaCLI provided by LSI is the most cryptic command line utility in existence. MegaCli is available for Linux, DOS, Windows, Netware and Solaris. You can get it from LSI’s website (search for MegaRAID SAS).
Inside the tarball or zip file you’ll find an RPM archive which contains the MegaCli and MegaCli64 binaries (will be installed to /opt/MegaRAID/MegaCli).
Please note:
This emergency cheat sheet is not exhaustive, but it should be sufficient in most cases. For a complete reference either call MegaCli -h or refer to the manual at:http://www.lsi.com/files/docs/techdocs/storage_stand_prod/sas/mr_sas_sw_ug.pdf
While there are a lot of different parameters for MegaCli, some of them are always identical. These are described here in short.
Adapter parameter -aN
The parameter -aN (where N is a number starting with zero or the string ALL) specifies the PERC5/i adapter ID. If you have only one controller it’s safe to use ALL instead of a specific ID, but you’re encouraged to use the ID for everything that makes changes to your RAID configuration.
Physical drive parameter -PhysDrv [E:S]
For commands that operate on one or more pysical drives, the -PhysDrv [E:S] parameter is used, where E is the enclosure device ID in which the drive resides and S the slot number (starting with zero). You can get the enclosure device ID using "MegaCli -EncInfo -aALL". The E:S syntax is also used for specifying the physical drives when creating a new RAID virtual drive.
Virtual drive parameter -Lx
The parameter -Lx is used for specifying the virtual drive (where x is a number starting with zero or the string all).
Controller information
MegaCli -AdpAllInfo -aALL
MegaCli -CfgDsply -aALL
MegaCli -AdpEventLog -GetEvents -f events.log -aALL && cat events.log
Enclosure information
MegaCli -EncInfo -aALL
Virtual drive information
MegaCli -LDInfo -Lall -aALL
Physical drive information
MegaCli -PDList -aALL
MegaCli -PDInfo -PhysDrv [E:S] -aALL
Battery backup information
MegaCli -AdpBbuCmd -aALL
Controller management
Silence active alarm
MegaCli -AdpSetProp AlarmSilence -aALL
Disable alarm
MegaCli -AdpSetProp AlarmDsbl -aALL
Enable alarm
MegaCli -AdpSetProp AlarmEnbl -aALL
Physical drive management
Set state to offline
MegaCli -PDOffline -PhysDrv [E:S] -aN
Set state to online
MegaCli -PDOnline -PhysDrv [E:S] -aN
Mark as missing
MegaCli -PDMarkMissing -PhysDrv [E:S] -aN
Prepare for removal
MegaCli -PdPrpRmv -PhysDrv [E:S] -aN
Replace missing drive
MegaCli -PdReplaceMissing -PhysDrv [E:S] -ArrayN -rowN -aN
The number N of the array parameter is the Span Reference you get using "MegaCli -CfgDsply -aALL" and the number N of the row parameter is the Physical Disk in that span or array starting with zero (it’s not the physical disk’s slot!).
Rebuild drive
MegaCli -PDRbld -Start -PhysDrv [E:S] -aN
MegaCli -PDRbld -Stop -PhysDrv [E:S] -aN
MegaCli -PDRbld -ShowProg -PhysDrv [E:S] -aN
Clear drive
MegaCli -PDClear -Start -PhysDrv [E:S] -aN
MegaCli -PDClear -Stop -PhysDrv [E:S] -aN
MegaCli -PDClear -ShowProg -PhysDrv [E:S] -aN
Bad to good (or back to good as I like to call it)
MegaCli -PDMakeGood -PhysDrv[E:S] -aN
This changes drive in state Unconfigured-Bad to Unconfigured-Good.
Walkthrough: Change/replace a drive
Set the drive offline, if it is not already offline due to an error
MegaCli -PDOffline -PhysDrv [E:S] -aN
Mark the drive as missing
MegaCli -PDMarkMissing -PhysDrv [E:S] -aN
Prepare drive for removal
MegaCli -PDPrpRmv -PhysDrv [E:S] -aN
Change/replace the drive
If you’re using hot spares then the replaced drive should become your new hot spare drive:
MegaCli -PDHSP -Set -PhysDrv [E:S] -aN
In case you’re not working with hot spares, you must re-add the new drive to your RAID virtual drive and start the rebuilding
MegaCli -PdReplaceMissing -PhysDrv [E:S] -ArrayN -rowN -aN
MegaCli -PDRbld -Start -PhysDrv [E:S] -aN

  1. Laz says:
    You are right I'm having a hard time setting the jbod disks spin down when they are not in use. The link with full commands is dead, can you repost a new link?
  2. Frank Cabreja says:
    The row number of a physical drive needed in the command: MegaCli -PdReplaceMissing -PhysDrv [E:S] -ArrayN -rowN -aN can be determined using MegaCli –PdGetMissing -aALL
  3. Jason Lucero says:
    I ran into an issue where there was no enclosure and had to use [:S] instead of [E:S]
  4. Jesper says:
    =]MARKED AS SPAM BY SLIDE2COMMENT[=
    Very nice cheatsheet, helped me a lot recently when I had to replace a faulty drive.
  5. Michael says:
    Thanks! This is great!
  6. Steve says:
    Instead of
    MegaCli -AdpEventLog -GetEvents -f events.log -aALL && cat events.log
    how about just using
    MegaCli -AdpEventLog -GetEvents -f /dev/stdout -aALL
  7. Great references!!! I found the that the MegaCLI GUI is not working well for us and is flaky. the commands helped us rebuild drive failures on a couple of our hybrid compute/storage arrays. This is part of our standarnd build now and the commands are great to utilize automation. No help from LSI.com website other than downloads. Thanks for spending the time to put this together!!!
  8. xteracrack says:
    Thanks a lot!!! work for me in Linux, great job this page ðŸ™‚
    [root@DBS1 MegaCli]# pwd
    /opt/MegaRAID/MegaCli
    [root@DBS1 MegaCli]# rpm -qa |grep Mega
    MegaCli-8.07.10-1.noarch
    [root@DBS1 MegaCli]# cat /etc/redhat-release
    Red Hat Enterprise Linux Server release 6.1 (Santiago)
    [root@DBS1 MegaCli]# uname -a
    Linux DBS1 2.6.32-100.34.1.el6uek.x86_64 #1 SMP Wed May 25 17:46:45 EDT 2011 x86_64 x86_64 x86_64 GNU/Linux
    [root@DBS1 MegaCli]# lspci |grep RAID
    50:00.0 RAID bus controller: LSI Logic / Symbios Logic MegaRAID SAS 2108 [Liberator] (rev 05)
  9. JP-TOK says:
    Hey guys
    what is the command for make the leds on the physical drives to light again , ,cant tell which drive is failing on visual check.
    Any way I can visualize what is my RAID arrangement ?
    Thanks
  10. Kuldeep Kulkarni says:
    Thank you! Really nice ðŸ™‚
  11. Florido says:
    Thanks Erik! this saved me a lot of time!
  12. sjas says:
    Blinking LED's on linux?
    THEORY: (from the manual)
    MegaCli –PDLocate –PhysDrv[E0:S0,E1:S1....]
    -aN|-a0,1,2|-aALL
    will locate drives.
    tricky part is, YOU HAVE TO ESCAPE THE BRACKETS IN THE SHELL. fml.
    in short: (a0 for adapter, since i assume you only have 1 raid controller)
    Start blinking:
    MegaCli pdlocate physdrv \[252:0\] a0
    Stop blinking:
    MegaCli pdlocate stop physdrv \[252:0\] a0
    where 252 is the enclosure's device id, find it out via:
    MegaCli encinfo a0
  13. Great reference - thank you for putting this together.
  14. Kenny says:
    To blink LED:
    MegaCli -PdLocate {[-start] | -stop} -physdrv[E0:S0,E1:S1,...] -aN|-a0,1,2|-aALL
    Meaning: MegaCli -PdLocate -start -physdrv["Enclosure Device ID":"Slot Number"] -"Adapter"
    Example: MegaCli -PdLocate -start -physdrv[237:2] -a0
    Example: MegaCli -PdLocate -stop -physdrv[237:2] -a0
    (Will return something like: Adapter: 0: Device at EnclId-252 SlotId-0 -- PD Locate Start Command was successfully sent to Firmware)
  15. Peter Torkelson says:
    I can not even count the number of times I have come back to this page as reference because the official documentation is ... well, LSI.
  16. JimD says:
    There's another MegaCli cheat sheet here: http://www.vmwareadmins.com/megacli-working-examples-cheat-sheet/
    ... with some additional, and extremely useful examples. For example to list info about logical drives (and the status of each VD):
    megacli -LDInfo -Lall -aALL
    ... and if you pipe the output from that through this command:
    | egrep "^(Virtual|State|Num)" /tmp/mega-l | sed -e 'N;N;s/\n/ /g'
    ... you'll see a one line summary of each VD, it's current state, an the number of disks associated with it.
    Another is this:
    ./MegaCLI -CfgLdAdd -r1' [38:0,38:1]' -a0
    ... set up a RAID-1 using drives 0 and 1 from enclosure 38 on adapter zero and
    this monster:
    ./MegaCli -CfgSpanAdd -r50 -Array0[38:0,38:1,38:2,38:3,38:4,38:5] -Array1[38:6,38:7,38:8,38:9,38:10,38:11] Direct RA WB -a0
    ... set up a RAID-50 (volume spanned across two RAID-5 arrays)
    Or this:
    ./MegaCli -AdpSetProp -EnableJBOD 1 -aALL
    ... which allegedly works with some MegaRAID adapters (though, perhaps not the ones I'm using in our cloud).
  17. JimD says:
    Here's yet another good cheat sheet with even more commands on it:http://www.maths.cam.ac.uk/computing/docs/public/megacli_raid_lsi.html
    ... but I'm still looking for a command or script that gives a simple tabular summary of every LD ... the corresponding Linux /dev/XX name ... and the member PDs (or LD Spans) ... and the status of each.
    We want a simple way to identify the failed or failing drives (in a pseudo-JBOD arrangement) ... auto-generate tickets to our DCOps staff ... and the be able to scan for the "Unconfigured(Good)" state that show up after the replacement ... to automate the re-creation of the LD (megacli -CfgLdAdd -r0'[?:XX]' -a0 --- single volume "RAID-0" in our case) and run our initialization script (parted mklabel ... mkpart ... mkfs.ext4 and mount, etc).

Downgrade from SQL Server Enterprise Edition to Standard Edition

Downgrade from SQL Server Enterprise Edition to Standard Edition


Problem
I have a SQL Server that was installed as Enterprise Edition. I don't need the Enterprise features and I don't want to pay for the licensing. What is the best way to downgrade to Standard Edition?
Solution
I've came across a lot of SQL Server's in my career that were installed using the Enterprise Edition and never utilized the Enterprise features. Downgrading to a lower edition cannot be done in place. This tip will describe the steps needed to downgrade.

Create Database Backups

As always, before doing anything drastic (or non-drastic), BACKUP all the databases (system and user)! Also, if you have a development environment, please test on it first.

Check for Enterprise features

After backing up the databases run the following query on each database:
SELECT * FROM sys.dm_db_persisted_sku_features
This DMV will tell you whether or not the database is utilizing any of the Enterprise features. You can find more information regarding this DMV from this tip.

Check Version and Build Number

Because you never know when an install may fail, check the version and build number of the current SQL Server. After the downgrade, you will need to bring the new SQL Server back to the patch level. You can view this information by executing the following command:
SELECT @@VERSION


Check Version and Build Number
Save the results to a text editor.

Decision...

There are two different directions we can go from here.
  1. We can do the traditional uninstall Enterprise, install Standard, patch, restore databases
  2. Or we can do what I call "The Jonathan Kehayias" approach. (I saw this method awhile back from a forum post by Jonathan):

Copy System Databases

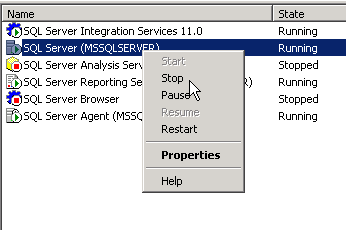
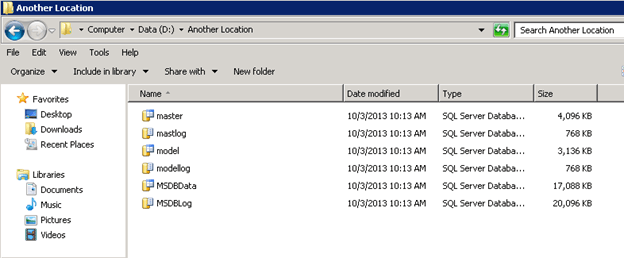
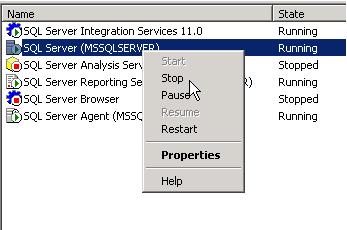
Shutdown the SQL Server service and copy the master, model and msdb database files (.mdf and .ldf) to another location. We will need these later:
hutdown the SQL Server service and copy the master, model and msdb database files


Copy System Databases

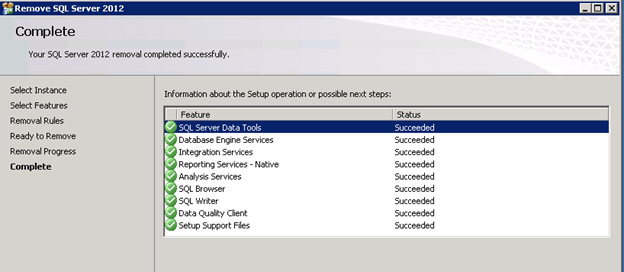
Uninstall SQL Server

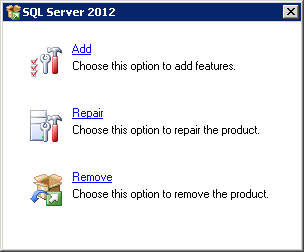
Uninstall SQL Server from Control Panel:
Uninstall SQL Server from Control Panel
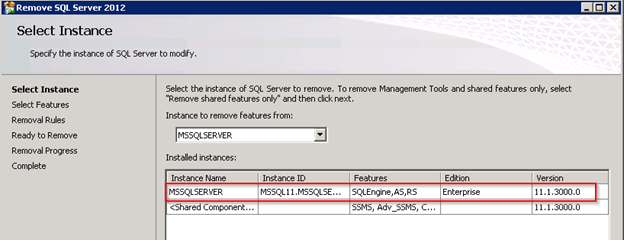
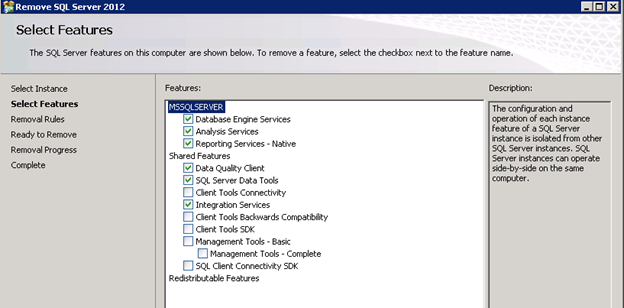
You only need to uninstall the Instance (includes SSIS, SSAS, SSRS, SSDT). There is no need to uninstall the Shared Components (SSMS, Client Tools, and Connectivity).
You only need to uninstall the Instance (includes SSIS, SSAS, SSRS, SSDT)


There is no need to uninstall the Shared Components (SSMS, Client Tools, and Connectivity)


Reboot

Reboot

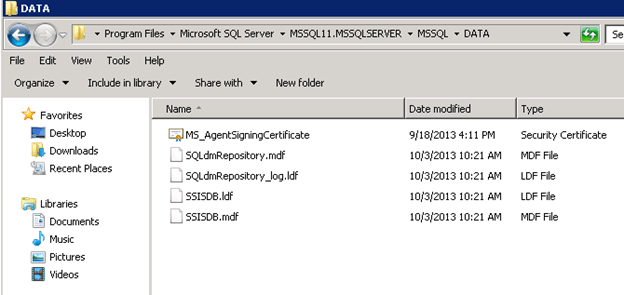
Reboot the server. After rebooting, browse to the location of the data files and you will notice that the user databases weren't removed with the uninstall, but the system databases were. This is why we copied them in the step above:
After rebooting, browse to the location of the data files and you will notice that the user databases weren't removed with the uninstall, but the system databases were.

Install New SQL Server Edition

Enterprise Edition should be completely removed from the system now. Insert/Mount the media for SQL Server Standard and install. The install should be pretty straight forward. To make things easier in the end, make sure the name of the instance remains the same and the Data Directories point to the correct location.
Once SQL Server is finished installing, open SQL Management Studio and connect to the newly installed instance.
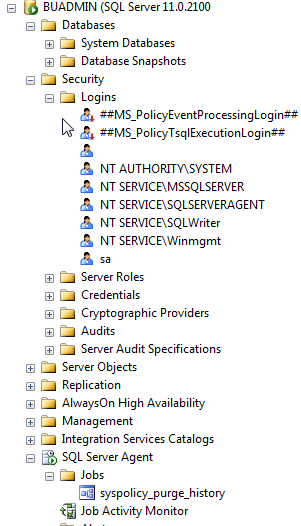
If you expand Databases, Security/Logins, SQL Server Agent/Jobs, etc. you will see it looks like a fresh copy of SQL Server.
If you expand Databases, Security/Logins, SQL Server Agent/Jobs, etc. you will see it looks like a fresh copy of SQL Server
Also, if you run the following command you will see that the version has changed to Standard Edition:
SELECT @@VERSION


Also, if you run the following command you will see that the version has changed to Standard Edition

Install SQL Server Patches

In this example, you will also notice that the build number has changed from 11.0.3000.0 to 11.0.2100.60 so I will need to install the correct patches to bring this server back to 11.0.3000.0.
(11.0.3000.0 is SQL Server 2012 SP1)
Download the correct patches and install on the server before doing anything else.
Once the patches are installed check the server to make sure it's at the same build number as it was before.

Copy System Databases

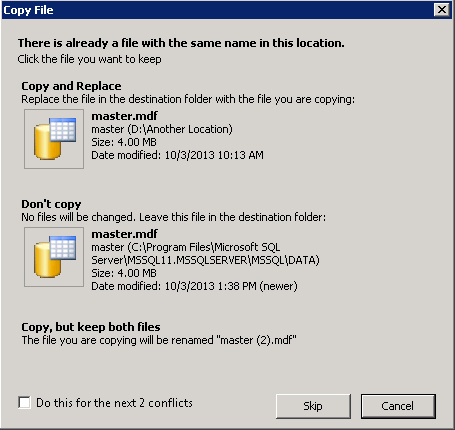
Shutdown the SQL Server service and copy the master, model and msdb database files (.mdf and .ldf) from the location you saved them in to the new location for the new install.
Copy System Databases


Shutdown the SQL Server service and copy the master, model and msdb database files

Start SQL Server

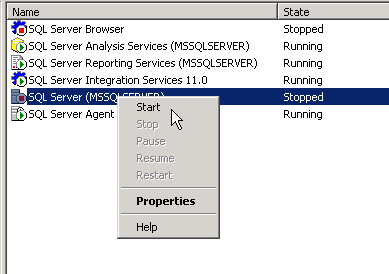
After copying the system files to the new location you can start SQL Server again:
After copying the system files to the new location you can start SQL Server again
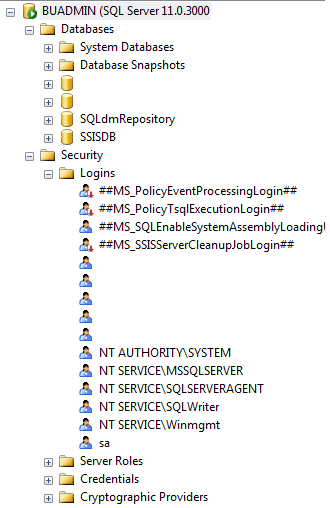
Once SQL Server comes back online, you should see all the databases, logins, jobs, etc. back to normal:
Once SQL Server comes back online, you should see all the databases, logins, jobs, etc. back to normal
Next Steps
  • The example I showed was downgrading Enterprise to Standard, however, this should work in any downgrade scenario
  • Starting in SQL Server 2008, Microsoft added an "Edition Upgrade" wizard to help with upgrading editions. You can view more information from this tip.

  How to Change Instance Type & Security Group of EC2 in AWS By David Taylor Updated April 29, 2023 EC2 stands for Elastic Compute Cloud...