Thursday, June 5, 2014

RAID 10 is not the same as RAID 01

RAID 10 is not the same as RAID 01.
This article explains the difference between the two with a simple diagram.
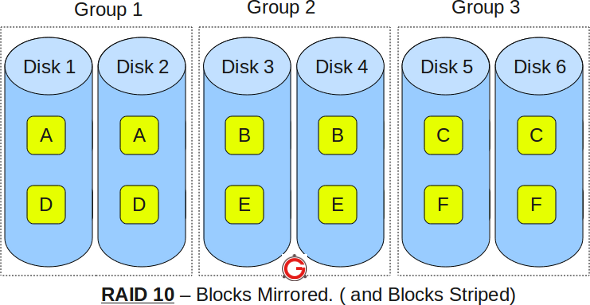
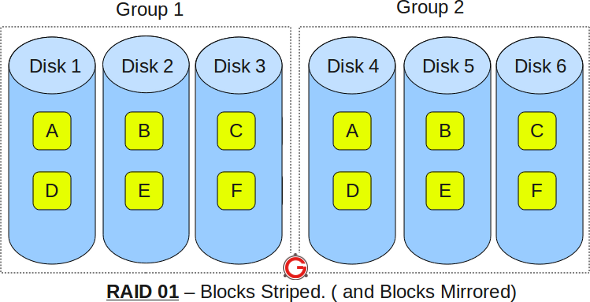
I’m going to keep this explanation very simple for you to understand the basic concepts well. In the following diagrams A, B, C, D, E and F represents blocks.

RAID 10
  • RAID 10 is also called as RAID 1+0
  • It is also called as “stripe of mirrors”
  • It requires minimum of 4 disks
  • To understand this better, group the disks in pair of two (for mirror). For example, if you have a total of 6 disks in RAID 10, there will be three groups–Group 1, Group 2, Group 3 as shown in the above diagram.
  • Within the group, the data is mirrored. In the above example, Disk 1 and Disk 2 belongs to Group 1. The data on Disk 1 will be exactly same as the data on Disk 2. So, block A written on Disk 1 will be mirroed on Disk 2. Block B written on Disk 3 will be mirrored on Disk 4.
  • Across the group, the data is striped. i.e Block A is written to Group 1, Block B is written to Group 2, Block C is written to Group 3.
  • This is why it is called “stripe of mirrors”. i.e the disks within the group are mirrored. But, the groups themselves are striped.
If you are new to this, make sure you understand how RAID 0, RAID 1 and RAID 5 and RAID 2, RAID 3, RAID 4, RAID 6 works.

RAID 01
  • RAID 01 is also called as RAID 0+1
  • It is also called as “mirror of stripes”
  • It requires minimum of 3 disks. But in most cases this will be implemented as minimum of 4 disks.
  • To understand this better, create two groups. For example, if you have total of 6 disks, create two groups with 3 disks each as shown below. In the above example, Group 1 has 3 disks and Group 2 has 3 disks.
  • Within the group, the data is striped. i.e In the Group 1 which contains three disks, the 1st block will be written to 1st disk, 2nd block to 2nd disk, and the 3rd block to 3rd disk. So, block A is written to Disk 1, block B to Disk 2, block C to Disk 3.
  • Across the group, the data is mirrored. i.e The Group 1 and Group 2 will look exactly the same. i.e Disk 1 is mirrored to Disk 4, Disk 2 to Disk 5, Disk 3 to Disk 6.
  • This is why it is called “mirror of stripes”. i.e the disks within the groups are striped. But, the groups are mirrored.

Main difference between RAID 10 vs RAID 01

  • Performance on both RAID 10 and RAID 01 will be the same.
  • The storage capacity on these will be the same.
  • The main difference is the fault tolerance level. On most implememntations of RAID controllers, RAID 01 fault tolerance is less. On RAID 01, since we have only two groups of RAID 0, if two drives (one in each group) fails, the entire RAID 01 will fail. In the above RAID 01 diagram, if Disk 1 and Disk 4 fails, both the groups will be down. So, the whole RAID 01 will fail.
  • RAID 10 fault tolerance is more. On RAID 10, since there are many groups (as the individual group is only two disks), even if three disks fails (one in each group), the RAID 10 is still functional. In the above RAID 10 example, even if Disk 1, Disk 3, Disk 5 fails, the RAID 10 will still be functional.
  • So, given a choice between RAID 10 and RAID 01, always choose RAID 10.

RAID 5 or RAID 10

In most critical production servers, you will be using either RAID 5 or RAID 10.

However there are several non-standard raids, which are not used except in some rare situations. It is good to know what they are.
This article explains with a simple diagram how RAID 2, RAID 3, RAID 4, and RAID 6 works.

RAID 2

  • This uses bit level striping. i.e Instead of striping the blocks across the disks, it stripes the bits across the disks.
  • In the above diagram b1, b2, b3 are bits. E1, E2, E3 are error correction codes.
  • You need two groups of disks. One group of disks are used to write the data, another group is used to write the error correction codes.
  • This uses Hamming error correction code (ECC), and stores this information in the redundancy disks.
  • When data is written to the disks, it calculates the ECC code for the data on the fly, and stripes the data bits to the data-disks, and writes the ECC code to the redundancy disks.
  • When data is read from the disks, it also reads the corresponding ECC code from the redundancy disks, and checks whether the data is consistent. If required, it makes appropriate corrections on the fly.
  • This uses lot of disks and can be configured in different disk configuration. Some valid configurations are 1) 10 disks for data and 4 disks for ECC 2) 4 disks for data and 3 disks for ECC
  • This is not used anymore. This is expensive and implementing it in a RAID controller is complex, and ECC is redundant now-a-days, as the hard disk themselves can do this.

RAID 3

  • This uses byte level striping. i.e Instead of striping the blocks across the disks, it stripes the bits across the disks.
  • In the above diagram B1, B2, B3 are bytes. p1, p2, p3 are parities.
  • Uses multiple data disks, and a dedicated disk to store parity.
  • The disks have to spin in sync to get to the data.
  • Sequential read and write will have good performance.
  • Random read and write will have worst performance.
  • This is not commonly used.

RAID 4

  • This uses block level striping.
  • In the above diagram B1, B2, B3 are blocks. p1, p2, p3 are parities.
  • Uses multiple data disks, and a dedicated disk to store parity.
  • Minimum of 3 disks (2 disks for data and 1 for parity)
  • Good random reads, as the data blocks are striped.
  • Bad random writes, as for every write, it has to write to the single parity disk.
  • It is somewhat similar to RAID 3 and 5, but little different.
  • This is just like RAID 3 in having the dedicated parity disk, but this stripes blocks.
  • This is just like RAID 5 in striping the blocks across the data disks, but this has only one parity disk.
  • This is not commonly used.

RAID 6

RAID stands for Redundant Array of Inexpensive

RAID stands for Redundant Array of Inexpensive (Independent) Disks.

On most situations you will be using one of the following four levels of RAIDs.
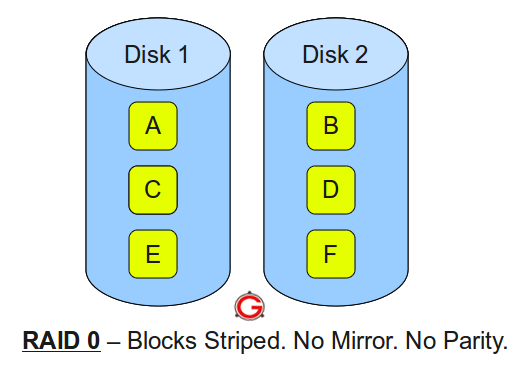
  • RAID 0
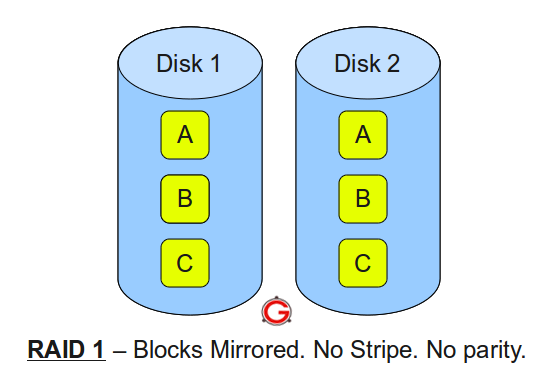
  • RAID 1
  • RAID 5
  • RAID 10 (also known as RAID 1+0)
This article explains the main difference between these raid levels along with an easy to understand diagram.

In all the diagrams mentioned below:
  • A, B, C, D, E and F – represents blocks
  • p1, p2, and p3 – represents parity

RAID LEVEL 0


Following are the key points to remember for RAID level 0.
  • Minimum 2 disks.
  • Excellent performance ( as blocks are striped ).
  • No redundancy ( no mirror, no parity ).
  • Don’t use this for any critical system.

RAID LEVEL 1

Following are the key points to remember for RAID level 1.
  • Minimum 2 disks.
  • Good performance ( no striping. no parity ).
  • Excellent redundancy ( as blocks are mirrored ).

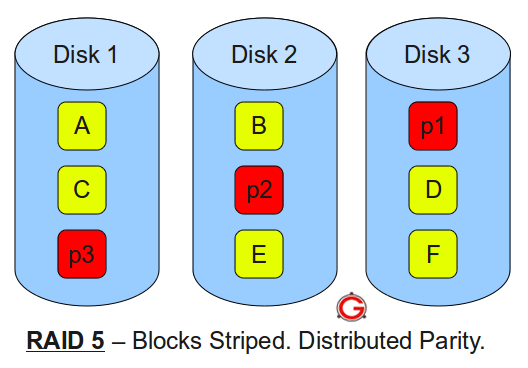
RAID LEVEL 5


Following are the key points to remember for RAID level 5.
  • Minimum 3 disks.
  • Good performance ( as blocks are striped ).
  • Good redundancy ( distributed parity ).
  • Best cost effective option providing both performance and redundancy. Use this for DB that is heavily read oriented. Write operations will be slow.

RAID LEVEL 10

Following are the key points to remember for RAID level 10.

Monday, June 2, 2014

OEL 6.3 and Oracle11gR2: Memory


OEL 6.3 and Oracle11gR2: Memory


Recently I had to mount six instances on a Linux host.  Everything was fine until I started the fourth instance:
ORA-00845: MEMORY_TARGET not supported on this system
The alert.log file had the following information:
WARNING: You are trying to use the MEMORY_TARGET feature. This feature requires the /dev/shm file system to be mounted for at least 1073741824 bytes. /dev/shm is either not mounted or is mounted with available space less than this size. Please fix this so that MEMORY_TARGET can work as expected. Current available is 899670016 and used is 2236674048 bytes. Ensure that the mount point is /dev/shm for this directory.

Obliviously the solution is mount a temporary file system with a larger size:
[root@nova Desktop]# df -h
Filesystem            Size  Used Avail Use% Mounted on
/dev/mapper/vg_nova-lv_root
                       50G  3.7G   44G   8% /
tmpfs                 2.0G  1.4G  646M  68% /dev/shm
/dev/sda1             485M   55M  405M  12% /boot
/dev/mapper/vg_nova-lv_u01
                      439G  208G  210G  50% /u01
[root@nova Desktop]# mount -t tmpfs shmfs -o size=12g /dev/shm
[root@nova Desktop]# df -h
Filesystem            Size  Used Avail Use% Mounted on
/dev/mapper/vg_nova-lv_root
                       50G  3.7G   44G   8% /
tmpfs                  12G     0   12G   0% /dev/shm
/dev/sda1             485M   55M  405M  12% /boot
/dev/mapper/vg_nova-lv_u01
                      439G  208G  210G  50% /u01
shmfs                  12G     0   12G   0% /dev/shm
[root@nova Desktop]#
The shared memory file system should be big enough to accommodate the MEMORY_TARGET and MEMORY_MAX_TARGET values, or Oracle will throw the ORA-00845 error.  By default, a tmpfs partition has its maximum size set to half of the total RAM. Note that the actual memory/swap consumption depends on how much is it filled up, as tmpfs partitions do not consume any memory until it is actually needed.
When changing something with the mount command, the changes are not permanent.  To make the change persistent, the /etc/fstab file must be edited to include the option:
[root@oracle-em ~]# cat /etc/fstab
[..]
tmpfs            /dev/shm         tmpfs   defaults,size=12g        0 0
Note 1:  There is a registered bug on Redhat and OEL that prevents the new size to be loaded from the fstab file (https://bugzilla.redhat.com/show_bug.cgi?id=669700), its solved installing the package mentioned on that link. The Update detail for the bug 669700 is:
“Prior to this update, the /dev/shm file system was mounted by the dracut utility without attributes from the /etc/fstab file. To fix this bug, /dev/shm is now remounted by the rc.sysinit script. As a result, /dev/shm now contains the attributes from /etc/fstab.”
One workaround suggested that could be used instead of the update package is add the following line in the script /etc/rc.d/rc.local:
mount -o remount /dev/shm
Workaround Note 2:  The mount command should not have the size option added or it will show an error:
[root@nova rc.d]# mount -o remount,size=6GB /dev/shm
mount: /dev/shm not mounted already, or bad option

  How to Change Instance Type & Security Group of EC2 in AWS By David Taylor Updated April 29, 2023 EC2 stands for Elastic Compute Cloud...