How to configure Oracle VM manager 3.3 in a lab at home using local disks
This post was done using version 3.3 of Oracle VM Manager.
Graphically things haven’t change much from version 3.2, but the configuration is slightly different and there are other improvements as well, by the way, I love the new Virtual Machine console!.
I am using a virtual box machine with Oracle Linux 6 and only 2GB of RAM for the VM Manager (requirements suggest 8GB!). It takes a time to boot and the first login in the console is quite slow as well but after that performance improves and is acceptable.
My VM server is a i7 quad-core with 2 hard drives. The more memory you have the better because OVM does not support memory overcommitment.
We need at least 2 HDD, one used as the installation/boot disk, the other one will be used as local storage for VMs.
Note: the second disk has to be raw, no partitions.
Note 2: As an alternative you can use external storage (not covered in this post), like those disk boxes that offer iSCSI or NFS (or another server sharing its disk like FreeNAS), if you have external storage the VM server machine needs only 1 HDD.
Note 2: As an alternative you can use external storage (not covered in this post), like those disk boxes that offer iSCSI or NFS (or another server sharing its disk like FreeNAS), if you have external storage the VM server machine needs only 1 HDD.
Once VM Manager is installed remember to install the new VNC console, it’s a package called ovmcore-console, use the one appropriate to your linux version.
rpm -ivh ovmcore-console-x.y-z.elv.noarch.rpm
If you follow the basic installation you already know the passwords and VM Manager console url: https://vmmanager1:7002/ovm/console
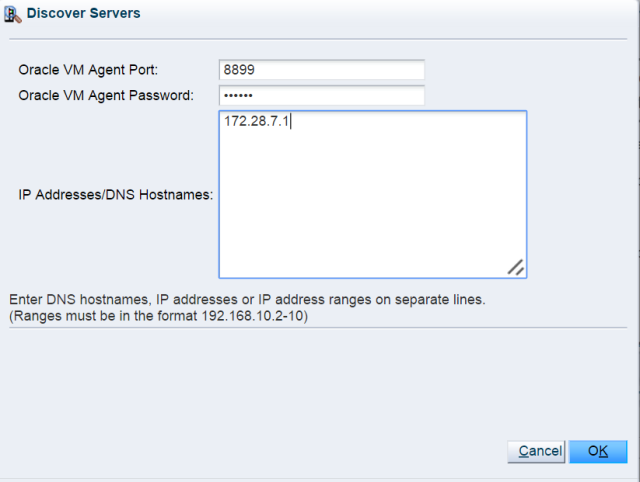
The first thing to do after you login is to discover the Oracle server: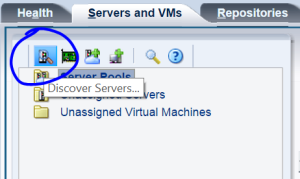
Optionally you can edit the local disk name on the virtualization server, select your server , on the left frame and on the right in the drop down list Perspective select “Physical Disks”:


Now we make our network available to virtual machines:


And now we are ready to create the Server Pool:


In Oracle OVM we need repositories, we will create one using the second local disk on the server.
Repositories will host the virtual machines disks as well other files like ISOs or Templates.


Now we can create virtual machines but first we need to import the media ortemplates to the repository we just created.
I have all my installers and templates on a different windows machine, Oracle VM can import them via HTTP so I installed a utility called HFS file server. It’s an executable file (no need to install it), once you run it will enable an HTTP file server in your machine. just drag the folders to the shareable section and that’s it!.


Here I’m importing a multi-file template:

And that’ s it, the system is ready to start creating virtual machines.
Here is a link to the official documentation:

No comments:
Post a Comment