Advanced Format: 4k Sector Size
The concept of Advance Format storage devices, with their underlying 4k sector sizes, is one which can cause a certain amount of confusion to newcomers. This is unfortunate, because once you understand the basics it is actually very simple – and the same rules apply across all 4k devices, regardless of vendor. Sadly, some of those vendors who do not yet support Advanced Format have taken the predictable route of attempting to use it as a method of attacking those that do. It is of course in their interest to confuse things further. I work for a vendor that does support Advanced Format, so this page is my attempt to bring clarity to the subject. To keep things simple, the page you are reading will discuss the basics, while the deep dive page will be a deep dive for those who like to look under the covers.
If you really want things simplified, to the extent that you don’t want to understand what’s happening and just need answers, you can skip right down to the section called “So What’s The Answer? What Do I Do?”.
Introduction
Like many newer disk technologies, Violin Memory flash arrays have a 4k sector size rather than the traditional 512 byte sector used on legacy disk drives. This larger sector size allows for higher capacity storage as well as the potential for improved performance, which is why it has been embraced by the likes of Western Digital,HGST and Seagate via a collective industry group called IDEMA. Not all software is able to handle 4k sector sizes, so Advanced Format storage systems have two options for presenting their storage: emulation mode (known as “512e“) and native mode (known as “4k“).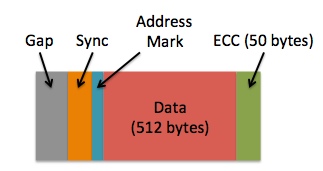 What does this mean? Well, it means that the size of a sector – i.e. the smallest possible amount of data which can be written or read – increases eightfold from 512 bytes to 4k. This has many positive advantages, because while you may think you are writing just x bytes of data to your storage system, you are in fact writing x + n, where n accounts for additional metadata such as address marks, sync marks and error correction codes (ECC) – everything in the image above that isn’t “data”. I’m not going to cover what these other components do but if you are interested you can read a good high-level explanation here. ECC is of special interested though, because more complex codes allow for an improved ability to detect and correct errors… but they also require more space (which increases the size of n) and in the legacy model ECC was limited to just 50 bytes. The upshot of this is that as disk drives grew larger, the amount of capacity lost to metadata (i.e. our value n) increased. The simple goal of Advanced Format is therefore to increase the efficiency of data storage by increasing the ratio of x to n. It achieves this simply by packing in eight times more data for each sector, reducing the capacity required for metadata – although it also increases ECC to 100 bytes (but 100 bytes for every 4k is still more efficient than 50 bytes for every 512 bytes).
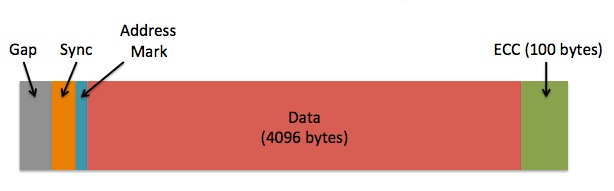 As a result of this change, Advanced Format drives allow more capacity to be used for data (known asimproved format efficiency) and offers the potential for improved error detection and correction. Everyone’s a winner, right? Well, almost everyone… what about anyone with code that relies on sectors being 512 bytes in size?
 What does this mean? Well, it means that the size of a sector – i.e. the smallest possible amount of data which can be written or read – increases eightfold from 512 bytes to 4k. This has many positive advantages, because while you may think you are writing just x bytes of data to your storage system, you are in fact writing x + n, where n accounts for additional metadata such as address marks, sync marks and error correction codes (ECC) – everything in the image above that isn’t “data”. I’m not going to cover what these other components do but if you are interested you can read a good high-level explanation here. ECC is of special interested though, because more complex codes allow for an improved ability to detect and correct errors… but they also require more space (which increases the size of n) and in the legacy model ECC was limited to just 50 bytes. The upshot of this is that as disk drives grew larger, the amount of capacity lost to metadata (i.e. our value n) increased. The simple goal of Advanced Format is therefore to increase the efficiency of data storage by increasing the ratio of x to n. It achieves this simply by packing in eight times more data for each sector, reducing the capacity required for metadata – although it also increases ECC to 100 bytes (but 100 bytes for every 4k is still more efficient than 50 bytes for every 512 bytes).
 As a result of this change, Advanced Format drives allow more capacity to be used for data (known asimproved format efficiency) and offers the potential for improved error detection and correction. Everyone’s a winner, right? Well, almost everyone… what about anyone with code that relies on sectors being 512 bytes in size?
Emulation Mode and Native Mode
For the sake of argument, imagine you own a house with the postal address 221 Baker Street. This number, i.e. 221, is the physical address of your house. However, at some point you decided to split your house into four separate apartments, each of which now requires its own postal address. There isn’t room in the existing Baker Street numbering scheme for you to assign new numbers to these extra addresses, since 220 and 222 Baker Street already exist. So what’s the answer? Simple, you assign each apartment a letter: 221A Baker Street, 221B Baker Street, 221C Baker Street and 221D Baker Street. Of course, it’s entirely likely that the house has one single letter box at the front, labelled 221 – you can consider this the physical address – but each internal property has a logical addressof 221A, 221B, etc. For the purposes of getting a letter delivered to this letter box, you can see that it would be possible to use either the physical or logical address and still be successful.
Advanced Format offers a similar dual addressing system: physical sectors, which are always 4k in size, have a physical block address. In the first method, which is called native mode (also known as “4k“), I/O operations correspond directly to the 4k physical sectors*, meaning no I/O can ever be less than 4k in size. There is more to say about this, but I’ll come back to it later. However, the most important thing to know about native mode is that applications, operating systems and so on need to understand how it works. In Linux, for example, I/O calls to 4k are subtly different to “normal” 512 byte I/O calls. So what happens if your application or OS doesn’t support native mode? The alternative is emulation mode, (also known as “512e“) which is shown in the image above. For the purposes of backwards compatibility, in 512e the storage system has to effectively pretend that each sector is 512 bytes when in reality it is 4k. Just like in the example using postal addresses above, a logical address layer is used to translate between the 512 byte logical block addresses expected by the application or OS and the 4k physical block addresses that the underlying storage uses. In the example shown in the image above an I/O to any of the 512 byte logical sectors shown in red/pink will be translated into an I/O to the 4096 byte physical sector shown in blue. This seems pretty simple – and it is in most cases, but there are a couple of important phenomena to consider as a consequence of introducing this logical to physical translation layer.
 The alternative is emulation mode, (also known as “512e“) which is shown in the image above. For the purposes of backwards compatibility, in 512e the storage system has to effectively pretend that each sector is 512 bytes when in reality it is 4k. Just like in the example using postal addresses above, a logical address layer is used to translate between the 512 byte logical block addresses expected by the application or OS and the 4k physical block addresses that the underlying storage uses. In the example shown in the image above an I/O to any of the 512 byte logical sectors shown in red/pink will be translated into an I/O to the 4096 byte physical sector shown in blue. This seems pretty simple – and it is in most cases, but there are a couple of important phenomena to consider as a consequence of introducing this logical to physical translation layer.
* In native mode the concept of logical block addresses still exists, but they map one to one with physical block addresses. So while technically any I/O operation is directed at a logical block address, for the purposes of this high-level discussion it’s convenient to imagine that they don’t. Life is like that sometimes.
Partial I/O
 In emulation mode, an I/O is issued to logical block address L1 – and this is translated to physical block address P1. But what is actually happening underneath? Well, a process reading data in a block of 512 bytes will actually cause all 4k of a physical sector to be read, with any other unwanted blocks then discarded. This process is called partial read and is essentially an inefficiency. On a disk system it may cause significant performance problems, although on flash it is far less of an issue unless taking place very frequently. Of more importance is the corresponding action during a write: a process writing data in a block of 512 bytes causes much more additional unseen work to take place in the background, since the storage system has to read all 4k of data into memory, change the single 512 byte block in question and then write the whole 4k sector back to persistent storage again. This is called a partial write and the action required is known as a read modify write operation. In large numbers, this is potentially much worse news for performance.
Alignment
Another consideration of emulation mode is the alignment of logical sectors to physical sectors. If, for example, a number of write I/Os issued to storage do not begin at the start of a physical sector, misalignment results in additional writes as the last logical block overlaps into a new physical sector – and consequently results in at least one extra I/O, which will be a partial write. We call this a misaligned I/O (or alternatively unaligned I/O – the terms are synonymous). By its very nature, misaligned I/O can cause big problems with performance simply because it massively increases the amount of I/O taking place, as well as causing partial I/O pretty much everywhere. Fortunately it’s very easy to avoid misalignment by doing do simple things: starting in the right place and using the right I/O size. Of course, an even easier method is to use native mode, where misalignment is not possible in the first place.
 By its very nature, misaligned I/O can cause big problems with performance simply because it massively increases the amount of I/O taking place, as well as causing partial I/O pretty much everywhere. Fortunately it’s very easy to avoid misalignment by doing do simple things: starting in the right place and using the right I/O size. Of course, an even easier method is to use native mode, where misalignment is not possible in the first place.
Summary
To recap, there are two choices in Advanced Format: native mode and emulation mode. Emulation mode offers backwards compatibility, meaning you can use it without requiring your application (which includes databases) or operating system to support it. However, emulation mode also opens up the possibility of partial or misaligned I/O which can affect performance if the right precautions are not taken. Native mode on the other hand pretty much guarantees there will be zero partial or misaligned I/O, but comes with its own caveat that applications (which, again, include databases) and operating systems must explicitly support it.

At the moment support for native mode is commonplace but not universal. Most older Microsoft operating systems, for example, can only work with emulation mode (although Windows 8 and Windows Server 2012 support native mode – kudos to Microsoft for being so quick on the uptake). The Linux kernel has an understanding of Advanced Format (which includes native mode support) from around version 2.6.32 [see more details on Linux below]. Which should you use? As always in life, it depends – although circumstances may dictate that you have no choice. That’s what the rest of this page will be devoted to, although if you are short of time you can just skip to the bit that says “So What’s The Answer? What Do I Do?”. In the long run, though, it’s much better to understand your choices than to simply believe something you read on the internet…
Oracle 4k Integration: The Essential Facts
The key to understanding the use of Oracle with Advanced Format is to recognise these two essential facts:
- Native mode is only possible in certain situations but, if used, virtually guarantees avoiding performance concerns such as partial or misaligned I/O
- Emulation mode is always possible but can allow partial or misaligned I/O to take place, to the potential detriment of performance
If emulation mode is to be used, we must add two further essential facts:
- Alignment is simple but crucial – any misaligned system will cause partial or misaligned I/O across all of its used sectors
- Once alignment is correct, partial I/O can be avoided simply that all data is accessed in multiples of 4k
This section is all about Oracle – and Oracle only has a limited set of file types – so let’s simply go through them all and discuss what unit of I/O Oracle allows for each one. Of course, this being Oracle, some are configurable and others are not…
Oracle Datafiles (and ASM Diskgroups)
Oracle databases tend to perform I/Os to their datafiles based on the configured database block size (i.e. the parameterDB_BLOCK_SIZE which defaults to 8k in recent releases but can also be 2k, 4k, 16k or 32k). Any I/O to a datafile will subsequently be a minimum of this size, or possibly a multiple. It therefore makes sense that, providing 2k is not chosen, I/Os to and from datafiles will not cause partial I/O in emulation mode. As for native mode support, Oracle introduced support for 4k devices as a new feature in version 11.2, meaning that both the database and Oracle’sAutomatic Storage Management (ASM) volume manager explicitly understood 4k devices. In this and subsequent versions of ASM, disk groups created on native mode 4k devices have a “SECTOR_SIZE” property of 4096 (rather than the default 512), while for the database it became possible to change the default block size of the online redo log. However, at least in Linux, native mode is only possible through the use of the ASMLib kernel driver (discussed below). If you want to use ASM and native mode together, ASMLib is the only way. If you are one of the brave souls still using a filesystem rather than ASM then native mode is possible, but only without DIRECTIO enabled (through the use of the FILESYSTEMIO_OPTIONS parameter which must be either ASYNCH or NONE). This is covered more on the deep dive page, or in My Oracle Support note 1133713.1 under the heading “Datafile Support of 4kb Sector Disks“:
Supporting 4K Sector Disks [Video] (Doc ID 1133713.1)
With respect to Oracle Support, I don’t entirely agree with all the content of this document. For example, the statement “Oracle in 11.2 is 4kb sector aware so will avoid this performance degradation” with regard to misalignment is, in my opinion, inaccurate and potentially misleading. If it were true, this page would be about two paragraphs long and would finish with the words, “Just use Oracle 11.2 and everything will be ok”. To save you pressing Page Down, it doesn’t.
Online Redo Logs
 The Oracle file type that has the most potential to cause issues with 4k storage is the online redo log. Redo logs are files which contain change vectors written by the log writer process from a memory buffer to storage every time a user commits a transaction. There are a minimum of two log file groups (although usually there will be many more), with each group consisting of one or more identical members (in other words, Oracle can multiplex the files at the software level for redundancy purposes). By default these files use a 512 byte block size, which results in partial writes on every commit. On an Advanced Format system using emulation mode, a busy database committing lots of transactions is liable to cause a lot of partial I/O, resulting in the potential for reduced performance. With the advent of 4k support in Oracle version 11.2, it became possible to change the block size of online redo logs to 4096 bytes, thus eliminating the potential for partial I/O. A new clause of “BLOCKSIZE” now allows for the administrator to explicitly specify whether a redo log should use 512 bytes, 1k or 4k. According to the Oracle documentation:
If the redo log file is being added to a 4KB sector disk with 512-byte emulation, then you can specify either 512, 1024 (or 1K), or 4096 (or 4K) as the block size, depending on your platform.
Unfortunately, this does not always appear to be the case, so in some circumstances it becomes necessary to set the parameter _DISK_SECTOR_SIZE_OVERRIDE to TRUE. This is discussed in more depth on the deep dive page, however while this is an underscore parameter (requiring permission from Oracle Support to set), Oracle’s own FAQ on flash storage suggests that this parameter can be set on database instances for this purpose:
FAQ: Flash Storage with ASM (Doc ID 1626228.1)
One of the simplest ways to configure Oracle for use on Advanced Format storage is therefore to use 512e emulation mode and then simply override the online redo log size to 4k through the use of this parameter, as described in Oracle’s FAQ.
Update June 2014:
At this point I must offer my respect to my friends within the Oracle ASM Development and Product Management teams, who invited me to Redwood Shores recently and allowed me hold court on the subject of Oracle and 4k storage. Not only did they listen very politely but they even allowed me to write a My Oracle Support note on their behalf, which has now been published:
Using 4k Redo Logs on Flash and SSD-based Storage (Doc ID 1681266.1)
Hopefully this makes things a little clearer with regard to Oracle’s support of advanced format, as well as showing that it is acceptable to use the _DISK_SECTOR_SIZE_OVERRIDE parameter in these situations.
The ASMLib Kernel Library
 For some years, Oracle has been providing the ASMLib kernel library for Linux. Although this library is optional, Oracle recommends its use in the Database High Availability Guide based upon two claimed benefits: simplified device management and a reduction in system resource usage. When using 4k devices in native mode, a third benefit can be added to this list: without ASMLib, the use of ASM with 4k devices is apparently impossible. Simply put, at this point in time 4k ASM diskgroups only work on Linux with the ASMLib driver [More detail on ASMLib can be found on the deep dive page]. But what about if you aren’t using 4k but instead have opted for 512e? ASMLib still brings value here, because I/Os through ASMLib seem to always remain 4k in size, while non-ASMLib I/Os appear to sometimes get fragmented when passing through direct I/O calls in Linux. This is why ASMLib is recommended even for emulation mode: it allows avoidance of partial I/O, which in turn aids performance.
Other Oracle Files
The following list of files currently cannot reside in an ASM diskgroup based on 4k native mode storage. They therefore need to reside on storage presented using 512e native mode:
- Database Server Parameter Files (SPFILEs)
- Oracle Cluster Registry (OCR) and Clusterware Voting Disks
- ASM Clustered Filesystem (ACFS) volumes
With the exception of ACFS, a very simple and practical solution is to simply create a small ASM diskgroup using 512e storage (such as one named +SYSTEMDG) and locate SPFILEs, OCR and voting disks on this.
Linux 4k Awareness
 Presenting storage to Oracle is all very well, but you must not forget about the operating system. Put simply, if the OS doesn’t understand your storage, you can forget about using it with Oracle. This is the reason, after all, that Advanced Format comes with the emulation mode option – it’s simple backwards compatibility. I’m not going to even attempt discussing the situation with other flavours of UNIX (because I haven’t a clue, although you can read about Solaris here) but for Linux the kernel version is the critical factor. For reference, Oracle’s list of certified Linux versions (including kernels) can be found in the following My Oracle Support note:
Certification Information for Oracle Database on Linux x86-64 (Doc ID 1304727.1)
Production Linux kernels prior to 2.6.32 do not have support for advanced format drives, which means LUNs presented to them must appear as if they are 512 byte. So as an example, the 2.6.18 kernel is not able to support native mode 4k sector drives – that means all Red Hat Enterprise Linux 5 distributions, all Oracle Enterprise Linux 5 distros using the RHEL-compatible kernel, SUSE Linux Enterprise Server 10 etc. That’s a lot of versions of Linux, many of which are happily running Oracle databases today. Yet these days, if you are building a database system based on Linux, it would be very unusual to build it on such an old kernel. Modern distributions of Linux tend to use 2.6.32 or later:
- Red Hat began using the 2.6.32 kernel in Red Hat Enterprise Linux 6
- Oracle started using the 2.6.32 kernel in the Unbreakable Enterprise Kernel (v1) which is available from Oracle Linux 5 Update 8 or Oracle Linux 6 Update 2
- Novell started using the 2.6.32 kernel in SUSE Linux Enterprise Server 11 SP1
The running theme of this page is that there are two choices available: emulation mode and native mode. What the list above is telling you is that if, for some reason, you are using a kernel version which is older than those listed, you have no choice but to use emulation mode. Again let me reiterate, that is not a problem – and if you follow the recommendations coming up next you shouldn’t suffer any performance degradation.
It All Sounds Confusing. Should I Panic?
 No. It isn’t that confusing, in fact it’s really quite simple because there are just two options to choose from: emulation mode and native mode. In some situations, e.g. an older Linux kernel or a version of Oracle prior to 11.2, you cannot use native mode… but emulation mode works every time. Don’t get confused by all the commentary you’ll find on this subject, or the rogue flash vendor who seeks to use this confusion to try and make their product sound more appealing. It’s clear that 4k is not a performance issue because, apart from anything else, Violin Memory arrays are 4k-based systems and they have a huge array of world-record benchmarks in the bag.
So What’s The Answer? What Do I Do?
It’s very simple. You have two choices, either of which will give you the best performance with very little added complexity.
EMULATION MODE: The 512e Method with 4k Redo
If you have a Linux kernel older than 2.6.32, or you are using VMware, or you want to run an Oracle product older than 11g Release 2, you have no choice but to use this. Don’t feel bad about that, as you can still get full performance if you follow these instructions correctly:
- Present all of your LUNs from storage using 512e (emulation mode). Do not partition them.
- Use ASMLib to label the devices and present them to Oracle ASM as usual [this step is optional but highly recommended, see below]
- Install Grid Infrastructure and create your ASM diskgroups as usual
- Install the database software and create a database as usual
- Set the _disk_sector_size_override parameter in the database instance(s)
- Recreate the database online redo logs using the BLOCKSIZE 4096 clause
That’s it. If you used ASMLib then you should find that this configuration causes no partial I/O at all. If you chose not to use ASMLib then there will be some partial I/O, such as during ASM rebalances. I cannot see why anyone would not use ASMLib, but some companies have strange procedures which are hard to change or bypass.
NATIVE MODE: The 4k Method with Separate SYSTEMDG
The only problem that can arise from the previous method is the requirement to set the _disk_sector_size_override parameter in the database. Although Oracle has support notes indicating that this can be set for flash storage (e.g. My Oracle Support note 1626228.1) it can deter some people who consider underscore parameters risky. No problem – the native mode method requires no such parameters:
- Present all but one of your LUNs from storage using 4k (native mode). Do not partition them.
- Now create an additional 512 byte LUN (or more, if you so desire) which will be used as a +SYSTEMDG diskgroup.
- Use ASMLib to label the devices and present them to Oracle ASM as usual [in native mode this step is mandatory, see below]
- Install Grid Infrastructure. At the ASM diskgroup creation screen, create only the +SYSTEMDG diskgroup. If installing a cluster, use this for OCR and voting disks.
- Once Grid Infrastructure is installed, create the other diskgroups (e.g. using asmca) and ensure that they have a SECTOR_SIZE of 4096
- Install the database software as a “software only install”
- When creating any databases, ensure that the SPFILE for each is located in the +SYSTEMDG diskgroup
That’s it. This solution gives you guaranteed zero partial I/O from your main diskgroups and automatically sizes redo logs as 4k.
Configuring Oracle ASMLib
Oracle ASMLib is highly recommended for the Emulation Mode option and mandatory for the Native Mode one, so it’s worth mentioning this extra detail. As discussed in more detail on the deep dive page, when using ASMLib in the above methods it is essential to set the ORACLEASM_USE_LOGICAL_BLOCK_SIZE parameter to true rather than its default value of false. This is achieved either by running the command “oracleasm configure -b” or by editing the file /etc/sysconfig/oracleasm and then restarting the driver. According to My Oracle Support note 1530578.1, support for this parameter came in with version oracleasm-support-2.1.8-1.
Disclaimer
 Of course, my advice is for educational purposes only and you should thoroughly test anything you do before putting it into production. Also, I am duty-bound to say that you should seek permission from Oracle Support before setting any underscore parameters … but then you knew that, right?