Wednesday, October 31, 2018

Getting exclusive access to restore SQL Server databases

Getting exclusive access to restore SQL Server databases

Problem
A task that you may be faced with as a DBA is the need to refresh a test or development database on a periodic basis. This may be a scheduled process or it may be an ad hoc process. One of the things that you need to do when restoring a database is to ensure you have exclusive access to the database otherwise the restore process will not work. What options are there to ensure you have exclusive database access, so the restore process will work without issue?
Solution
There are a couple of options that you have to ensure that you have exclusive access to the database. The following outlines a few of these options and how this task can be simplified.

Kill Users

For this option to work you need to ensure that once you kill the connection, that the connection doesn't reconnect. In some systems where you have automated connections occurring, this may not be the best option. Take a look at this prior tip, Die Sucker - Killing SQL Server Process Ids (spids).

Using GUI to do restore

In Enterprise Manager and SQL Server Management Studio there is not an option to kill all of the users when restoring a database. You can go through the restore steps, but if you click on restore the process will start, but it will not complete. Eventually it will time out and you will get an error message like this: So this is not an option if you have open transactions and connections to the database.
sql server error exclusive access

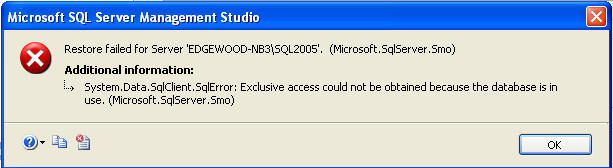
Detach Database, Reattach and Restore

Another possible approach would be to detach the database. When doing this through the GUI you have the option of dropping existing connections first. The way this is done is that the existing connections are killed first, the database is put into single user mode and then the database is taken offline.
With this method you could detach with drop connections, reattach the database, put the database is single user mode and then do the restore, but there is still a chance that a connection could be made and you would be back in the same spot. So this is not really a good option either, plus there are too many steps.
detach database

ALTER DATABASE

The best approach for doing this would be to use the ALTER DATABASE command to set the database to single user mode along with rolling back any open transactions. The command looks something like one of the following.
ALTER DATABASE [Test4] SET SINGLE_USER WITH ROLLBACK IMMEDIATE 
OR 
ALTER DATABASE [Test4] SET SINGLE_USER WITH ROLLBACK AFTER 30 
OR 
ALTER DATABASE [Test4] SET SINGLE_USER WITH NO_WAIT 
  • WITH ROLLBACK IMMEDIATE - this option doesn't wait for transactions to complete it just begins rolling back all open transactions
  • WITH ROLLBACK AFTER nnn - this option will rollback all open transactions after waiting nnn seconds for the open transactions to complete. In our example we are specifying that the process should wait 30 seconds before rolling back any open transactions.
  • WITH NO_WAIT - this option will only set the database to single user mode if all transactions have been completed. It waits for a specified period of time and if the transactions are not complete the process will fail. This is the cleanest approach, because it doesn't rollback any transactions, but it will not always work if there are open transactions.
Once the database has been put in single user mode, you have exclusive access to the database and can then do the restore without a problem.
Note: when using the ROLLBACK option you are rolling back any open transactions that still exist for the database. The rollback process should work without issue, but if you have very long running transactions the rollback process could take a long time, so be aware of what is running on your systems. For test and development systems since you are doing a restore you don't care about the transactions anyway, so rolling things back should not be an issue, but you still need to be aware that long running transactions may take some time to rollback.

Summary

Once the database is in single user mode it is now easy to perform the restore process. Here is a sample set of code that puts the database in single user mode and does the restore.
ALTER DATABASE [Test4] SET SINGLE_USER WITH ROLLBACK IMMEDIATE 

RESTORE DATABASE [Test4] 
FROM DISK = 'c:\test4.BAK' 
WITH MOVE 'Test4_Data' TO 'c:\data\Test4.mdf', 
MOVE 'Test4_Log' TO 'c:\data\Test4_log.ldf' 
Once the database has been restored you can put the database back into multi-user access mode using this command:
ALTER DATABASE [Test4] SET MULTI_USER
Next Steps
  • If you need to refresh test and development environments on a set schedule, put this technique in place on your systems. This can be setup as a scheduled job and run unattended.
  • Take a look at these other backup and restore tips

Kill SQL Server Process Ids (spids)

Kill SQL Server Process Ids (spids)

ProblemI have noticed some of my processes are failing because spids are already connected to the database.  This happens specifically when I need to a restore database.  I catch this problem pretty quick when I am working on it during the data and can fix it, but during nightly processing existing spids become problematic.  I have also noticed existing spids causing problems for my SQL Server 2000 Database Maintenance Plans.  I have found this issue in my logs specifically related to performing integrity checks (DBCC CHECKDB ('YourDatabaseName') REPAIR_FAST) when the database needs to be in single user mode before the integrity check commands run.  How can I kill these spids prior to running my processes?

Solution
Killing the spids is the process that needs to occur prior to issuing DBCC CHECKDB (when repairing) or performing the database restore process.  Killing the spids can be accomplished by adding another step to your SQL Server Agent Jobs or in your script\stored procedure calling the code below to perform the KILL  process prior to executing code that needs exclusive use of the database.

SQL Server 2000 and SQL Server 2005
USE Master
GO

SET NOCOUNT ON

-- 1 - Variable Declaration
DECLARE @DBID int
DECLARE @CMD1 varchar(8000)
DECLARE @spidNumber int
DECLARE @SpidListLoop int
DECLARE @SpidListTable table
(UIDSpidList int IDENTITY (1,1),
SpidNumber int)

-- 2 - Populate @SpidListTable with the spid information
INSERT INTO @SpidListTable (SpidNumber)
SELECT spid
FROM Master.dbo.sysprocesses
WHERE DBID NOT IN (1,2,3,4) -- Master, Tempdb, Model, MSDB
AND spid > 50
AND <> @@spid

ORDER BY spid DESC

-- 3b - Determine the highest UIDSpidList to loop through the records
SELECT @SpidListLoop = MAX(UIDSpidList) FROM @SpidListTable

-- 3c - While condition for looping through the spid records
WHILE @SpidListLoop > 0
BEGIN

-- 3d - Capture spids location
SELECT @spidNumber = spidnumber
FROM @spidListTable
WHERE UIDspidList = @SpidListLoop

-- 3e - String together the KILL statement
SELECT @CMD1 = 'KILL ' + CAST(@spidNumber AS varchar(5))

-- 3f - Execute the final string to KILL the spids
-- SELECT @CMD1
EXEC (@CMD1)

-- 3g - Descend through the spid list
SELECT @SpidListLoop = @SpidListLoop - 1
END

SET NOCOUNT OFF
GO
Next Steps
  • Check your Database Maintenance Plan logs or SQL Server Agent Job Step History to determine when existing spids are preventing your automated processes from succeeding.
  • Depending on the user and/or automated processes that are running dictates how the scripts above should be modified to meet your needs.
  • Although the scripts above are beneficial for you to execute your process, you may also need to consider the other processes that are running and determine if 1 or more of the processes need to be executed at another time period for all of the processes to complete in a reasonable time period.  For example, you may not want to kill a process at 4:00 AM that needs 4 hours to complete and must be finished by 8:00 AM.  In this circumstance, re-scheduling the process may be a better bet.
  • Check out these related tips from MSSQLTips.com:
  • Stay tuned for another tip on situational alternatives to issuing the KILL command.

Tuesday, October 30, 2018

Script to start/stop the Oracle Enterprise Manager 12C

Script to start/stop the Oracle Enterprise Manager 12C

The scripts can automate start and stop routines.  make sure you have this setup so you do not waste time when something goes bad and you have to do maintenance on your Oracle Enterprise Management System.

Script to start the Oracle Enterprise Manager 12C

Make sure the you alter the script to match with your environment.

Script to stop the Oracle Enterprise Manager 12C

Make sure the you alter the script to match with your environment.

Friday, October 26, 2018

SQL Server Transaction Log Backup

SQL Server Transaction Log Backup

Overview

There are only two commands for backup, the primary is BACKUP DATABASE which backs up the entire database and BACKUP LOG which backs up the transaction log.  The following will show different options for doing transaction log backups.

Explanation

The BACKUP LOG command gives you many options for creating transaction log backups.  Following are different examples.

Create a simple transaction log backup to disk

The command is BACKUP LOG databaseName.  The "TO DISK" option specifies that the backup should be written to disk and the location and filename to create the backup is specified.  The file extension is "TRN".  This helps me know it is a transaction log backup, but it could be any extension you like.  Also, the database has to be in the FULL or Bulk-Logged recovery model and at least one Full backup has to have occurred.
BACKUP LOG AdventureWorks 
TO DISK = 'C:\AdventureWorks.TRN'
GO

Create a log backup with a password

This command creates a log backup with a password that will need to be supplied when restoring the database.
BACKUP LOG AdventureWorks 
TO DISK = 'C:\AdventureWorks.TRN'
WITH PASSWORD = 'Q!W@E#R$'
GO

Create a log backup with progress stats

This command creates a log backup and also displays the progress of the backup.  The default is to show progress after every 10%.
BACKUP LOG AdventureWorks 
TO DISK = 'C:\AdventureWorks.TRN'
WITH STATS
GO
Here is another option showing stats after every 1%.
BACKUP LOG AdventureWorks 
TO DISK = 'C:\AdventureWorks.TRN'
WITH STATS = 1
GO

Create a backup and give it a description

This command uses the description option to give the backup a name.  This can later be used with some of the restore commands to see what is contained with the backup.  The maximum size is 255 characters.
BACKUP LOG AdventureWorks 
TO DISK = 'C:\AdventureWorks.TRN'
WITH DESCRIPTION = 'Log backup for AdventureWorks'
GO

Create a mirrored backup

This option allows you to create multiple copies of the backups, preferably to different locations.
BACKUP LOG AdventureWorks 
TO DISK = 'C:\AdventureWorks.TRN'
MIRROR TO DISK =  'D:\AdventureWorks_mirror.TRN'
WITH FORMAT
GO

Specifying multiple options

This example shows how you can use multiple options at the same time.
BACKUP LOG AdventureWorks 
TO DISK = 'C:\AdventureWorks.TRN'
MIRROR TO DISK =  'D:\AdventureWorks_mirror.TRN'
WITH FORMAT, STATS, PASSWORD = 'Q!W@E#R$'
GO

SQL Server Database Backup 

SQL Server Database Backup 

Overview

There are only two commands for backup, the primary is BACKUP DATABASE.  This allows you to do a complete backup of your database as well as differential, file, etc. backups depending on the options that you use.

Explanation

The BACKUP DATABASE command gives you many options for creating backups.  Following are different examples.

Create a full backup to disk

The command is BACKUP DATABASE databaseName.  The "TO DISK" option specifies that the backup should be written to disk and the location and filename to create the backup is specified.
BACKUP DATABASE AdventureWorks 
TO DISK = 'C:\AdventureWorks.BAK'
GO

Create a differential backup

This command adds the "WITH DIFFERENTIAL" option.
BACKUP DATABASE AdventureWorks 
TO DISK = 'C:\AdventureWorks.BAK' 
WITH DIFFERENTIAL 
GO

Create a file level backup

This command uses the "WITH FILE" option to specify a file backup.  You need to specify the logical filename within the database which can be obtained by using the command sp_helpdb 'databaseName', specifying the name of your database.
BACKUP DATABASE TestBackup FILE = 'TestBackup' 
TO DISK = 'C:\TestBackup_TestBackup.FIL'
GO

Create a filegroup backup

This command uses the "WITH FILEGROUP" option to specify a filegroup backup.  You need to specify the filegroup name from the database which can be obtained by using the command sp_helpdb 'databaseName', specifying the name of your database.
BACKUP DATABASE TestBackup FILEGROUP = 'ReadOnly' 
TO DISK = 'C:\TestBackup_ReadOnly.FLG'
GO

Create a full backup to multiple disk files

This command uses the "DISK" option multiple times to write the backup to three equally sized smaller files instead of one large file.
BACKUP DATABASE AdventureWorks 
TO DISK = 'C:\AdventureWorks_1.BAK',
DISK = 'D:\AdventureWorks_2.BAK',
DISK = 'E:\AdventureWorks_3.BAK'
GO

Create a full backup with a password

This command creates a backup with a password that will need to be supplied when restoring the database.
BACKUP DATABASE AdventureWorks 
TO DISK = 'C:\AdventureWorks.BAK'
WITH PASSWORD = 'Q!W@E#R$'
GO

Create a full backup with progress stats

This command creates a full backup and also displays the progress of the backup.  The default is to show progress after every 10%.
BACKUP DATABASE AdventureWorks 
TO DISK = 'C:\AdventureWorks.BAK'
WITH STATS
GO
Here is another option showing stats after every 1%.
BACKUP DATABASE AdventureWorks 
TO DISK = 'C:\AdventureWorks.BAK'
WITH STATS = 1
GO

Create a backup and give it a description

This command uses the description option to give the backup a name.  This can later be used with some of the restore commands to see what is contained with the backup.  The maximum size is 255 characters.
BACKUP DATABASE AdventureWorks 
TO DISK = 'C:\AdventureWorks.BAK'
WITH DESCRIPTION = 'Full backup for AdventureWorks'
GO

Create a mirrored backup

This option allows you to create multiple copies of the backups, preferably to different locations.
BACKUP DATABASE AdventureWorks 
TO DISK = 'C:\AdventureWorks.BAK'
MIRROR TO DISK =  'D:\AdventureWorks_mirror.BAK'
WITH FORMAT
GO

Specifying multiple options

This next example shows how you can use multiple options at the same time.
BACKUP DATABASE AdventureWorks 
TO DISK = 'C:\AdventureWorks.BAK'
MIRROR TO DISK =  'D:\AdventureWorks_mirror.BAK'
WITH FORMAT, STATS, PASSWORD = 'Q!W@E#R$'
GO

Friday, October 12, 2018

The Beginners Guide To Cron Jobs

The Beginners Guide To Cron Jobs

Cron is one of the most useful utility that you can find in any Unix-like operating system. It is used to schedule commands at a specific time. These scheduled commands or tasks are known as “Cron Jobs”. Cron is generally used for running scheduled backups, monitoring disk space, deleting files (for example log files) periodically which are no longer required, running system maintenance tasks and a lot more. In this brief guide, we will see the basic usage of Cron Jobs in Linux.

The typical format of a cron job is:
Minute(0-59) Hour(0-24) Day_of_month(1-31) Month(1-12) Day_of_week(0-6) Command_to_execute
Just memorize the cron job format or print the following illustration and keep it in your desk.

In the above picture, the asterisks refers the specific blocks of time.
To display the contents of the crontab file of the currently logged in user:
$ crontab -l
To edit the current user’s cron jobs, do:
$ crontab -e
If it is the first time, you will be asked to editor to edit the jobs.
no crontab for sk - using an empty one

Select an editor. To change later, run 'select-editor'.
 1. /bin/nano <---- easiest
 2. /usr/bin/vim.basic
 3. /usr/bin/vim.tiny
 4. /bin/ed

Choose 1-4 [1]:
Choose any one that suits you. Here it is how a sample crontab file looks like.

In this file, you need to add your cron jobs.
To edit the crontab of a different user, for example ostechnix, do:
$ crontab -u ostechnix -e
Let us see some examples.
To run a cron job every minute, the format should be like below.
* * * * * <command-to-execute>
To run cron job every 5 minute, add the following in your crontab file.
*/5 * * * * <command-to-execute>
To run a cron job at every quarter hour (every 15th minute), add this:
*/15 * * * * <command-to-execute>
To run a cron job every hour at 30 minutes, run:
30 * * * * <command-to-execute>
You can also define multiple time intervals separated by commas. For example, the following cron job will run three times every hour, at minutes 0, 5 and 10:
0,5,10 * * * * <command-to-execute>
Run a cron job every half hour:
*/30 * * * * <command-to-execute>
Run a job every hour:
0 * * * * <command-to-execute>
Run a job every 2 hours:
0 */2 * * * <command-to-execute>
Run a job every day (It will run at 00:00):
0 0 * * * <command-to-execute>
Run a job every day at 3am:
0 3 * * * <command-to-execute>
Run a job every sunday:
0 0 * * SUN <command-to-execute>
Or,
0 0 * * 0 <command-to-execute>
It will run at exactly at 00:00 on Sunday.
Run a job on every day-of-week from Monday through Friday i.e every weekday:
0 0 * * 1-5 <command-to-execute>
The job will start at 00:00.
Run a job every month:
0 0 1 * * <command-to-execute>
Run a job at 16:15 on day-of-month 1:
15 16 1 * * <command-to-execute>
Run a job at every quarter i.e on day-of-month 1 in every 3rd month:
0 0 1 */3 * <command-to-execute>
Run a job on a specific month at a specific time:
5 0 * 4 * <command-to-execute>
The job will start at 00:05 in April.
Run a job every 6 months:
0 0 1 */6 * <command-to-execute>
This cron job will start at 00:00 on day-of-month 1 in every 6th month.
Run a job every year:
0 0 1 1 * <command-to-execute>
This cron job will start at 00:00 on day-of-month 1 in January.
We can also use the following strings to define job.
@rebootRun once, at startup.
@yearlyRun once a year.
@annually(same as @yearly).
@monthlyRun once a month.
@weeklyRun once a week.
@dailyRun once a day.
@midnight(same as @daily).
@hourlyRun once an hour.
For example, to run a job every time the server is rebooted, add this line in your crontab file.
@reboot <command-to-execute>
To remove all cron jobs for the current user:
$ crontab -r
There is also a dedicated website named crontab.guru for learning cron jobs examples. This site provides a lot of cron job examples.
Also, there is web-based tool named “Crontab UI” to easily and safely create cronjobs. Do check it in the following link.
For more details, check man pages.
$ man crontab
And, that’s all for now. At this point, you might have a basic understanding of cron jobs and how to use them in real time. More good stuffs to come. Stay tuned!!
Cheers!

管理 Linux 系统中的用户

管理 Linux 系统中的用户

也许你的 Lniux 用户并不是愤怒的公牛,但是当涉及管理他们的账户的时候,能让他们一直开心也是一种挑战。监控他们当前正在访问的东西,追踪他们他们遇到问题时的解决方案,并且保证能把他们在使用系统时出现的重要变动记录下来。这里有一些方法和工具可以使这份工作轻松一点。

配置账户

添加和移除账户是管理用户中最简单的一项,但是这里面仍然有很多需要考虑的选项。无论你是用桌面工具或是命令行选项,这都是一个非常自动化的过程。你可以使用命令添加一个新用户,像是 adduser jdoe,这同时会触发一系列的事情。使用下一个可用的 UID 可以创建 John 的账户,或许还会被许多用以配置账户的文件所填充。当你运行 adduser 命令加一个新的用户名的时候,它将会提示一些额外的信息,同时解释这是在干什么。
  1. $ sudo adduser jdoe
  2. Adding user 'jdoe' ...
  3. Adding new group `jdoe' (1001) ...
  4. Adding new user `jdoe' (1001) with group `jdoe' ...
  5. Creating home directory `/home/jdoe' ...
  6. Copying files from `/etc/skel' …
  7. Enter new UNIX password:
  8. Retype new UNIX password:
  9. passwd: password updated successfully
  10. Changing the user information for jdoe
  11. Enter the new value, or press ENTER for the default
  12. Full Name []: John Doe
  13. Room Number []:
  14. Work Phone []:
  15. Home Phone []:
  16. Other []:
  17. Is the information correct? [Y/n] Y
像你看到的那样,adduser 将添加用户的信息(到 /etc/passwd/etc/shadow 文件中),创建新的家目录,并用 /etc/skel 里设置的文件填充家目录,提示你分配初始密码和认定信息,然后确认这些信息都是正确的,如果你在最后的提示 “Is the information correct” 处的答案是 “n”,它将回溯你之前所有的回答,允许修改任何你想要修改的地方。
创建好一个用户后,你可能会想要确认一下它是否是你期望的样子,更好的方法是确保在添加第一个帐户之前,“自动”选择与您想要查看的内容相匹配。默认有默认的好处,它对于你想知道他们定义在哪里有所用处,以防你想作出一些变动 —— 例如,你不想家目录在 /home 里,你不想用户 UID 从 1000 开始,或是你不想家目录下的文件被系统上的每个人都可读。
adduser 如何工作的一些细节设置在 /etc/adduser.conf 文件里。这个文件包含的一些设置决定了一个新的账户如何配置,以及它之后的样子。注意,注释和空白行将会在输出中被忽略,因此我们可以更加集中注意在设置上面。
  1. $ cat /etc/adduser.conf | grep -v "^#" | grep -v "^$"
  2. DSHELL=/bin/bash
  3. DHOME=/home
  4. GROUPHOMES=no
  5. LETTERHOMES=no
  6. SKEL=/etc/skel
  7. FIRST_SYSTEM_UID=100
  8. LAST_SYSTEM_UID=999
  9. FIRST_SYSTEM_GID=100
  10. LAST_SYSTEM_GID=999
  11. FIRST_UID=1000
  12. LAST_UID=29999
  13. FIRST_GID=1000
  14. LAST_GID=29999
  15. USERGROUPS=yes
  16. USERS_GID=100
  17. DIR_MODE=0755
  18. SETGID_HOME=no
  19. QUOTAUSER=""
  20. SKEL_IGNORE_REGEX="dpkg-(old|new|dist|save)"
可以看到,我们有了一个默认的 shell(DSHELL),UID(FIRST_UID)的开始数值,家目录(DHOME)的位置,以及启动文件(SKEL)的来源位置。这个文件也会指定分配给家目录(DIR_HOME)的权限。
其中 DIR_HOME 是最重要的设置,它决定了每个家目录被使用的权限。这个设置分配给用户创建的目录权限是 755,家目录的权限将会设置为 rwxr-xr-x。用户可以读其他用户的文件,但是不能修改和移除他们。如果你想要更多的限制,你可以更改这个设置为 750(用户组外的任何人都不可访问)甚至是 700(除用户自己外的人都不可访问)。
任何用户账号在创建之前都可以进行手动修改。例如,你可以编辑 /etc/passwd 或者修改家目录的权限,开始在新服务器上添加用户之前配置 /etc/adduser.conf 可以确保一定的一致性,从长远来看可以节省时间和避免一些麻烦。
/etc/adduser.conf 的修改将会在之后创建的用户上生效。如果你想以不同的方式设置某个特定账户,除了用户名之外,你还可以选择使用 adduser 命令提供账户配置选项。或许你想为某些账户分配不同的 shell,请求特殊的 UID,完全禁用登录。adduser 的帮助页将会为你显示一些配置个人账户的选择。
  1. adduser [options] [--home DIR] [--shell SHELL] [--no-create-home]
  2. [--uid ID] [--firstuid ID] [--lastuid ID] [--ingroup GROUP | --gid ID]
  3. [--disabled-password] [--disabled-login] [--gecos GECOS]
  4. [--add_extra_groups] [--encrypt-home] user
每个 Linux 系统现在都会默认把每个用户放入对应的组中。作为一个管理员,你可能会选择以不同的方式去做事。你也许会发现把用户放在一个共享组中可以让你的站点工作的更好,这时,选择使用 adduser--gid 选项去选择一个特定的组。当然,用户总是许多组的成员,因此也有一些选项去管理主要和次要的组。

处理用户密码

一直以来,知道其他人的密码都是一个不好的念头,在设置账户时,管理员通常使用一个临时的密码,然后在用户第一次登录时会运行一条命令强制他修改密码。这里是一个例子:
  1. $ sudo chage -d 0 jdoe
当用户第一次登录的时候,会看到像这样的事情:
  1. WARNING: Your password has expired.
  2. You must change your password now and login again!
  3. Changing password for jdoe.
  4. (current) UNIX password:

添加用户到副组

添加用户到副组中,你可能会用如下所示的 usermod 命令 —— 添加用户到组中并确认已经做出变动。
  1. $ sudo usermod -a -G sudo jdoe
  2. $ sudo grep sudo /etc/group
  3. sudo:x:27:shs,jdoe
记住在一些组,像是 sudo 或者 wheel 组中,意味着包含特权,一定要特别注意这一点。

移除用户,添加组等

Linux 系统也提供了命令去移除账户、添加新的组、移除组等。例如,deluser 命令,将会从 /etc/passwd/etc/shadow 中移除用户登录入口,但是会完整保留他的家目录,除非你添加了 --remove-home 或者 --remove-all-files 选项。addgroup 命令会添加一个组,按目前组的次序给他下一个 ID(在用户组范围内),除非你使用 --gid 选项指定 ID。
  1. $ sudo addgroup testgroup --gid=131
  2. Adding group `testgroup' (GID 131) ...
  3. Done.

管理特权账户

一些 Linux 系统中有一个 wheel 组,它给组中成员赋予了像 root 一样运行命令的能力。在这种情况下,/etc/sudoers 将会引用该组。在 Debian 系统中,这个组被叫做 sudo,但是以相同的方式工作,你在 /etc/sudoers 中可以看到像这样的引用:
  1. %sudo ALL=(ALL:ALL) ALL
这个基础的设定意味着,任何在 wheel 或者 sudo 组中的成员,只要在他们运行的命令之前添加 sudo,就可以以 root 的权限去运行命令。
你可以向 sudoers 文件中添加更多有限的特权 —— 也许给特定用户运行一两个 root 的命令。如果这样做,您还应定期查看 /etc/sudoers 文件以评估用户拥有的权限,以及仍然需要提供的权限。
在下面显示的命令中,我们看到在 /etc/sudoers 中匹配到的行。在这个文件中最有趣的行是,包含能使用 sudo 运行命令的路径设置,以及两个允许通过 sudo 运行命令的组。像刚才提到的那样,单个用户可以通过包含在 sudoers 文件中来获得权限,但是更有实际意义的方法是通过组成员来定义各自的权限。
  1. # cat /etc/sudoers | grep -v "^#" | grep -v "^$"
  2. Defaults env_reset
  3. Defaults mail_badpass
  4. Defaults secure_path="/usr/local/sbin:/usr/local/bin:/usr/sbin:/usr/bin:/sbin:/bin:/snap/bin"
  5. root ALL=(ALL:ALL) ALL
  6. %admin ALL=(ALL) ALL <== admin group
  7. %sudo ALL=(ALL:ALL) ALL <== sudo group

登录检查

你可以通过以下命令查看用户的上一次登录:
  1. # last jdoe
  2. jdoe pts/18 192.168.0.11 Thu Sep 14 08:44 - 11:48 (00:04)
  3. jdoe pts/18 192.168.0.11 Thu Sep 14 13:43 - 18:44 (00:00)
  4. jdoe pts/18 192.168.0.11 Thu Sep 14 19:42 - 19:43 (00:00)
如果你想查看每一个用户上一次的登录情况,你可以通过一个像这样的循环来运行 last 命令:
  1. $ for user in `ls /home`; do last $user | head -1; done
  2. jdoe pts/18 192.168.0.11 Thu Sep 14 19:42 - 19:43 (00:03)
  3. rocket pts/18 192.168.0.11 Thu Sep 14 13:02 - 13:02 (00:00)
  4. shs pts/17 192.168.0.11 Thu Sep 14 12:45 still logged in
此命令仅显示自当前 wtmp 文件变为活跃状态以来已登录的用户。空白行表示用户自那以后从未登录过,但没有将其调出。一个更好的命令是过滤掉在这期间从未登录过的用户的显示:
  1. $ for user in `ls /home`; do echo -n "$user ";last $user | head -1 | awk '{print substr($0,40)}'; done
  2. dhayes
  3. jdoe pts/18 192.168.0.11 Thu Sep 14 19:42 - 19:43
  4. peanut pts/19 192.168.0.29 Mon Sep 11 09:15 - 17:11
  5. rocket pts/18 192.168.0.11 Thu Sep 14 13:02 - 13:02
  6. shs pts/17 192.168.0.11 Thu Sep 14 12:45 still logged
  7. tsmith
这个命令会打印很多,但是可以通过一个脚本使它更加清晰易用。
  1. #!/bin/bash
  2. for user in `ls /home`
  3. do
  4. echo -n "$user ";last $user | head -1 | awk '{print substr($0,40)}'
  5. done
有时,此类信息可以提醒您用户角色的变动,表明他们可能不再需要相关帐户。

与用户沟通

Linux 提供了许多方法和用户沟通。你可以向 /etc/motd 文件中添加信息,当用户从终端登录到服务器时,将会显示这些信息。你也可以通过例如 write(通知单个用户)或者 wallwrite 给所有已登录的用户)命令发送通知。
  1. $ wall System will go down in one hour
  2. Broadcast message from shs@stinkbug (pts/17) (Thu Sep 14 14:04:16 2017):
  3. System will go down in one hour
重要的通知应该通过多个管道传递,因为很难预测用户实际会注意到什么。mesage-of-the-day(motd),wall 和 email 通知可以吸引用户大部分的注意力。

注意日志文件

更多地注意日志文件上也可以帮你理解用户活动。事实上,/var/log/auth.log 文件将会为你显示用户的登录和注销活动,组的创建等。/var/log/message 或者 /var/log/syslog 文件将会告诉你更多有关系统活动的事情。

追踪问题和请求

无论你是否在 Linux 系统上安装了票务系统,跟踪用户遇到的问题以及他们提出的请求都非常重要。如果请求的一部分久久不见回应,用户必然不会高兴。即使是纸质日志也可能是有用的,或者更好的是,有一个电子表格,可以让你注意到哪些问题仍然悬而未决,以及问题的根本原因是什么。确保解决问题和请求非常重要,日志还可以帮助您记住你必须采取的措施来解决几个月甚至几年后重新出现的问题。

总结

在繁忙的服务器上管理用户帐户部分取决于从配置良好的默认值开始,部分取决于监控用户活动和遇到的问题。如果用户觉得你对他们的顾虑有所回应并且知道在需要系统升级时会发生什么,他们可能会很高兴。

如何在 Linux 中配置基于密钥认证的 SSH

如何在 Linux 中配置基于密钥认证的 SSH

什么是基于 SSH 密钥的认证?

众所周知,Secure Shell,又称 SSH,是允许你通过无安全网络(例如 Internet)和远程系统之间安全访问/通信的加密网络协议。无论何时使用 SSH 在无安全网络上发送数据,它都会在源系统上自动地被加密,并且在目的系统上解密。SSH 提供了四种加密方式,基于密码认证基于密钥认证基于主机认证键盘认证。最常用的认证方式是基于密码认证和基于密钥认证。
在基于密码认证中,你需要的仅仅是远程系统上用户的密码。如果你知道远程用户的密码,你可以使用 ssh user@remote-system-name 访问各自的系统。另一方面,在基于密钥认证中,为了通过 SSH 通信,你需要生成 SSH 密钥对,并且为远程系统上传 SSH 公钥。每个 SSH 密钥对由私钥与公钥组成。私钥应该保存在客户系统上,公钥应该上传给远程系统。你不应该将私钥透露给任何人。希望你已经对 SSH 和它的认证方式有了基本的概念。
这篇教程,我们将讨论如何在 Linux 上配置基于密钥认证的 SSH。

在 Linux 上配置基于密钥认证的 SSH

为方便演示,我将使用 Arch Linux 为本地系统,Ubuntu 18.04 LTS 为远程系统。
本地系统详情:
  • OS: Arch Linux Desktop
  • IP address: 192.168.225.37/24
远程系统详情:
  • OS: Ubuntu 18.04 LTS Server
  • IP address: 192.168.225.22/24

本地系统配置

就像我之前所说,在基于密钥认证的方法中,想要通过 SSH 访问远程系统,需要将公钥上传到远程系统。公钥通常会被保存在远程系统的一个 ~/.ssh/authorized_keys 文件中。
注意事项:不要使用 root 用户生成密钥对,这样只有 root 用户才可以使用。使用普通用户创建密钥对。
现在,让我们在本地系统上创建一个 SSH 密钥对。只需要在客户端系统上运行下面的命令。
  1. $ ssh-keygen
上面的命令将会创建一个 2048 位的 RSA 密钥对。你需要输入两次密码。更重要的是,记住你的密码。后面将会用到它。
样例输出
  1. Generating public/private rsa key pair.
  2. Enter file in which to save the key (/home/sk/.ssh/id_rsa):
  3. Enter passphrase (empty for no passphrase):
  4. Enter same passphrase again:
  5. Your identification has been saved in /home/sk/.ssh/id_rsa.
  6. Your public key has been saved in /home/sk/.ssh/id_rsa.pub.
  7. The key fingerprint is:
  8. SHA256:wYOgvdkBgMFydTMCUI3qZaUxvjs+p2287Tn4uaZ5KyE [email protected]
  9. The key's randomart image is:
  10. +---[RSA 2048]----+
  11. |+=+*= + |
  12. |o.o=.* = |
  13. |.oo * o + |
  14. |. = + . o |
  15. |. o + . S |
  16. | . E . |
  17. | + o |
  18. | +.*o+o |
  19. | .o*=OO+ |
  20. +----[SHA256]-----+
如果你已经创建了密钥对,你将看到以下信息。输入 y 就会覆盖已存在的密钥。
  1. /home/username/.ssh/id_rsa already exists.
  2. Overwrite (y/n)?
请注意密码是可选的。如果你输入了密码,那么每次通过 SSH 访问远程系统时都要求输入密码,除非你使用了 SSH 代理保存了密码。如果你不想要密码(虽然不安全),简单地敲两次回车。不过,我建议你使用密码。从安全的角度来看,使用无密码的 ssh 密钥对不是什么好主意。这种方式应该限定在特殊的情况下使用,例如,没有用户介入的服务访问远程系统。(例如,用 rsync 远程备份……)
如果你已经在个人文件 ~/.ssh/id_rsa 中有了无密码的密钥,但想要更新为带密码的密钥。使用下面的命令:
  1. $ ssh-keygen -p -f ~/.ssh/id_rsa
样例输出
  1. Enter new passphrase (empty for no passphrase):
  2. Enter same passphrase again:
  3. Your identification has been saved with the new passphrase.
现在,我们已经在本地系统上创建了密钥对。接下来,使用下面的命令将 SSH 公钥拷贝到你的远程 SSH 服务端上。
  1. $ ssh-copy-id sk@192.168.225.22
在这里,我把本地(Arch Linux)系统上的公钥拷贝到了远程系统(Ubuntu 18.04 LTS)上。从技术上讲,上面的命令会把本地系统 ~/.ssh/id_rsa.pub 文件中的内容拷贝到远程系统 ~/.ssh/authorized_keys 中。明白了吗?非常棒。
输入 yes 来继续连接你的远程 SSH 服务端。接着,输入远程系统用户 sk 的密码。
  1. /usr/bin/ssh-copy-id: INFO: attempting to log in with the new key(s), to filter out any that are already installed
  2. /usr/bin/ssh-copy-id: INFO: 1 key(s) remain to be installed -- if you are prompted now it is to install the new keys
  3. sk@192.168.225.22's password:
  4. Number of key(s) added: 1
  5. Now try logging into the machine, with: "ssh 'sk@192.168.225.22'"
  6. and check to make sure that only the key(s) you wanted were added.
如果你已经拷贝了密钥,但想要替换为新的密码,使用 -f 选项覆盖已有的密钥。
  1. $ ssh-copy-id -f sk@192.168.225.22
我们现在已经成功地将本地系统的 SSH 公钥添加进了远程系统。现在,让我们在远程系统上完全禁用掉基于密码认证的方式。因为我们已经配置了密钥认证,因此不再需要密码认证了。

在远程系统上禁用基于密码认证的 SSH

你需要在 root 用户或者 sudo 执行下面的命令。
禁用基于密码的认证,你需要在远程系统的终端里编辑 /etc/ssh/sshd_config 配置文件:
  1. $ sudo vi /etc/ssh/sshd_config
找到下面这一行,去掉注释然后将值设为 no
  1. PasswordAuthentication no
重启 ssh 服务让它生效。
  1. $ sudo systemctl restart sshd

从本地系统访问远程系统

在本地系统上使用命令 SSH 你的远程服务端:
  1. $ ssh sk@192.168.225.22
输入密码。
样例输出
  1. Enter passphrase for key '/home/sk/.ssh/id_rsa':
  2. Last login: Mon Jul 9 09:59:51 2018 from 192.168.225.37
  3. sk@ubuntuserver:~$
现在,你就能 SSH 你的远程系统了。如你所见,我们已经使用之前 ssh-keygen 创建的密码登录进了远程系统的账户,而不是使用当前账户实际的密码。
如果你试图从其它客户端系统 ssh(远程系统),你将会得到这条错误信息。比如,我试图通过命令从 CentOS SSH 访问 Ubuntu 系统:
样例输出
  1. The authenticity of host '192.168.225.22 (192.168.225.22)' can't be established.
  2. ECDSA key fingerprint is 67:fc:69:b7:d4:4d:fd:6e:38:44:a8:2f:08:ed:f4:21.
  3. Are you sure you want to continue connecting (yes/no)? yes
  4. Warning: Permanently added '192.168.225.22' (ECDSA) to the list of known hosts.
  5. Permission denied (publickey).
如你所见,除了 CentOS(LCTT 译注:根据上文,这里应该是 Arch)系统外,我不能通过其它任何系统 SSH 访问我的远程系统 Ubuntu 18.04。

为 SSH 服务端添加更多客户端系统的密钥

这点非常重要。就像我说过的那样,除非你配置过(在之前的例子中,是 Ubuntu),否则你不能通过 SSH 访问到远程系统。如果我希望给更多客户端予以权限去访问远程 SSH 服务端,我应该怎么做?很简单。你需要在所有的客户端系统上生成 SSH 密钥对并且手动拷贝 ssh 公钥到想要通过 ssh 访问的远程服务端上。
在客户端系统上创建 SSH 密钥对,运行:
  1. $ ssh-keygen
输入两次密码。现在,ssh 密钥对已经生成了。你需要手动把公钥(不是私钥)拷贝到远程服务端上。
使用以下命令查看公钥:
  1. $ cat ~/.ssh/id_rsa.pub
应该会输出类似下面的信息:
  1. ssh-rsa AAAAB3NzaC1yc2EAAAADAQABAAABAQCt3a9tIeK5rPx9p74/KjEVXa6/OODyRp0QLS/sLp8W6iTxFL+UgALZlupVNgFjvRR5luJ9dLHWwc+d4umavAWz708e6Na9ftEPQtC28rTFsHwmyLKvLkzcGkC5+A0NdbiDZLaK3K3wgq1jzYYKT5k+IaNS6vtrx5LDObcPNPEBDt4vTixQ7GZHrDUUk5586IKeFfwMCWguHveTN7ykmo2EyL2rV7TmYq+eY2ZqqcsoK0fzXMK7iifGXVmuqTkAmZLGZK8a3bPb6VZd7KFum3Ezbu4BXZGp7FVhnOMgau2kYeOH/ItKPzpCAn+dg3NAAziCCxnII9b4nSSGz3mMY4Y7 ostechnix@centosserver
拷贝所有内容(通过 USB 驱动器或者其它任何介质),然后去你的远程服务端的终端,像下面那样,在 $HOME 下创建文件夹叫做 .ssh。你需要以 root 身份执行命令(注:不一定需要 root)。
  1. $ mkdir -p ~/.ssh
现在,将前几步创建的客户端系统的公钥添加进文件中。
  1. echo {Your_public_key_contents_here} >> ~/.ssh/authorized_keys
在远程系统上重启 ssh 服务。现在,你可以在新的客户端上 SSH 远程服务端了。
如果觉得手动添加 ssh 公钥有些困难,在远程系统上暂时性启用密码认证,使用 ssh-copy-id 命令从本地系统上拷贝密钥,最后禁用密码认证。
推荐阅读:
好了,到此为止。基于密钥认证的 SSH 提供了一层防止暴力破解的额外保护。如你所见,配置密钥认证一点也不困难。这是一个非常好的方法让你的 Linux 服务端安全可靠。

Thursday, October 4, 2018

TOP参数解释

TOP参数解释


第一行 分别显示:系统当前时间 系统运行时间 当前用户登陆数 系统负载。
  系统负载(load average),这里有三个数值,分别是系统最近1分钟,5分钟,15分钟的平均负载。一般对于单个处理器来说,负载在0 — 1.00 之间是正常的,超过1.00就要引起注意了。在多核处理器中,你的系统均值不应该高于处理器核心的总数。

第二行 分别显示:total进程总数、 running正在运行的进程数、 sleeping睡眠的进程数、stopped停止的进程数、 zombie僵尸进程数。

第三行
分别显示:
%us用户空间占用CPU百分比、
%sy内核空间占用CPU百分比、
%ni用户进程空间内改变过优先级的进程占用CPU百分比、
%id空闲CPU百分比、
%wa等待输入输出(I/O)的CPU时间百分比 、
%hi指的是cpu处理硬件中断的时间、%si指的是cpu处理软中断的时间 、
%st用于有虚拟cpu的情况,用来指示被虚拟机偷掉的cpu时间。
通常id%值可以反映一个系统cpu的闲忙程度。

第四行 MEM :total 物理内存总量、    used 使用的物理内存总量、free 空闲内存总量、    buffers 用作内核缓存的内存量。

第五行 SWAP:total 交换区总量、     used使用的交换区总量、free 空闲交换区总量、 cached缓冲的交换区总量。
buffers和cached的区别需要说明一下,buffers指的是块设备的读写缓冲区,cached指的是文件系统本身的页面缓存。它们都是linux操作系统底层的机制,目的就是为了加速对磁盘的访问。
第六行  PID(进程号)、 USER(运行用户)、PR(优先级)、NI(任务nice值)、VIRT(虚拟内存用量)VIRT=SWAP+RES 、RES(物理内存用量)、SHR(共享内存用量)、S(进程状态)、%CPU(CPU占用比)、%MEM(物理内存占用比)、TIME+(累计CPU占 用时间)、 COMMAND 命令名/命令行。
下面简单介绍top命令的使用方法:
top [-] [d] [p] [q] [c] [C] [S] [s]  [n]
运维必会!
参数说明
d指定每两次屏幕信息刷新之间的时间间隔。当然用户可以使用s交互命令来改变之。
p通过指定监控进程ID来仅仅监控某个进程的状态。
q该选项将使top没有任何延迟的进行刷新。如果调用程序有超级用户权限,那么top将以尽可能高的优先级运行。
S指定累计模式。
s使top命令在安全模式中运行。这将去除交互命令所带来的潜在危险。
i使top不显示任何闲置或者僵死进程。
c显示整个命令行而不只是显示命令名。
下面介绍在top命令执行过程中可以使用的一些交互命令
  从使用角度来看,熟练的掌握这些命令比掌握选项还重要一些。
  这些命令都是单字母的,如果在命令行选项中使用了s选项,则可能其中一些命令会被屏蔽掉。

Ctrl+L 擦除并且重写屏幕。

h或者? 显示帮助画面,给出一些简短的命令总结说明。
k 终止一个进程。系统将提示用户输入需要终止的进程PID,以及需要发送给该进程什么样的信号。一般的终止进程可以使用15信号;如果不能正常结束那就使用信号9强制结束该进程。默认值是信号15。在安全模式中此命令被屏蔽。
i 忽略闲置和僵死进程。这是一个开关式命令。
q 退出程序。
r 重新安排一个进程的优先级别。系统提示用户输入需要改变的进程PID以及需要设置的进程优先级值。输入一个正值将使优先级降低,反之则可以使该进程拥有更高的优先权。默认值是10。
s 改变两次刷新之间的延迟时间。系统将提示用户输入新的时间,单位为s。如果有小数,就换算成m s。输入0值则系统将不断刷新,默认值是5 s。需要注意的是如果设置太小的时间,很可能会引起不断刷新,从而根本来不及看清显示的情况,而且系统负载也会大大增加。
f或者F 从当前显示中添加或者删除项目。
o或者O 改变显示项目的顺序。
l 切换显示平均负载和启动时间信息。
m 切换显示内存信息。
t 切换显示进程和CPU状态信息。
c 切换显示命令名称和完整命令行。
M 根据驻留内存大小进行排序。
P 根据CPU使用百分比大小进行排序。
T 根据时间/累计时间进行排序。
W 将当前设置写入~/.toprc文件中。这是写top配置文件的推荐方法。
Shift+M 可按内存占用情况进行排序。

sysstat 说明


[root@www ~]# yum install sysstat -y
[root@www ~]# vmstat --help
usage: vmstat [-V] [-n] [delay [count]]
              -V prints version.
              -n causes the headers not to be reprinted regularly.
              -a print inactive/active page stats.
              -d prints disk statistics
              -D prints disk table
              -p prints disk partition statistics
              -s prints vm table
              -m prints slabinfo
              -t add timestamp to output
              -S unit size
              delay is the delay between updates in seconds.
              unit size k:1000 K:1024 m:1000000 M:1048576 (default is K)
              count is the number of updates.12345678910111213141516
例子:每隔1秒获取1次,次数不限

[root@www ~]# vmstat 1
procs -----------memory---------- ---swap-- -----io---- --system-- -----cpu-----
 r  b   swpd   free   buff  cache   si   so    bi    bo   in   cs us sy id wa st
 0  0      0 547332 177544 535336    0    0     1     6    5   41  1  0 98  0  0   
 0  0      0 547324 177544 535336    0    0     0     0  210  445  1  0 99  0  0   
 0  0      0 547324 177544 535336    0    0     0     0  195  435  0  0 100  0  0
 0  0      0 547324 177544 535336    0    0     0     0  208  440  1  0 99  0  0   
 0  0      0 547332 177544 535336    0    0     0     0  209  446  0  0 100  0  0
 0  0      0 547332 177544 535336    0    0     0     0  207  442  1  1 98  0  0   
 0  0      0 547332 177544 535336    0    0     0     0  201  438  0  0 100  0  0
^C1234567891011
#r表示CPU排队的情况,b代表 进程堵塞,等待io
每隔1秒获取1次,次数10次

[root@www ~]# vmstat 1 10
procs -----------memory---------- ---swap-- -----io---- --system-- -----cpu-----
 r  b   swpd   free   buff  cache   si   so    bi    bo   in   cs us sy id wa st
 1  0      0 547340 177544 535344    0    0     1     6    5   41  1  0 98  0  0   
 0  0      0 547332 177544 535344    0    0     0    28  210  453  1  1 97  1  0   
 0  0      0 547332 177544 535344    0    0     0     0  200  433  0  0 100  0  0
 0  0      0 547332 177544 535344    0    0     0     0  211  445  1  0 99  0  0   
 0  0      0 547332 177544 535344    0    0     0     0  201  439  0  1 99  0  0   
 0  0      0 547332 177544 535344    0    0     0     0  197  436  0  0 100  0  0
 0  0      0 547332 177544 535344    0    0     0     0  201  442  1  0 99  0  0   
 0  0      0 547324 177544 535348    0    0     0     0  240  484  2  1 97  0  0   
 0  0      0 547324 177544 535348    0    0     0     0  203  438  0  0 100  0  0
 0  0      0 547324 177544 535348    0    0     0     0  197  430  1  0 99  0  0    12345678910111213
mpstat
查看所有CPU的平均值

[root@www ~]# mpstat 1
Linux 2.6.32-431.23.3.el6.x86_64 (www)  08/30/2016  _x86_64_    (1 CPU)
05:13:22 PM  CPU    %usr   %nice    %sys %iowait    %irq   %soft  %steal  %guest   %idle
05:13:23 PM  all    1.00    0.00    0.00    0.00    0.00    0.00    0.00    0.00   99.00
105:13:24 PM  all    0.00    0.00    0.00    0.00    0.00    0.00    0.00    0.00  100.00
05:13:25 PM  all    2.00    0.00    1.00    0.00    0.00    0.00    0.00    0.00   97.00
05:13:26 PM  all    1.00    0.00    0.00    0.00    0.00    0.00    0.00    0.00   99.00
^C12345678
不解释——————————

[root@www ~]# mpstat 1 10
Linux 2.6.32-431.23.3.el6.x86_64 (www)  08/30/2016  _x86_64_    (1 CPU)
05:13:38 PM  CPU    %usr   %nice    %sys %iowait    %irq   %soft  %steal  %guest   %idle
05:13:39 PM  all    2.00    0.00    0.00    0.00    0.00    0.00    0.00    0.00   98.00
05:13:40 PM  all    0.00    0.00    1.00    0.00    0.00    0.00    0.00    0.00   99.00
05:13:41 PM  all    1.01    0.00    0.00    0.00    0.00    0.00    0.00    0.00   98.99
.................1234567
上述是CPU监控,CPU监控主要靠经验。因为业务不同指标不同,指标越低越好是不变的道理

内存硬盘监控:


硬盘格式化后分成块(blog)
内存默认是页(大小4kb)读取按照页来进行读取
内存:free   vmstat

[root@www ~]# free -m
             total       used       free     shared    buffers     cached
Mem:          1875       1338        537          0        173        523
-/+ buffers/cache:        640       1234
Swap:            0          0          0
提示:云主机是没有Swap分区的123456
total 总内存
used 已使用内存
free 空闲内存
shared 共享内存(进程间相互通信使用共享内存)
buffers 缓冲
cached 缓存
Centos7 会有一个available,活动内存
#云服务器一般不分配swap分区,物理机能不使用交换分区就不使用交换分区
vmstat命令

[root@www ~]# vmstat 1
procs -----------memory---------- ---swap-- -----io---- --system-- -----cpu-----
 r  b   swpd   free   buff  cache   si   so    bi    bo   in   cs us sy id wa st
 0  0      0 550628 177684 536324    0    0     1     6    7   46  1  0 98  0  0   
 0  0      0 550620 177684 536324    0    0     0    40  187  429  0  0 100  0  0
 0  0      0 550620 177684 536324    0    0     0     0  183  427  1  0 99  0  0   
 0  0      0 550620 177684 536324    0    0     0     0  197  436  0  1 99  0  01234567
swpd交换分区的大小
free可用的物理内存大小
buff 缓冲区的大小
cache 缓存区的大小
si  数据从交换分区读取到内存的大小
so 数据从内存到交换分区
bi 从交换分区读到内存(block)
bo 内存写到硬盘的
内存达到多少报警呢? 80%
1
正常是一个进程启动后会一直往上升,最后到达一个平稳期
硬盘:IOPS  IO’s Per Second        iotop   df -h  iostat
  顺序IO(快)
  随机IO(慢)
查看磁盘剩余空间

[root@www ~]# df -h
Filesystem      Size  Used Avail Use% Mounted on
/dev/xvda1       40G  4.1G   34G  11% /
tmpfs           938M     0  938M   0% /dev/shm1234
监控磁盘IO  iotop

[root@www ~]# yum install iotop -y1
iotop

可以使用dd命令生成一个文件夹进行测试
生成命令如下:

[root@www ~]# dd if=/dev/zero of=/tmp/1.txt bs=1M count=1000
1000+0 records in
1000+0 records out
1048576000 bytes (1.0 GB) copied, 20.509 s, 51.1 MB/s
[root@www ~]# ls -lh /tmp/1.txt
-rw-r--r-- 1 root root 1000M Aug 30 19:48 /tmp/1.txt123456
此时IO写入如下图

iostat命令,可以看到那块磁盘,比iotop更加细致

[root@www ~]# iostat 1 2
Linux 2.6.32-431.23.3.el6.x86_64 (www)  08/30/2016  _x86_64_    (1 CPU)
avg-cpu:  %user   %nice %system %iowait  %steal   %idle
           1.10    0.00    0.27    0.16    0.00   98.46
Device:            tps   Blk_read/s   Blk_wrtn/s   Blk_read   Blk_wrtn
xvda              1.51         2.26        17.09     986748    7467560
avg-cpu:  %user   %nice %system %iowait  %steal   %idle
           1.02    0.00    0.00    0.00    0.00   98.98
Device:            tps   Blk_read/s   Blk_wrtn/s   Blk_read   Blk_wrtn
xvda              0.00         0.00         0.00          0          012345678910
tps 设备每秒的传输次数(每秒多少的io请求)
Blk_read/s 每秒从设备读取的数据量
Blk_wrtn/s 每秒像设备写入的数据量
Blk_read   写入数据的总数
Blk_wrtn    读取数据的总数

  How to Change Instance Type & Security Group of EC2 in AWS By David Taylor Updated April 29, 2023 EC2 stands for Elastic Compute Cloud...